~ – Enjoy a meal or a recipe with us! Be sure to check the Sidebar and Menu above. Interesting resources are listed there. Most are hot links. Air Fryer (AF), Instant Pot (IP) and Captain's Shack (CS) recipes now have their own page. Subscribe to the blog. It's still FREE!
There are times when one feels really challenged in the kitchen, whether it is perfecting a dish, Creamed Spinach for example, where something just does not come out as you had planned or pictured. And at other times you want to create something kind of different with pan drippings. Or you want to create a dish that can be daunting or challenging. Well here are 3 that did just that. Let’s take a look. (Click on the images to see them enlarged)
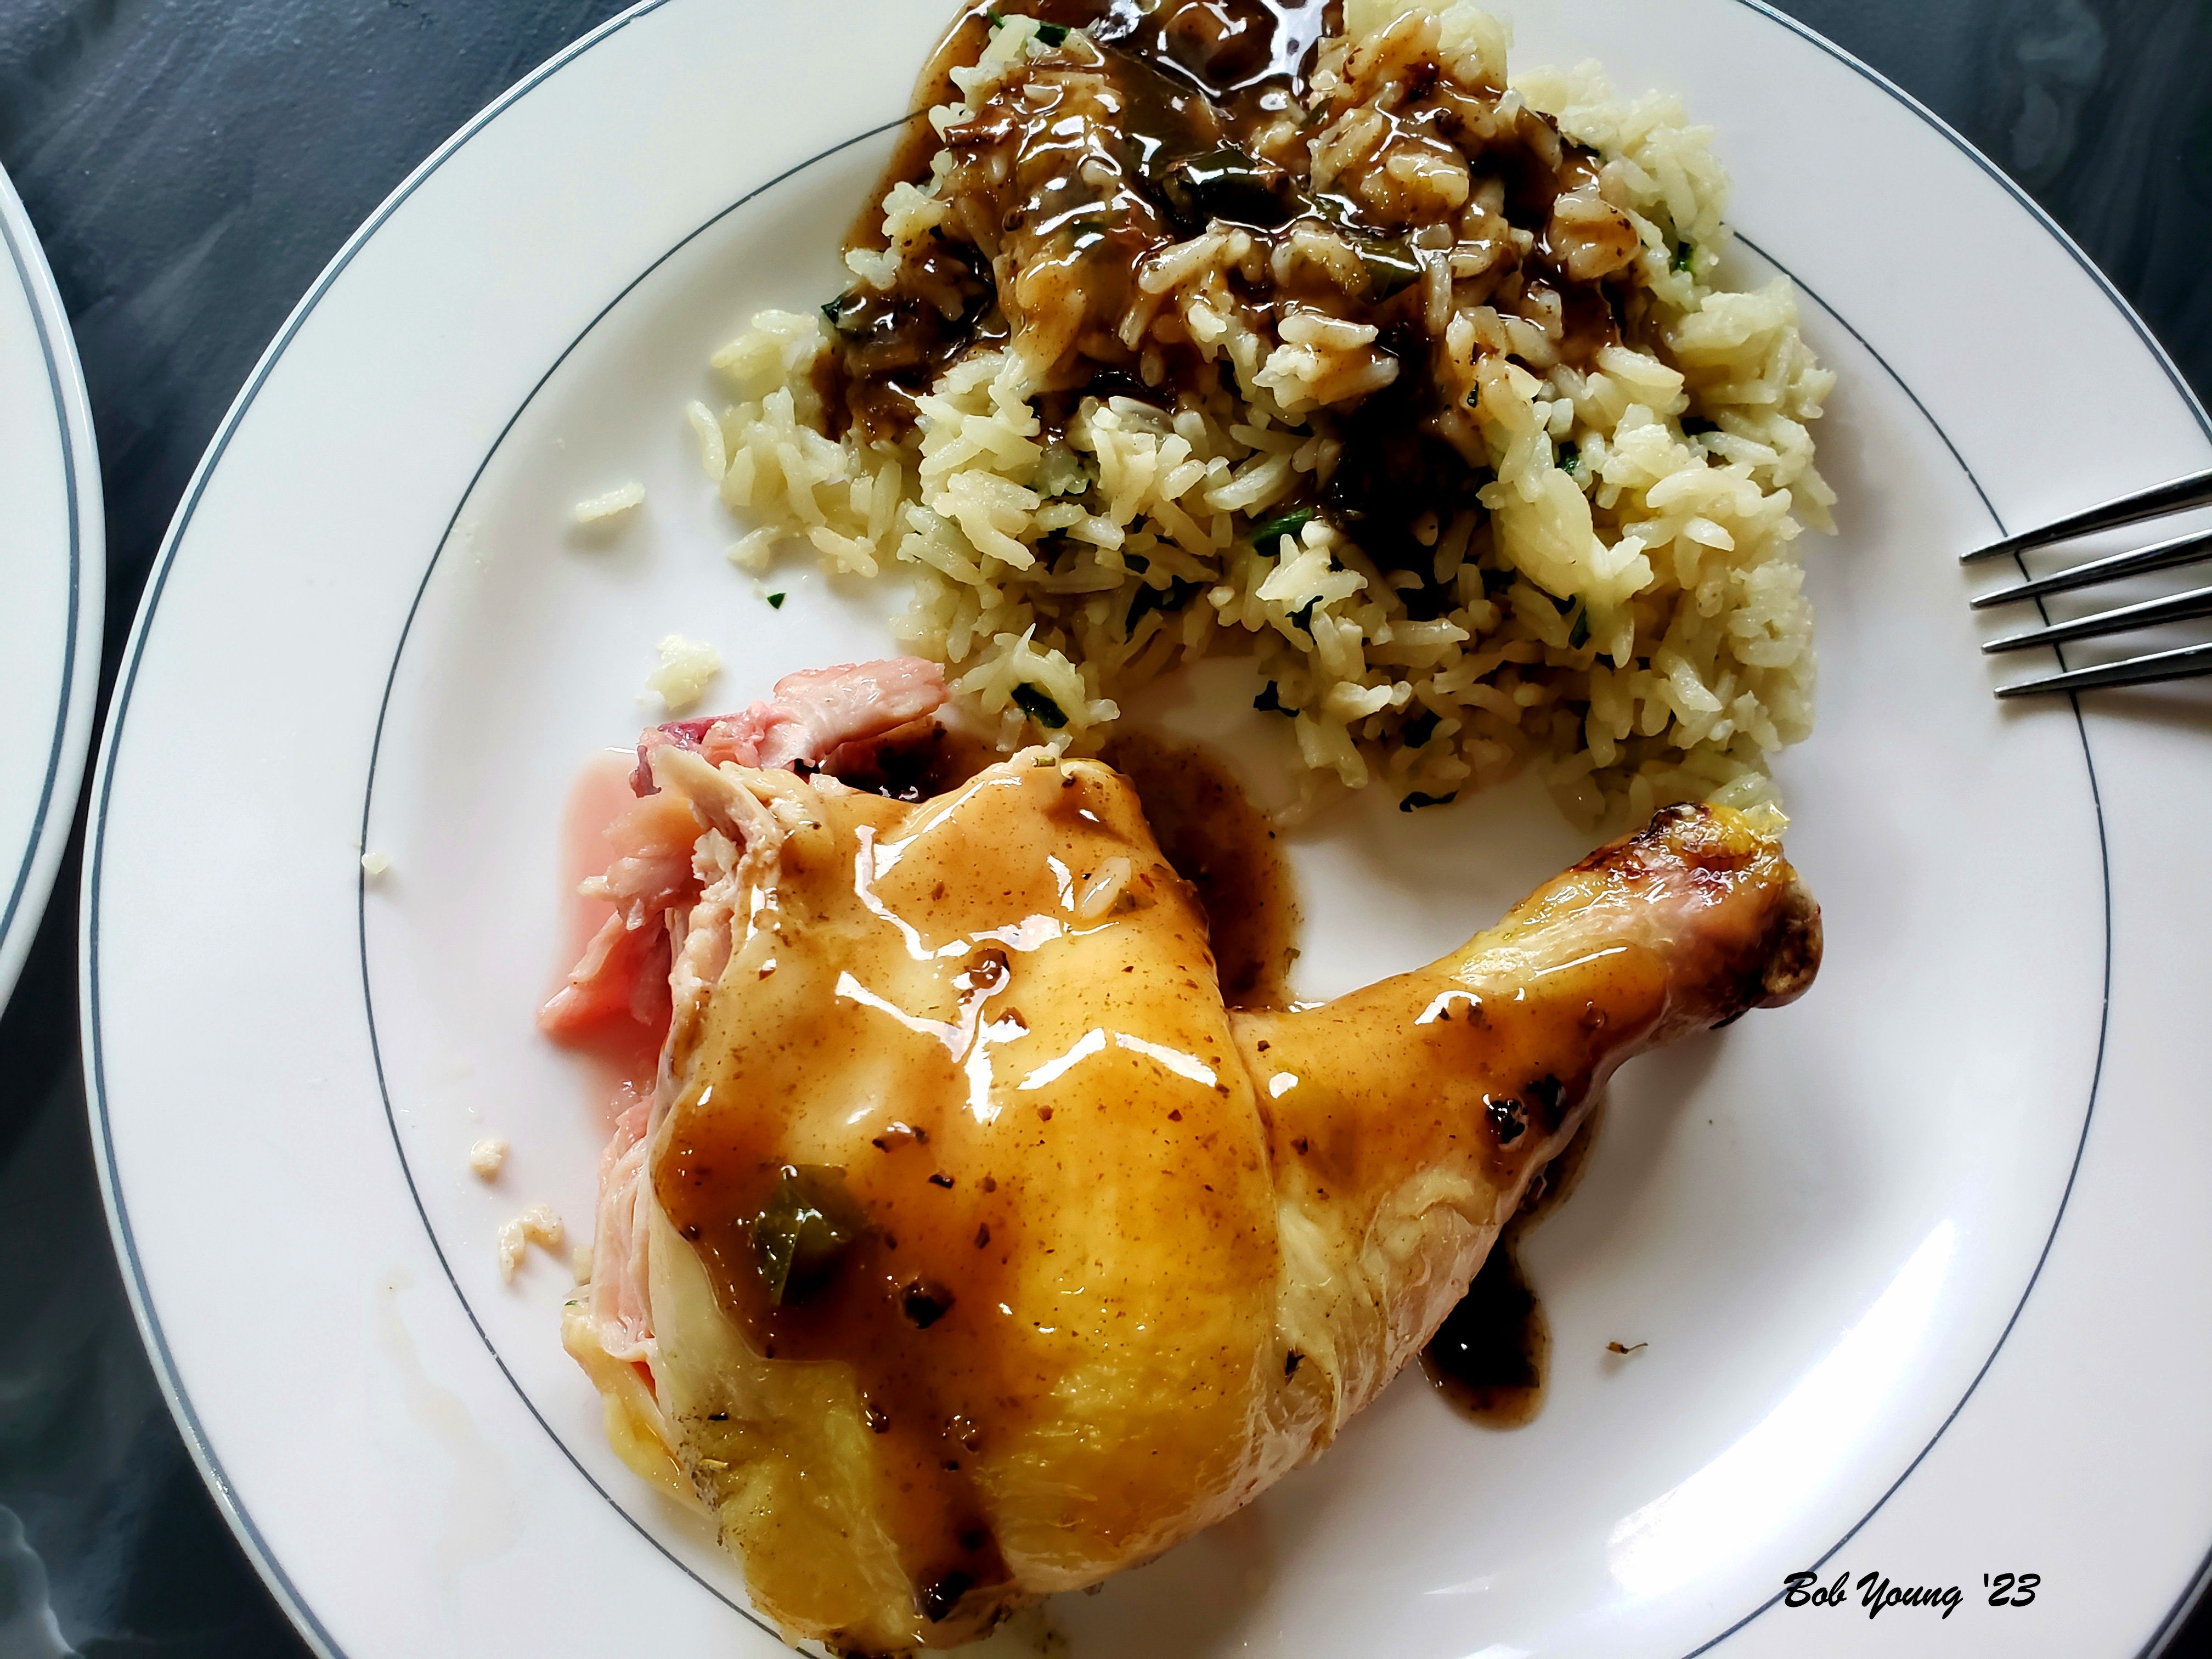
This one was, I thought, just a basic baked chicken and rice dish. But then I thought, plain Jasmin rice with a good baked chicken can be sort of mundane, so why not add some green onion – a very Oriental twist – and fresh spinach? That spinach was a surprise to some who ate it. And the pan drippings of the rosemary and sage can create a differently good gravy. It did! Even added a little to the rice, which gave it a whole new twist. I think, and use it quite often, that it is sinful to “dump the pan drippings” in the trash, so I used it. Not many in the household would do such a thing. Use those drippings!
Potatoes. They are good, but if it were up to some other cooks that need potatoes at every meal – you know who you are – at least change them up from peeled, water logged piles of something that resembles pablum, to maybe some good, crispy hash browns that don’t need to be only served at breakfast. And to, add something green, like the creamed spinach pictured here. Add some mushrooms to the pan dripping gravy from the seared pork chop. Don’t be afraid to be creative and adventuresome in preparing a meal. If nothing else, it’s fun!
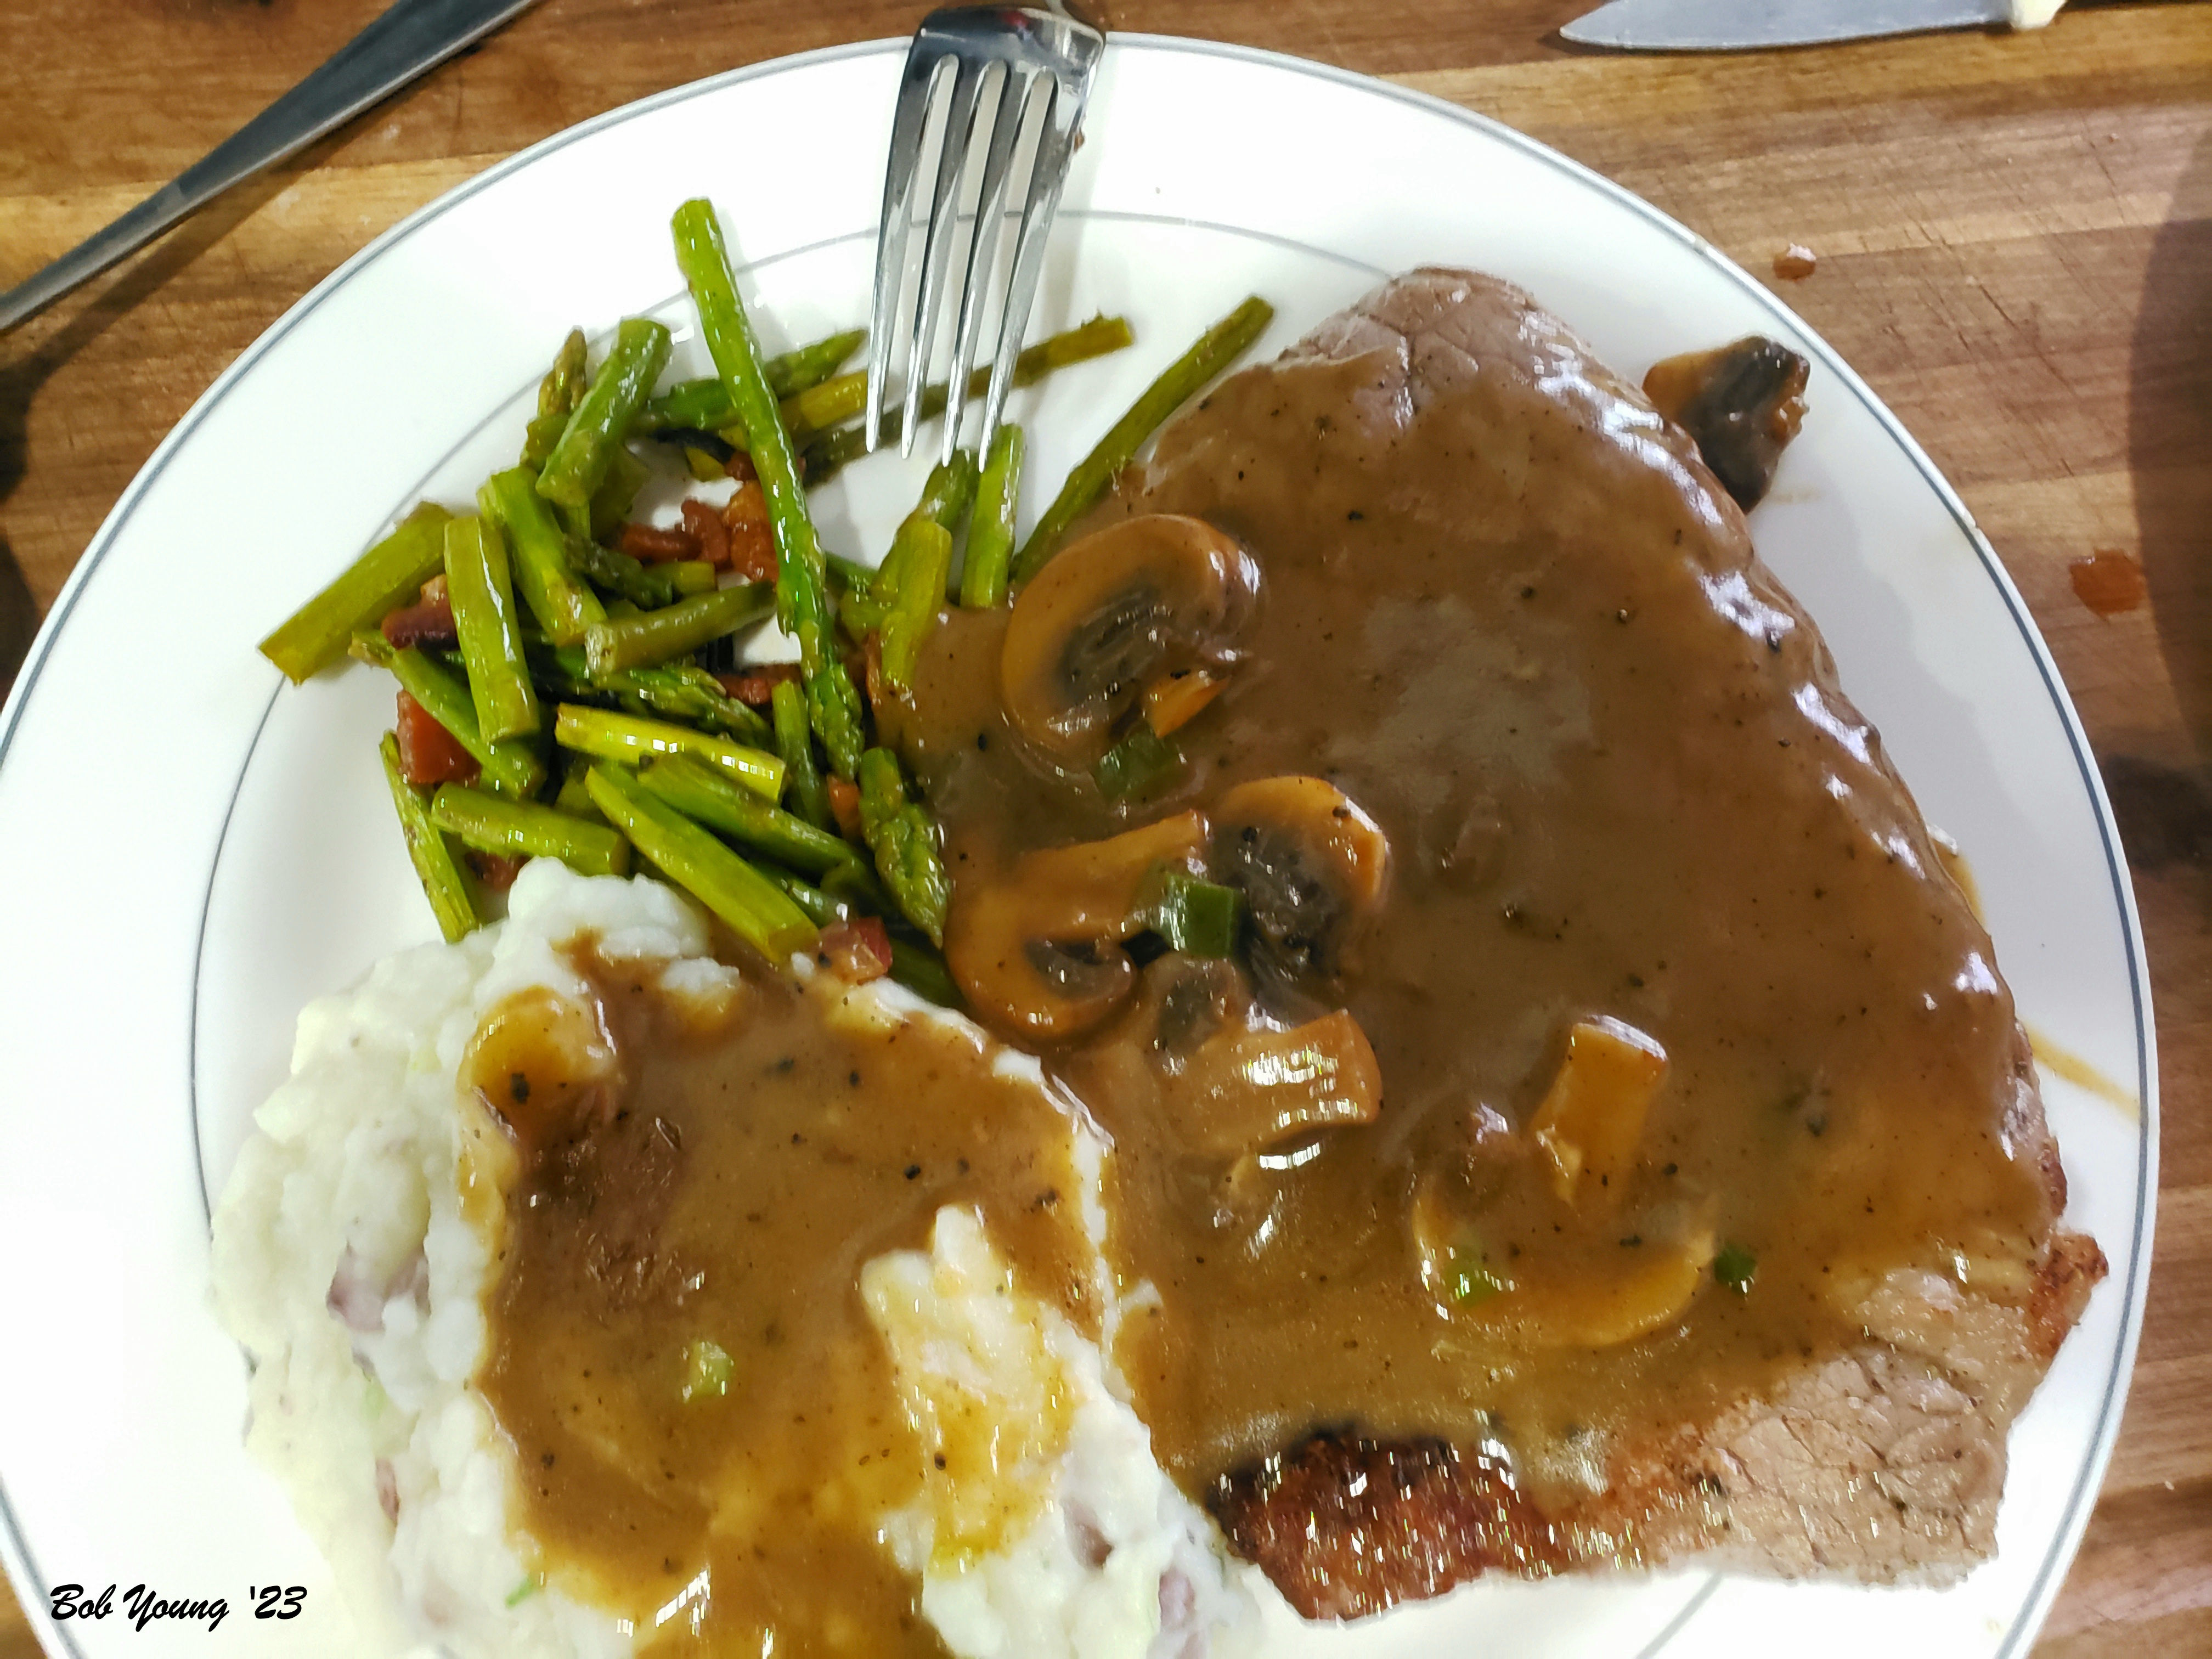
Here is another adventure. Steak with Mushroom and Onion Pan Gravy, Asparagus with Lardons and Green Onion and Smashed Potatoes and Gravy. (I used an hand masher and left the potatoes a little lumpy and as always, left the peels on.)
I guess I like to “mix things up” in the kitchen and try different variations of a given dish. Have fun when preparing and use your imagination. And, I might add, most of the products here came from the Boise Farmers Market.
I have been working on some new recipes for the past several weeks. I have 3 that I will post here. Hope you like them. Let me know. The3re will be at least three new recipes. My favorite oven bbq pork ribs, a really good bbq sauce in the Memphis style – slightly tart, but also with a sweetness. A Memphis style bbq rub that is great on ribs, beef, pork and chicken. Then a side dish – corn fritters, since corn is now in season. I grew up on these and love them. Almost as good as a corn pie! Most, but not all of the ingredients in the posted recipes, come from the Boise Farmer’s Market (BFM) and I am grateful for their products and information. Use your local farmer’s markets. Enjoy!
Starting with the Oven BBQ Pork Ribs, I have created our version of a Memphis style bbq rub. Sweet, but tangy. Best to be very generous with this rub and the longer it “cures”, stays refrigerated for awhile – I let the ribs I was doing to rest (cure) in the refrigerator for 24 hours. But that length of time is not essential. 8 hours will also work. Don’t forget to let the meat come to room temperature before you cook it. This rub is full of sugar, sea salt, onion powder and garlic granules, Aleppo pepper, cumin and smoky paprika. Great on the pork In did and super on chicken.
The BBQ Sauce I came up with, https://www.rockinrs.com/CS-BBQ-Sauce.pdf, CS BBQ Sauce, is thick and rich. Slightly smoky. Slightly tangy. It includes red onion, minced garlic, ketchup, dark brown sugar, apple cider vinegar and pomegranate molasses among some other ingredients. Check the recipe by clicking the link.
Now, IMNSHO, In My Opinion Not So Humble Opinion, are super good! And they are done in the oven. (Can these be considered truly BBQ Ribs?) As plated here, we added some of our Doctored Baked Beans and a Corn Fritter. Drizzle some CS BBQ Sauce over the ribs (even go well with the beans) and Yum-O! They fall of the bone and have great flavors from the rub and the sauce.
And since I mentioned Corn Fritters, they go really great for breakfast with eggs. The eggs above are basted. A very Pennsylvania Dutch (German) treat. I was raised on these and they were aq hit when I made them for folks. Not hard to do. Fresh corn works best, but frozen corn can also be used. Here they are served with fresh fruit and homemade sourdough bread toast.
The last item I want to share is a sourdough bread we have been working on since January of this year. Created our own starter and it takes a while to develop and experiment making bread and other treats. Sourdough Blueberry Muffins, for one. (https://www.rockinrs.com/Sourdough-Blueberry-Muffins.pdf) This bread I have baking in a Romertopf Clay Pot and it comes out just great.It is a full flavored sourdough. Robust. Makes great toast and sandwiches. Great grilled cheese.
So there you are. Try these and let us know if you liked them or not. If not, let us know why. Cheers and Good Eating!
I know. Its been a while. But it has been a learning session. Making sourdough starter, bread and pancakes. But it has been an exciting adventure and a real learning experience. Started out with a basic
The starter, in my opinion, must be active, bubbly and smell somewhat “sour”. It is the starter is what gives the bread it’s name – Sourdough Bread or Pancakes, Cookies, Bagels or a host of other baked goods their name. The starter pictured here is my starter and you can see how it has doubled in size and is nice and bubbly. Thee rubber band around the jar marks the level at the start and then one can “see” how the starter has grown, or not. The starter is not especially difficult to do, but it does take some time and persistence to create. Check the recipe above to see how it is done, but don’t be intimidated by it.
This is the bread right after it came out of the oven. The recipe link above has two different baking techniques listed. Personally I like the 500 degree F temperature best, but either one will work fine. See the recipe above. The crust could be a little browner, but not much more.
Here is the loaf after it has cooled and is partially sliced. Notice the crumb – the “holes” – in the surface and the color of the crust. Love the flavor from the starter. The interior is soft, but not gummy.. The crust is crunchy, but you won’t break any teeth on it. It is somewhat crunchy. However, it could be a little more crunchy.
And finally, we have one, of many uses, for the starter discard. Sourdough Pancakes. But you can also make cookies, bagels, rolls, etc. There are many recipes on the web, but the one I like is PantryMama, http://www.pantrymama.com. Many recipes there, but more importantly, much useful information and help in solving sourdough problems. You can also find help on Facebook.
So there you go! It was a long 5 weeks or so to gather, read and then produce this bread. It was a long process, but well worth it. And then too, I had a lot of personal help from friends and relatives. I want to Thank each and everyone who gave me assistance. Have fun with these recipes. It might be a new adventure, but a fun one. just remember – Temperatures are extremely important, so follow them closely. And please don’t use cups or ounces. Rather use an inexpensive digital scale that reads in tare and grams. They range from about $20 to well mover $100. The brand I use is Escali, for about $30 and it works just fine. And please too, use a 10 quart Cast Iron pan with lid.
So now I am confronted with a dilemma. First, how many times do I chew a bite before I swallow? 5 times? 10 times? 20 times? 30 times?
And the second part of the dilemma is do I peel potatoes, carrots and tomatoes before I use them in a recipe?
My sources for this article are varied and it has taken a while to research the questions. My sources include, but are limited to thekitchn, healthline, intestinal.com and others. Most of the many resources reiterate
the answers, so I have chosen and condensed the articles to create this post. I do hope you find the information helpful and healthy.
Let’s start with chewing.Chewing creates more digestive enzymes in the saliva and are helpful in breaking down food further and to aid in digestion. Chewing also triggers the stomach to produce more hydrochloric acid and regulating the pH to assist in food breakdown. When you chew your food properly, the food gets broken down into smaller pieces and mixes with saliva to extract the greatest amount of nutrients,
If you are not chewing your food thoroughly, you are likely eating to quickly which can lead to over eating. The metabolic syndrome is marked by obesity, high cholesterol levels, blood pressure problems and glucose levels to high. Metabolic Syndrome can increase your risk of cardiovascular disease, diabetes and certain cancers. (Dr. Supriya Rao, MD, Gastroenterology Consultants)
If you don’t chew your food enough, it could lead to bloating, diarrhea, heartburn, acid reflux, cramps, nausea, headaches, skin problems, irritability, malnutrition and a over production of gas. Eating more fermented foods, sauerkraut and pickles for instance, will produce more digestive enzymes and beneficial bacteria. They can reduce symptoms of irritable bowel syndrome, gluten intolerance, allergies and asthma.
It is strongly that you chew your foods a minimum of 32 times! When I site in restaurants and around our table at meal time, I count my chews and everyone else. Mine, and my wifes, are right around 30+ chews before we swallow. I can’t say that for the people I am watching. 5 times, 10 times and swallow. So my question is: How can they possibly say they enjoyed their meal? They can’t! It’s your choice. Choose wisely.
Tomatoes, Carrots and Potatoes. To peel or not to peel?
By leaving the peels on the listed vegetables, and there are others too, The peels contain soluble and insoluble fiber, and both are important components of a healthy diet and add to the flavor of most dishes. Those vegetables that should be peeled, the peels are tough and hard to eat, are kabocha ( a sweet squash variety in the Cucurbitaceae family, related to gourds and pumpkins). Professional and home chefs cherish Kabocha for its exceptionally sweet flavor. Kabocha is considered to be even sweeter than butternut squash), red kuri (Red kuri squash is a small or medium sized winter squash with a hard, orange skin that can be used in all kinds of sweet and savory recipes), celery root and kohlrabi. Generally, unpeeled produce contains higher amounts of vitamins, minerals and other useful compounds, whereas peeled vegetables have had these compounds removed. Interesting to know that potatoes that are boiled or cooked with the skin on contain 332% more vitamin K, 142% more potassium, 111% more folate and 110% more magnesium and phosphorus than peeled potatoes. And fruits can contain 328 times more antioxidants in the peels than in the pulp. The peels can increase your intake of these nutrients when eaten with the pulp.
Tomato peels contain flavanols, a plant-based antioxidant and are linked to age related complications, i.e., lower risk of cancer and cardiovascular disease. Lycopene, a major source of antioxidants, is found in the tomato skins. If the skins of tomatoes are offensive to you, that is bitter, use a submersible hand blender to completely grind the skins into fine “bits”. The liquid will then be like a passata.
So there you have some information on fruits and vegetables. Use the information as you wish. If you question anything related to this article, please contact me and I will answer your questions. Thanks.
Here are two really good meals we made. At least they’re good in my humble opinion. I liked them. The Fettuccini Alfredo our daughter found a basic recipe, but it looked a little bland, so I “adjusted” it a little. Added dried morels that were rehydrated in some white wine and added basil and fresh garlic. It was tasty. And the 2nd dish was Stuffed Peppers and i do like a good stuffed pepper. But Robin can not eat them. The last dish was 5 Hour Roasted Duck, which we all love! Take a look.
Fettuccini Alfredo
This was really a good dinner. As I stated above, I adjusted it. I used Half and Half instead of milk and added some white wine to the Alfredo. It was rich and smooth. Awesome flavor levels. Just be careful when adding the Half and Half that you don’t scorch it. Keep stirring gently. And I have never cooked pasta like this either. It worked fine.. (See the recipe) And too, I broke the dry pasta in half before adding to the pan. Easier for all to eat. Give it a try and let us know what you think.
Stuffed Pepper
This was a great pepper. The pepper was cooked, but still somewhat “crunchy”, but not raw. The flavor levels were great. Not over powered by the herbs or a strong green pepper taste. If you are making one, and use a larger cooking dish, try using different colored peppers – green, red, orange or whatever is available. And then serve them in the cooking dish. There was just me eating this, so I cooked it in a Pâté pan, as pictured. Worked well.
5 Hour Roasted Duck
We all like duck. But it can be greasy. So if you like duck, try this one. 5 Hour Roasted Duck. It definitely is not difficult to do. Just takes a while. 5 hours! So plan ahead! Stewed the neck and any leftover vegetable parts and reduced it down to create the gravy. Use some pan drippings and wine, too. An awesome gravy. Serve with peas and carrots, mashed potatoes and gravy and thinly sliced fruit, left from stuffing the duck. While the duck is resting, cover it with aluminum foil to keep it warm. And as a note, we have tried this with a goose, but it was not as good.
So threr you have it. Try them all and let us know how it turned out. Guten Abend!
So you have some “stuff” still in the refrigerator that you don’t quite know what to do with. Don’t throw it out, unless, of course, it’s green and fuzzy. It’s not exactly Réchauffé – a dish of warmed-up leftovers, but more like Utiliser les restes – using leftovers. We have strawberries that need to be used, so we make Strawberry Waffles. And there is some Pork Belly, “… pork belly is uncured meat (while) bacon is a cured meat…(it is) the boneless cut that remains after the loin and spareribs are removed.” (pork.org) Just in case you wanted to know. So why not make an Idaho Benedict or a sautéed cabbage and apple to go with a Malheur River Meals ( https://malheurrivermeats.com ) pork chop? (Or you can get their products at the Boise Farmers Market or at Lark and Larder in Boise Good idea! So let’s take a look. Bon appetit!
Strawberry Waffle
Strawberry Waffles are so delicious. I have made waffles from scratch but here I used Krusteaz, because I had some that needed to be used. Just altered it slightly with strawberry jam and 1 egg in the batter. Then when I cooked it, I put sliced strawberries in the batter plus more sliced strawberries on top of the waffle before serving. A dusting of powdered sugar, too. You can use other fruits, also, like blueberries.
Malheur River Meats Pork Chop with Braised Apple and Cabbage
This was a yum dinner. A Smoked Bone-In Pork Chop with Braised Apple and Cabbage. Caramelized the apple first in butter and brown sugar over med-high heat and watched it carefully so as not to burn the apple. Just golden brown. Then added some chopped cabbage and caraway and sautéed it all together. There were no left-overs from this dinner!
Idaho Benedict
Shredded potato in egg ring form
Potatoes browned
This was so differently good! If you like Eggs Benedict, try this version. Instead of a toasted English muffin, I used a potato pancake, of sorts. More like a latke than a pancake. I had the “cake” keep its shape and form by using an egg ring. Worked well. Cooking was a challenge to keep it from burning. Med high heat and used the rendered pork belly fat – some of it – to cook the potato in. Turned it over carefully when I noticed some browning on the edges. It really came out fine and was cooked all the way through. Then for serving, placed potato on plate, then one strip of thick cut pork belly broken in half, poached egg and finally Hollandaise Sauce. ( CIA Basic Hollandaise Sauce )
So there you have it. Another fun week in the kitchen!
Here are two dishes we made this past week. Both are delicious and fairly easy to do, especially the salmon. Take a look.
The first is a baked salmon dish that does not have a specific recipe. This time we used a local Golden Plum Jam, but normally I use a MacKays Orange Marmalade. Just make sure the salmon is dry before you spread the jam, or marmalade, on the fish. Lightly salt and pepper the fish before adding the jam and then bake for about 7 minutes in a 375 degree F oven. Enjoy.
Golden Plum Jam or Orange Marmalade Coated Salmon served on a bed of Steamed Red Chard and Spinach.
Next we have a delicious venison backstrap pan roast with a special Blackberry Jam Sauce. A mixture of reduced blackberry jam, made from fresh blackberries from our daughter’s bushes last fall, and a good balsamic vinegar and apple cider. (See the recipe) OK. So your question is, “What is backstrap?”
Venison backstraps are a cut of meat that is found along the back of a deer; alongside the spine. They are often confused with a tenderloin cut of meat. While they aren’t the same as a tenderloin, they are considered one of the most tender cuts of meat of a deer. Also, known as striploin. There are 2 ways of dealing with a venison saddle, the most common is to prepare a venison backstrap or striploin. The difference between backstrap and tenderloin is, backstrap refers to a length of loin on the back of a deer, elk, moose, etc. It’s the ribeye in beef and loin in pork. Tenderloins are the two strips of very tender meat under the loin, behind the ribs.
Venison Backstrap plated with Asparagus and Mashed Garlic Potatoes
This dish would be awesome with a pork tenderloin, if you don’t have venison. Use the same recipe that is linked under the photo of the venison. If you use pork tenderloin, serve it with beets, either whole small beets or sliced, or sauteed cabbage.
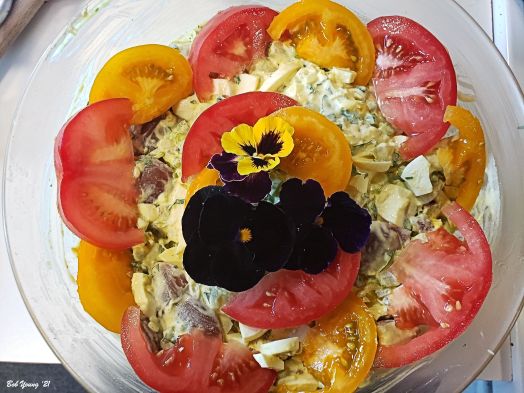
This potato salad,the recipe is located here Chef Lou’s Potato Salad, is full of vegetables. (Pictured above) You can use veggies, or not, or choose your own. The salad has an awesome dressing of mayo, apple cider vinegar and Dejon mustard. I also added some fresh lovage to add to the “celery” flavor. Try it. Easy to make. I chilled the cooked potatoes before adding them to the sauce/vegetable mix. I also cut the potatoes in “bite sized” pieces before cooking them. Try using new potatoes and quarter them.
The second wonderful dish we made was a Shrimp Salad. (Pictured above) This was a great, summer salad and it can be made ahead of time and refrigerated. Full of vegetables and shrimp and with a creamy sauce. I added frozen peas and corn to this salad which gave a a nice texture and flavor. I also used some fresh lovage in this, too. You could probably use lobster instead of shrimp, if you are so inclined. We served it with baked Orange Kokanee – salmon – (7 min at 375 degrees F) for 7 minutes. Toasted Sourdough Wedges with butter and garlic.
Well there are two meals you can play with. Have fun and enjoy! Just don’t forget: If it is on a plate, it is edible! Don’t ever put something on a plate that is not edible.
It never ceases to amaze me as to in the times of hardship and strife how all kinds of people – from all background, ethnicities and religions – come together to lend a helping hand and expect absolutely nothing in return! Such a great feeling.
And during this time of self and required quarantine due to the CoronaVirus, the generosity of people all comes to the surface. There are several churches, and other religious faiths, and businesses that have come to the aid of those in need. In particular the homeless and those who just need a meal and a smiling face. So we bind together and offer a helping hand and something to eat. And by the way, all of the food products and individual help are all donated! To these businesses, people and churches, Thank-You! Our part was at the 1st Presbyterian Church, 9th and State Streets, Boise. (Left-Click any of these photographs to see them enlarged!)
This sign was on a post in downtown Boise
Look at these meals. Usually fro 45 to 60 served on the 4th Thursday of each month at the 1st Presbyterian Church at 9th and State Streets in Boise. (The room and all facilities included, including the full kitchen!)
Filling the Dinner Bags
But before we moved to Dinner Bags, we had Baked Potatoes and all the trimmings. Look –
Baked Potato and Acme Bakeshop Dinner Roll
Baked Potato and Chicken with Acme Bakeshop Rolls and Salad
But then, we had to switch to the Dinner Sacks because of The Virus –
Hot Dog Rolls from Acme Bakeshop
Hot Dogs! Good ones! Not microwaved! Cooked the Old Fashion Way!
Packing the dinner sacks
Dinner Sacks in March
Dinner Sacks in April
and this is why we do it. Thank-You Joe Levitch for this photograph! It says it all. “Man Alone”
As many of you know, I have a lot of resources that I use in this blog – recipes, suggestions, food items, kitchen products, etc. Here is a list of ten items that I always have in my kitchen. This list comes from My Recipes
Onion
White, yellow, or Vidalia, I’ll always have one kicking around. I caramelize them for tarts, build massive pots of black and white beans around them, and throw them into guacamole.
Garlic
Like ebony and ivory, these two (of course!) go together. I love to roast the whole head and use the sweet, smashed cloves on bread or spun into pasta. And in the event that I made too much pasta, I’ll sauté a small smashed clove in butter or olive oil the next day, discarding the clove and tossing leftover noodles quickly in the infused oil, then dolloping the whole shebang with crème fraîche.
Lemon
Ideally one has both limes and lemons, but as bartender Joaquín Simó of New York bar Pouring Ribbons expressed it to me, “Lemons are sour, and limes are tart.” Lemon juice adds a real punch of acidity to a dish, whereas lime sort of nudges it down a tart path. I use lemons to stuff chickens and deglaze their pans for easy gravy. I squeeze them into homemade bourbon sours and over pasta. If a dish is lacking something, I ask myself if it’s lemon.
Tuna
Everyone has their emergency canned protein, and props to those of you who bust out high-quality anchovies and salmon as your go-to snacks, but I always have good tuna on hand, splurging on Genova or Cento packed in olive oil when I can. It makes for instant snacks or—if I have bread—tuna melts when I walk in the door ravenous, and I’ve been playing around with layering it into pasta with olive oil, capers, and roasted garlic. (Yum!)
Butter
I’m a New Englander, and even at my most broke in this life—my pants had holes; I couldn’t afford health insurance—I’d buy good, unsalted, European butter. These days some domestic butters are just as lovely, and the price has gone, blessedly, way down.
Olive oil – Greek and Italian
Yes, this list is heavy on proteins and fats, which testifies to the foods that power me; I’d fight you for cheese, but never for a box of pasta. My belly rumbles when I’ve had biscuits or French toast for breakfast, but not when I’ve wolfed a few tablespoons of cannellini beans sautéed in olive oil with onions and garlic and seasoned with lemon.
Salt
An acquaintance, observing my twitchy salt trigger hand at the table, once joked that I should have a salt lick installed in my home. I’m a big fan. I love that you can season lightly at the beginning of cooking in order to cut down on how much you need later. (Pasta water, for example, should be seasoned with at least a tablespoon.) I always have Kosher and sea salt on hand, and sprinkle the latter liberally on eggs and avocados.
Cheese
It was only when I attended the Vermont cheesemakers’ festival many years ago that I felt truly at home in this world. Here were bearded men holding babies and arguing about the difference between 18-month and 30 month Comté; there were women tipping back beer while debating the merits of Brillat-Savarin and Camembert. I’ll always have a knob of cheddar, some twisty, stringy Oaxacan cheese, or a fresh cheese in my fridge.
Coffee
Because life is short, and it’s best to stay alert to catch it all. I have learned the hard way not to leave the house without coffee, as I am not a good person without it in my system. These days I stock up on locally roasted, chocolatey Ethiopian Forty Weight beans.
Beans
Cheap, cheerful, and plentiful in my Mexican-American neighborhood, beans are a major staple in my home. Ideally I have a bag of cannellini and another of black, which are less expensive and lighter than the heavy pre-soaked, pre-cooked beans, but I like to have those, too, for those hangry, rushed weeknights that sideswipe all of us.
And many readers of this blog have trouble making a good gravy. Even I do, at times. Here, from the same source is how to make gravy.
Step One: Choose Your Gravy Style
As much as we absolutely sympathize with the urge to guzzle gravy by itself, it is admittedly a finishing sauce, not a complete meal on its own. Therefore, it’s important to consider what style of gravy you’d like to go for; that means, ultimately, considering what kind of foods the gravy will be topping. It also means considering whether you have the ingredients on hand to make the base flavor behind most gravies. For white gravy, you’ll want butter, milk, ample salt and pepper, and possibly pork fat. For brown gravies, you’ll want some sort of stock, and ideally, fat drippings and browned bits from recently cooked meat. If you or your dinner guests are vegetarian, you can use vegetables that impart a good bit of umami flavor, like mushrooms or onions. Those ingredients can also be used to amplify your meaty gravies.
You’ll also want to think about whether you want a smooth finish to your gravy, or if you’re fine with meaty bits in the sauce. If you’d rather a gravy that mimics store bought, you’ll need to use a sieve to strain out any pieces of meat, onion, or mushroom that might be roughing up the gravy’s finish.
Step Two: Make Your Roux
Making roux is the most critical step to making a good gravy. To many home cooks, it’s also the most nerve-wracking; though it’s not nearly as intimidating a process as it might seem at first. Once you master it, you’ll open yourself up to a lot of other culinary possibilities, like bechamel and hearty stews. To make a roux, you’ll need two things: fat and some sort of thickening agent. Usually, that agent is flour, but cornmeal or cornstarch can also be used, as demonstrated in Uncle Ellis’ recipe listed above. You can also use seeds and nuts (like pine nuts) to thicken your roux, as long as you grind them into a paste first. This method may still require some flour, however.
To make a roux, warm a couple of tablespoons of butter, bacon drippings, or some other form of fat into a pan over medium-high heat. Once the fat is warm, add in your thickening agent, one tablespoon at a time. Stir the mixture until it begins to brown. If you’re making a country or white gravy, you’ll want it to just barely change colors; it’ll smell slightly nutty and have the texture of wet sand. If you’re making a brown gravy, let the roux cook for a little longer. Just don’t let it get too brown; the more a roux cooks, the less thickening power it has. Dark brown roux is best used in dishes with thinner sauces, like gumbo.
After you’ve cooked your roux, slowly add in your liquid. For white gravies, this would be milk; for brown, this would usually be a stock of some sort. Make sure to add your liquid slowly—less than a quarter of a cup at a time is fine. Stir constantly while you’re adding it, too; if possible, you might even want someone else to slowly pour while you stir. The goal is to emulsify the liquid with the hot roux for a smooth gravy that has minimal lumps. If the liquid is added too quickly, the gravy won’t thicken properly.
If something is going wrong with your roux or you’re feeling a little nervous about making one, check out this troubleshooting guide. It’ll take you through the most common mistakes. Adding hot liquid to a hot roux (or cold liquid to a cold roux), for example, will result in a lumpy mess, which is why you want to use cold liquids when using the stovetop roux-making method. And if roux-making ends up becoming one of your most-hated kitchen activities, it’s worth mentioning that roux can absolutely be made up ahead of time. Just keep it in a container in the fridge, and make sure only to add it to hot liquids so that you’re spared the lumpy gravy that results from the temperature mistake mentioned above.
How to Make Brown Gravy
Brown gravy is one of the most universally applicable forms of gravy. For this recipe, you’ll want to gather fat drippings; these can be collected (and stored for later use) the next time you make a roast, cook a turkey, or simply fry up some bacon in the morning. If you don’t have enough (or any) animal fat, you can also, of course, just use butter. It won’t be quite as flavorful as drippings, but it will absolutely still do the job.
Once you’ve made your roux, you’ll want to add your liquid to finish your brown gravy. Oftentimes, this will be the stock or any thinner drippings you may have still from your roast, but you can also use canned or boxed stock to finish off your gravy. Add the liquid to your pan slowly, and stir constantly until the sauce coats the back of your spoon. After about three to five minutes, your gravy should be ready to serve.
How to Make Mushroom Gravy
Mushroom gravy follows almost exactly the same process as brown gravy. After adding a chicken (or vegetable) stock and thickening the gravy, however, you will want to add sauteed mushrooms and shallots to the sauce. If you’re looking for even more flavor (and you’re using meat products), consider sauteeing the mushrooms and shallots in your pan drippings before you make your roux. Remove them from the pan, and then proceed to the next step. You’ll come out with an even more full-bodied gravy that’s perfect for your next steak or stroganoff.
How to Make Onion Gravy
As with mushroom gravy, onion gravy is yet another variation on the classic brown finishing sauce. With this variation, however, it’s worth considering whether you’d like a creamier consistency; as noted in the Caramelized Onion Gravy recipe above, milk makes for a great addition to this gravy variant. If you’re looking for an even easier way to incorporate onions into your gravy, sprinkle them with flour after softening them in the pan, and then proceed to make your roux. The flour-covered onions will help you get your gravy to the dinner table even faster.
How to Make Fruit-Infused Gravy
We know—the idea of fruit-flavored gravy might sound bizarre. But when paired with the right entree, it can be the perfect accompaniment. For this variation, you’ll want to cook a fruit base that compliments your final dish; apple cider can be reduced into a great gravy, but tangerines, cherries, and cranberries would also be a delicious accents to a holiday feast. Once you’ve made a fruit juice that suits your taste, combine with stock, if desired, and add to your roux.
How to Use Beer, Wine, or Spirits to Make Gravy
Whiskey, sherry, wine, and beer can all make for fantastic gravy flavors. And if you’re ambitious, they can also do the duel job of serving as a marinade for your meat. To incorporate alcohol into your gravy, decide whether you would like to add it cold to an already finished gravy, or whether you would like to use it as a cooking liquid first. If the former, make roux as described above and slowly whisk in a quarter cup to a 1 ½ cups of your desired brew. If you’d like to use your gravy as a marinade first, however, cook your meat (either in a slow cooker or on the stove) until tender in a mixture of your chosen alcohol and stock. Remove the meat and strain out any bits that may still remain in the sauce; add the alcohol and stock mixture to a pot, heat it up, and stir in flour a tablespoon at a time. Soon, you’ll have a custom gravy that highlights the flavors you initially imparted into your entree.
How to Make Tomato Gravy
If you love tomatoes, then you’ll adore a gravy that incorporates the sweet, acidic fruit. For this gravy, add tomatoes to your drippings and cook them thoroughly. If they’re whole tomatoes, make sure the skin blisters before breaking them open. Then, once your tomatoes are cooked down and seasoned, add in flour to thicken your sauce. Serve over burgers, pork chops, biscuits, or anything else that you’d prefer topped with tomato-y goodness.
How to Make Redeye Gravy
Redeye gravy is a Southern delight that doesn’t get its due. The caffeine-infused sauce is great when served over country ham and biscuits, and it’s also a great alternative topper for country-fried steak. To make redeye gravy, cook chopped up bacon and ham in butter, along with some onion and garlic, if desired. Add flour and cook your roux, then slowly mix in milk, broth, and cooled, already brewed coffee. Pepper to taste, and feel free to add in some chopped chives or cayenne if you like.
How to Make Egg Gravy
Another Southern staple, giblet gravy is great when dripped over mashed potatoes or bits of turkey. The addition of hard-boiled egg also adds intrigue and flavor to this gravy variation. For this recipe, make gravy using chopped up turkey giblets and turkey neck. Leave these bits in, if desired, once the gravy has thickened. Slice and stir in a hard-boiled egg before serving.
How to Make Country Gravy
Sausage gravy is a comforting treat that every home cook should learn how to make. For great, at-home sawmill gravy, brown some sausage (or use a plant-based meat or textured vegetable protein). If needed or desired, add some butter for extra fat. Then, add some flour to the pan, cooking your roux while adding salt and pepper. Next, slowly stir in milk to finish the gravy off. Cook until thick, and serve over biscuits, mashed potatoes, country-fried steaks, or whatever else you think could use a savry, decadent topping. If you like a little extra spice with your gravy, consider stirring in a can of Ro-Tell tomatoes for an even tastier treat.
How to Make Gravy with Chocolate
Appalachian readers may already be familiar with chocolate gravy—a sweet, thickened sauce that’s sometimes served over biscuits. But if you haven’t had a chance to try it yourself, there’s no time like the present. For this recipe, melt butter in a pan and then whisk in flour, sugar, salt and cocoa powder. Then, slowly add in milk once the roux has cooked. You’ll end up with a thick, chocolatey sauce that’s obviously different from the gravies you may be accustomed to, but no less delicious.
If you’re a fan of Mexican food, then you may prefer a mole inspired version of gravy. For this recipe, you’ll want to make a turkey giblet stock that incorporates toasted chiles (preferably ancho chiles, but use whatever you like best). Once you make a stock using turkey fat, or some other available fat, pour in some of your chile-infused broth, thicken the gravy, and stir in about two ounces of dark chocolate after removing your pan from the heat, along with about a tablespoon of balsamic vinegar. Serve and enjoy.
How to Make Gravy Even Easier
Gravy isn’t exactly time-consuming to make, but if you need to whip up a delicious gravy at the last minute, we have a few hacks for you. For one thing, you can dissolve a bouillon cube in water and use that for stock, if you’re out of the real thing. You can also use poultry seasoning to punch up a gravy made without drippings. And if you’ve got some extra biscuits around, but no time to make a true sawmill gravy, then add some crumbled up biscuits, hot sauce, and seasonings to a blender. Heat up about a cup of milk for each biscuit you use, then add that hot liquid to a blender, cover the top with a towel, throw in some butter, and hit puree. You’ll have an instant gravy that you can immediately serve over your entree.