~ – Enjoy a meal or a recipe with us! Be sure to check the Sidebar and Menu above. Interesting resources are listed there. Most are hot links. Air Fryer (AF), Instant Pot (IP) and Captain's Shack (CS) recipes now have their own page. Subscribe to the blog. It's still FREE!
We do like a good bagel, cream cheese and lox, We have been known to make our own lox – cured salmon. We also like an old dish, Egg in Hole. This is a twist on that theme – Grilled Bagel (any kind), Egg in Hole and Lox. A n easy recipe, quick – 10 minutes and delicious. Here.s how to do it.
Ingredients – (Serves 2) 2 Bagels, any kind 4 lg Eggs Lox unsalted Butter Micro Greens, any kind, I like Alfalfa/Broccoli
Directions – 1. Cut each bagel in half, leaving half of the hole with the bagel hole. Enlarge the hole if necessary. 2. Thoroughly butter both sides of the cut bagel, Add butter and a little vegetable oil to a large skillet. Start to grill the bagel halves, cut side up. Grill until the bagel is browned, Turn bagel over and grill the cut side until barely browned. Add an egg to the hole and cook until the white is set. 3. Add a little water to the pan and cover with a glass lid. Cook until the yolk is set to your liking. Remove from pan and top with lox and then some sprouts on the lox. Serve immediately.
The first time I posted this recipe to this blog was in September 2009. It’s time to enhance it and give the reader some suggestions for the ingredients, especially the clams. Here is a link to the “original” recipe straight from the Jersey Shore and the Cape May area. Here is the Direct Link to the chowder. If you are not sure how to shuck clams, then lightly steam them, about 2 minutes until they are just open. Remove clam from shell and set aside. Strain and save the liquid! And there are markets available for either frozen or canned (which should work fine along with liquid). Walmart, Chef’s Store (Snows chopped) and Whole Foods for national suppliers and in Boise , Reel Foods on Vista Ave. Ok. Here is the recipe, Enjoy!
Tom’s Cove Clam Chowder
Recipe Source: Tom’s Cove, New Jersey Serves: 8
Ingredients: 6 Bacon slices, diced 3½ c Tomatoes, fresh and chopped, optional 20 oz Clams, fresh and with juice or canned or frozen 2½ T Thyme, dried Parsley, chopped 1 c Red Onion, diced fine 2 c Hot water 16 oz Heavy Cream 16 oz Clam Juice, if using 3 c Red Potatoes, diced Salt and pepper to taste Directions: In a soup pot, fry bacon until crisp and golden. Sauté onion and 1 t thyme in bacon pot until onion is tender. Add potatoes, tomatoes, if using, water, cream, clam juice and salt and pepper. Cover pot and simmer until potatoes are tender, but not mushy. Shuck and cut clams into pieces, reserving juices. Add to the pot with the juice. Add parsley and another 1½ t thyme. Simmer to taste. Cool and re-heat for better chowder.
Many questions and discussions on peeling vegetables. Here is a good article on just that question. To peel or not to peel That is the question. But first, what is a vegetable? “A vegetable is a plant or plant product, but commonly refers to the edible parts of a plant, such as the roots, stems, leaves, flowers, fruit, or seeds.” (SNF) Many vegetables can be left unpeeled, as their skins are rich in nutrients, fiber, and flavor. However, whether you leave them unpeeled often depends on the recipe, the vegetable’s condition, and personal preference. Here are some vegetables that are generally best left unpeeled. 1. Carrots The skin contains a lot of nutrients and fiber. Scrubbing them thoroughly is sufficient to remove dirt. 2. Potatoes Skins are rich in potassium, fiber, and vitamins. Great for roasting, mashing (for a rustic texture), and making fries. 3. Sweet Potatoes The skin is nutrient-rich and becomes tender when cooked. Adds a slightly earthy flavor to dishes. 4. Cucumbers The peel contains antioxidants and fiber. Thin-skinned varieties, like English cucumbers, are particularly good unpeeled. 5. Zucchini (and other summer squash) The skin is tender and full of nutrients. Adds texture and color to dishes. 6. Eggplants The skin is edible, especially in younger or smaller varieties. Older eggplants might have tougher skin, which can be peeled if desired. 7. Parsnips The thin skin can be left on, especially for younger parsnips. Scrub them well to remove dirt. 8. Beets When roasted or boiled, the skin becomes easy to slip off, but leaving it on during cooking helps retain nutrients. 9. Apples (if used as a vegetable, e.g., in savory dishes) The skin contains fiber and beneficial compounds. 10. Turnips and Rutabagas Smaller, younger roots have tender skins that can be left on.
Tips for Leaving Skins On:Clean Thoroughly: Use a vegetable brush to wash away dirt and residue. Organic Preference: Opt for organic produce when leaving the skin on, as it’s less likely to have pesticide residues. Taste Test: For some vegetables, leaving the skin on may slightly alter texture or taste. Tomatoes are perfectly fine to eat unpeeled! In fact, the skin of a tomato contains many beneficial nutrients, such as: 1. Fiber: Helps with digestion. 2. Lycopene: A powerful antioxidant that may reduce the risk of certain cancers and heart disease. Lycopene is often concentrated in the skin. Good for eye health. 3. Vitamins and Minerals: The skin is rich in vitamin C, potassium, and other nutrients. When to Eat Tomatoes Unpeeled: 1. Fresh Dishes: For salads, sandwiches, or salsas, the skin adds texture and a slight chewiness. 2. Cooking: In soups, stews, or sauces, the skin softens during cooking and usually blends well with other ingredients. When to Peel Tomatoes: 1. Smooth Sauces or Soups: If you want a silky texture without bits of skin, except in a marinara, peeling might be preferable. 2. Tough Skins: Some varieties have thicker skins that might not break down well during cooking. 3. Personal Preference: If you find the skin unpleasant in certain dishes, you can peel it. How to Peel Tomatoes (If Needed): Score the bottom with a shallow “X.”. Blanch them in boiling water for 20-30 seconds. Transfer to ice water to cool. The skin should easily slip off. Unless a recipe specifically calls for peeling, eating tomatoes with the skin is healthy and convenient! Some tomato varieties naturally have tougher skins, which can make them less ideal for eating raw in certain dishes but often better for storage and transport. Here are some types of tomatoes known for their thicker or tougher skins: 1. Roma Tomatoes (Plum Tomatoes) Known for their dense flesh and lower water content. these tomatoes are not known as “slicing” tomatoes. Often used in sauces, pastes, and canning. The skin can be tougher compared to other varieties. 2. Cherry and Grape Tomatoes Some smaller varieties, especially those bred for durability, have thicker skins. Grape tomatoes, in particular, tend to have firmer, more resilient skins. 3. Heirloom Varieties Certain heirloom tomatoes, especially those bred for flavor rather than ease of peeling, can have tougher skins. Variability depends on the specific variety. 4. Green Tomatoes Unripe tomatoes, including green heirlooms, tend to have firmer skins. Often used in cooking (e.g., fried green tomatoes) where toughness is less of an issue. 5. Hybrids Bred for Shipping Many commercially grown hybrids are designed for durability during transport, which often means thicker skins. Examples include some supermarket slicing tomatoes. 6. Sun-Dried Tomatoes These naturally develop tougher skins during the drying process. Factors Influencing Skin Toughness: 1. Growing Conditions: Hot, dry climates can cause tomatoes to develop thicker skins as a protective mechanism. 2. Ripeness: Overripe tomatoes usually have thinner skins, while under ripe ones are firmer and tougher. 3. Variety: Certain types, like those bred for processing or long shelf life, inherently have thicker skins. If you prefer tender-skinned tomatoes, look for varieties like Brandywine, Big Beef, or other soft-skinned heirlooms for fresh eating. For cooking, tough-skinned tomatoes can work well as their skins often break down during the cooking process or can be easily removed. (Sources: USDA, SNF, Food52)
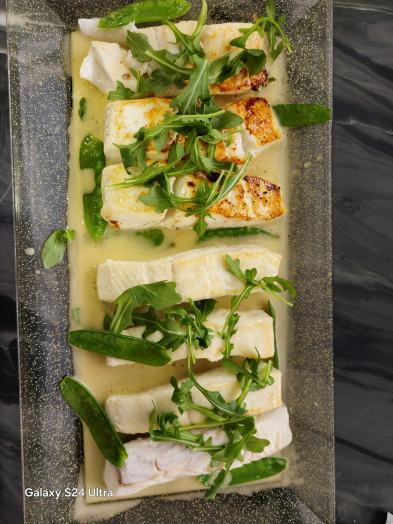
Not everything one makes comes out as expected or as good as one “dreams” about. This is one of those times. I made a Halibut Beurre Blanc – https://www.rockinrs.com/Beurre-Blanc2.pdf – and it was OK, but just Ok. Nothing to write home about. The beurre blanc was thin, not as thick as I would have liked it, and the tarragon and clove were just about non-existent. The temperature was kept at around 120 degrees F and it did not break. The liquid did reduce to 1/2 cup and it did take about 40 minutes to complete the sauce. I have made this several times over the years, but this was about the most delinquent I have ever done! If you look at the recipe and can give me any suggestions as to how to correct it, I sure would appreciate your comments and suggestions. Thanks.
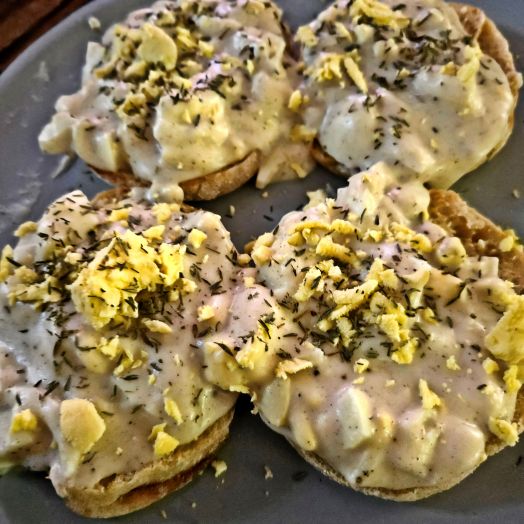
Here isw an old family recipe, and others I would guess, that my Mother made on a regular basis. I believe that she got the recipe from her mother. Nothing was written down, but it was good and still is, It is an easy recipe; quick and fast. All it takes is hard cooked eggs, whole milk, roux and fresh grated nutmeg, salt and pepper. I do hope you try it as written or with your own versions. ie, try adding chopped spinach or corn to the white sauce.
Creamed Eggs on Toast
Ingredients: 1 T unsalted Butter, 1 T All Purpose Flour, 1 c whole Milk, 4 Hard Cooked Eggs, chopped – 1 Yolk reserved, 1 t fresh grated Nutmeg, Salt and Pepper to taste, 6 slices Bread toasted, Thyme
Directions: Add butter to a medium pan and melt, but do not brown. Add the flour and mix well. Add the milk, chopped eggs, fresh grated nutmeg, salt and pepper and mix well. If the sauce gets to thick, add a little milk. Serve on the toast. Grate the egg yolk over each serving along with a pinch of the thyme. Serves about 3.
Note: When you add the eggs to the white sauce, you can also add chopped spinach or corn or anything you like. Great on toasted sourdough toast or toasted English Muffins.
I must apologize for the delay in posting. It’s been a while. However, I lost the internet connection and it took CenturyLink a while to determine the problem was in their modem. They let me know it was working on Labor Day at 9:30pm, but at least now it is working.
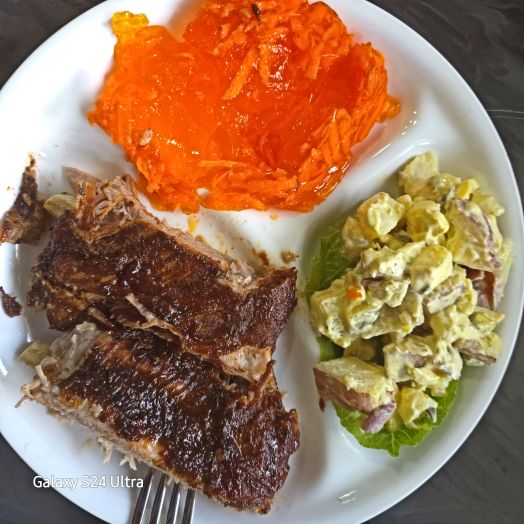
I was lucky enough to work on two recipes that are really good. One is for Instant Pot (IP) BBQ Ribs. Don’t fret. You can adjust it to your own liking. Make it more “smoky” or BBQ’d if you want. The other one came from a good friend, Scot Beseman, RN (Ret). It is for a Potato Salad that is really terrific.
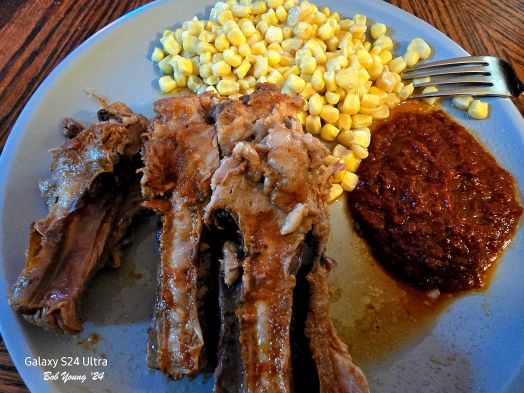
These are the BBQ Ribs done in an IP. They are spare ribs, which I do not prefer but were all I could get.(https://www.rockinrs.com/CS-IP-Ribs.pdf) The recipe is rather easy, although you should really try to follow the it pretty closely. Feel free to adjust to your liking. I served it for Labor Day with Orange Jello with Carrots and Beseman Potato Salad, recipe to follow.
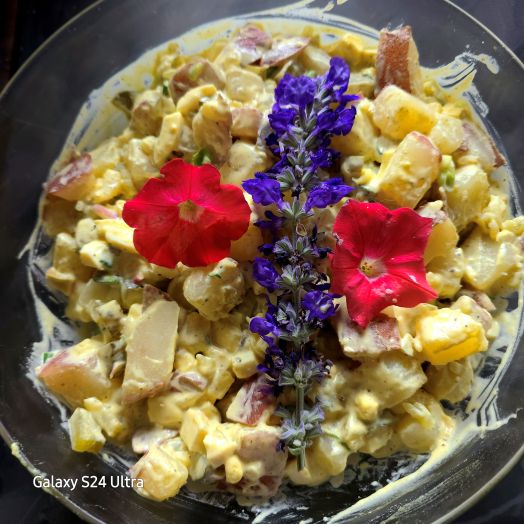
This is the Beseman Potato Salad (https://www.rockinrs.com/CS-Beseman-Potato-Salad.pdf) and it is really good. Love to add flowers to a salad like this for presentation. I used red potatoes, or you can use Yukon Gold potatoes, but I would not use Russet potatoes. Their water content is high and you can end up with mashed potato salad. Also, I did not peel the potatoes.. I also added some Dijon mustard to the recipe, I like the subtle flavor it gives dishes. Be sure, too, to use sweet pickles to add another flavor level.
If you have any questions or comments, please let us know.Hope you enjoy these recipes. Most of the products used in both recipes came from the Boise Farmers Market (BFM).
An Instant Pot is diverse and fun to use. It cooks many styles and methods. I love ribs done on a grill, but this method is quick and somewhat easy. The recipe is a little involved, but if you follow it, your ribs will come out great. Especially at the end where you caramelize them under a broiler. Here is the recipe we use. I like Baby Back Rib, but you can use any ribs. A good gameday treat. https://www.rockinrs.com/CS-IP-Ribs.pdf . In the photo below, we served them with fresh off the cob corn, or you can leave it on the cob, and doctored Bush’s Beans.
Just watch your time in the Instant Pot. 23 minutes should be enough. I went 25 minutes and that was a little long. The ribs fell off the bone when I got them out to go under the broiler. Let us know what you think and if you liked them.
As you can see, I have changed the opening graphic. I was playing around with AI and came up with several of these. It fits with the Captain’s Shack. Robin and I thoroughly like scallops, especially sea scallops – the larger ones. We also enjoy brazing them, over medium low heat, and that is important. Here is the recipe. I know, there are several recipes available for a Viognier Sauce, but this one is one I came up with. https://www.rockinrs.com/CS-Scallops-Viognier.pdf. The recipe is scaled for 2, but you can easily adjust the recipe to suit your needs without adjusting the sauce.
Braised Scallops with Viognier Sauce
Notice the light braise on the scallops and it is served with Creamed Spinach. A good combination. I always put fresh grated nutmeg in all by white sauces and a cream sauce is a white sauce. If you make these, and it is not difficult, just watch the heat and cook 2-3 minutes per side, and let us know how you liked them.
I have had several questions about the difference between crab back fin and claw meat. Are they not from the same animal? Yes they are, but like different cuts of beef, they come from different parts of the crab. I hope this short discussion will clarify the question. I prefer to use Blue Crab over any other type. Here is a recipe for Crab Cakes. http://www.rockinrs.com/CS-Crab-Cakes.pdf (Tartar Sauce – https://www.rockinrs.com/CS-Tartar-Sauce-Best.pdf)
Crab meat can be found in different parts of the crab, and each type has distinct characteristics. Here are the key differences between claw meat and back fin meat:
Crab Cakes
Claw Meat
Texture: Claw meat is typically firmer and more fibrous than back fin meat. This is because the claws are used for defense and feeding, requiring stronger muscle fibers. Color: It often has a darker color compared to back fin meat, with a slightly reddish-brown hue. Flavor: Claw meat tends to have a stronger, more pronounced flavor, which can be slightly sweeter. This makes it a favorite for dishes where a robust crab taste is desired. Use: It’s commonly used in dishes where the crab flavor needs to stand out, such as crab cakes, soups, and stews.
Back Fin Meat
Texture: Back fin meat, also known as lump or body meat, is usually flakier and more delicate than claw meat. It comes from the crab’s body and the area where the back fins attach. Color: It is typically whiter and more translucent compared to claw meat. Flavor: The flavor is milder and less pronounced than claw meat. This subtle taste makes it ideal for dishes where a delicate crab flavor is preferred. Use: Back fin meat is often used in salads, cocktails, and more refined dishes where the presentation and texture of the crab meat are important.
Each type of crab meat has its own culinary uses and can be chosen based on the desired texture and flavor profile of the dish being prepared. The crab cakes pair well with a Parma Ridge Winery Avielle.
Salmon Benedict on a Spinach Bed and Fresh Idaho BFM Fruit – Israli Melon
There are several differednt types of Eggs Benedict that one can make. In fact, You can really make them any way you want. The key is in the Hollandaise Sauce, not the eggs combinations. Here are the 3 basic types.
BasIC Eggs Benedict is with ham’ Canadian Bacon or pancetta. Eggs Florentine is with sauteed spinach. Eggs Royale is with smoked salmon. All three breakfasts are created the same, starting with a toasted English muffin, poached eggs and topped with hollandaise sauce. Here is the recipe for Hollandaiuse Sauce that I make from scratch and we love. https://www.rockinrs.com/CIA-Basic-Hollandaise.pdf It may take some practice, but it’s worth it. Just don’t let the temperature get above 130 degrees F.