A visit to Pizzalchik, Boise


To say that today was a big waste of time, would not be true! So I won’t say it. Robin and I had the very distinct pleasure of meeting and having lunch with Michael Boss of Behind The Menu at Pizzalchik on Gary Lane in Boise. Some really unique pizzas and salads. Try a Tequila and Lime Roasted Prawn Salad with Asian Noodles or one of the fantastic House Salads with a Balsamic Dressing! Or a Neapolitan Pizza – thin crust, tomato and cheese. Or Build Your Own – ground beef, garlic, sun dried tomatoes, red onion and basil. And then there is always wine to go with the meals or beer or Cokes. Here are some slides.

Want something different along the lines of a pizza? Try the Pizzalchik. It’s well worth the trip. And try one of their salads while you’re there. Cheers!

Roasted Turkey in 70 Minutes


Actually, yes you can!! Robin and I made one of these turkeys yesterday, as a preliminary trial for Thanksgiving, coming up soon. The style of cooking is called spatchcocked. “Really, “spatchcocking” is just a fancy term for cooking a whole turkey or chicken by removing the backbone and splaying the bird out flat.
Spatchcocked Turkey

Spatchcocked Turkey

And it’s that simple. Really! Just cut along the both sides of the turkey’s backbone to remove it (use sturdy kitchen scissors). Flip the bird over and flatten it by breaking the breast bone. Brush the bird with olive oil, salt and pepper…Just 70 minutes later (you’ll want to baste it halfway through), you’ll have a perfectly cooked bird.

There are actually a few additional benefits to spatchcocking, in addition to the quick cooking time

–Space. Flattening the turkey out like this makes a lot more room in your crowded Thanksgiving Day oven.
–Carving. With the backbone out of the way, it’s much, much simpler to carve the bird when it’s time to serve it.
–Taste. We actually thought the meat turned out better tasting and more moist than with a traditional roast turkey. And the skin crisped up to golden perfection.” (http://thebittenword.typepad.com)

Roasted Turkey in 70 Minutes

Serves: 8 – 10
Ingredients: (Oil Mixture)
2 T Extra-Virgin Olive Oil
1 T coarse Salt
1 t freshly ground Pepper
1 whole fresh turkey (about 12+ pounds)
Our Suggestion: Add your favorite spices to this mixture: Sage, Thyme, Rosemary, etc.

Directions:
1. Preheat oven to 450°F. Stir together oil, salt, and pepper in a small bowl.
2. Rinse inside and outside of turkey; pat dry with paper towels. Spatchcock turkey*. Transfer to a rimmed baking sheet, breast side up. Let stand for 30 minutes.
3. Brush or rub turkey all over with oil mixture. Roast, rotating sheet halfway through and basting twice, until an instant-read thermometer inserted
into the thickest part of the thigh reaches 165°, about 1 hour and 10 minutes. Let stand for 20 minutes before carving.

*Spatchcocking: (See photo above)
1. Cut out the backbone. Start with the turkey breast side down. Use poultry shears to cut along both sides of the backbone, beginning at the tail end. If you hit a tough spot, try cutting with just the tip of the shears.

2. Open the turkey. Set aside backbone (and giblets) for stock. Take hold of both newly cut edges, and open the turkey. Remove any large pieces of fat. Turn the turkey, breast side up.

3. Break the breastbone. Place your hand on one side of the breast, close to the breastbone, and push down firmly until you hear a crack. Repeat on the other side. (For better leverage as you work, stand on a step stool.)

4. Flatten the turkey. Pull the thighs outward so the turkey lies flat, with the wings facing inward. Tuck the wing tips under to secure.

5. Brush with oil. Place the turkey on a rimmed baking sheet. Let stand for 30 minutes. Use a basting brush to apply oil mixture.

How To Carve:
A spatchcocked turkey requires a slightly different carving technique than a bird cooked the traditional way, but the basic approach remains
the same: Remove the legs and wings, and then slice the breast meat.

1. Cut legs from breast. With a sharp chef’s knife, remove each leg by cutting through the turkey where the thigh connects to the breast.

2. Separate drumsticks and thighs. At the joint of each leg, cut drumstick from thigh. Transfer thighs and drumsticks to a warm platter. Tent with foil.

3. Cut wings and breast. On one side, find the joint connecting wing and breast, and cut through it (not shown). Repeat to cut off other wing. Cut breast meat into two pieces, slicing along either side of breastbone.

4. Slice breast meat. Slice the breast meat across the grain. Arrange on the platter with the dark meat, and add the wings.

——————————

The photos are from Martha Stewart Living and the article came from The Bitten Word. This goes great with a 2008 Bedrock Wine Co. Cuvee Caritas White Wine, Sonoma County (55% 100 year old Semillon from Monte Rosso and 45% Sauvignon Blanc from Kick Ranch Vineyard) and a super gravy made from Madeira. (The gravy recipe can be found on this blog)

We found this turkey to be extremely moist and succulent. And the interesting thing is that it really is easy to do and very fast cooking. It has a wonderful flavor and moistness eaten cold in sandwiches or for “nibbling”. The skin is crusty and wonderful. That’s it. Cheers!

Promises! Promises!


I said that the next time we went to Sweetwater’s Tropic Zone, that I would get the Curry Goat. As the Walrus said, “The time has come”. We returned tonight and the meal was superb!!! Here is what we had. You might want to read below, but the slides are labeled. Remember to go to full screen to view the photos.

Our dinner consisted of: Pineapple Curry Muscles that were superb. The sauce is awesome. House Salad, Trinidadian Curry Goat (there’s the goat), Cuban-Style Bistec de Palomilla (Cuban steak that is pan seared) and a Chocolate Torte. The main thing is, would I have the Goat again? The answer is simple: Absolutely! It was that good! Actually, everything we had was that good. When we go back, and we will, it will be hard not to choose the same things again. We will probably go through the entire menu eventually. You really need to visit the Sweetwater’s Tropic Zone. It’s that good and giving the old Andrae’s a race for taste and quality! Cheers!

Holiday Foods Part II


Here is the second installment.

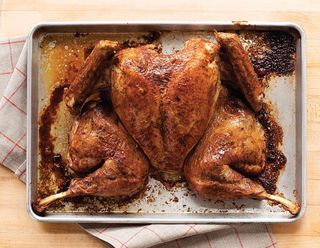
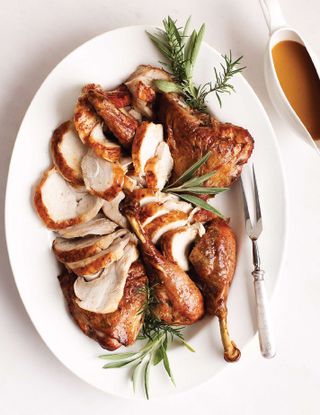
Roast Turkey with Madeira Gravy

From EatingWell.com

This gorgeous herb-rubbed turkey- complete with luscious gravy- is the quintessential holiday centerpiece. It is particularly fitting for Thanksgiving because Madeira, a fortified wine from the Portuguese island of the same name, flowed like water through the Colonies, having arrived here as ballast in ships. Sweet and mellow, reminiscent of sherry, Madeira beautifully enhances a turkey gravy.

Yields: Makes 8 servings, about 3 ounces each, with leftovers

Ingredients:
1/4 c Parsley, fresh and chopped
2 T Thyme, fresh and chopped
2 T Rosemary, fresh and chopped
2 T Shallots, finely chopped
1 T Extra-Virgin Olive Oil, (for turkey)
Salt and freshly ground pepper to taste
1 (12- to 14-pound) Turkey, with giblets
1 Onion, peeled and quartered
1 1/2 t Extra-Virgin Olive Oil, (for gravy)
1 Onion, coarsely chopped
2 Carrots, chopped
2 stalk(s) Celery, chopped
3 c Chicken Stock
1/4 c dry White Wine for basting
1/2 c Madeira
1 1/2 T Cornstarch mixed with 2 tablespoons water

Directions:
1. Set oven rack in the bottom of the oven and preheat to 325 degrees F. Set a wire roasting rack in a large roasting pan and coat the rack with cooking spray.

2. To prepare turkey: Combine parsley, thyme, rosemary, shallots and 1 tablespoon oil in a small bowl. Season with salt.

3. Reserve giblets and neck for the stock; discard the liver. Remove any visible fat from the turkey. Rinse it inside and out with cold water and pat dry. Season the cavity with salt and pepper and place onion in cavity.

4. With your fingers, separate the turkey skin from the breast meat, taking care not to tear the skin or pierce the meat. Smear the herb mixture between the flesh and the skin on both sides of the breastbone. Tie the drumsticks together and tuck the wing tips behind the back. Set the turkey, breast-side up, in the prepared roasting pan and tent with foil.

5. Roast the turkey for 2 hours.

6. To prepare giblet stock: Heat 1 1/2 teaspoons oil in a large heavy saucepan over medium heat. Add chopped onion, carrots, celery and the turkey neck and giblets. Cook, stirring occasionally, until well browned, about 15 minutes. Pour in broth and bring to a boil. Reduce the heat to low and simmer, partially covered, for 30 minutes. Strain the giblet stock through a fine sieve (you should have about 2 cups). Chill until ready to use.

7. After the turkey has been in the oven for 2 hours, remove the foil and continue roasting, basting with white wine from time to time, until an instant-read thermometer inserted into the thickest part of the thigh registers 180 degrees, 45 minutes to 1 1/4 hours longer. Transfer the turkey to a carving board. Cover loosely with foil and let rest for 20 to 30 minutes before carving.

8. To prepare gravy: While the turkey is resting, pour the drippings from the roasting pan through a strainer into a small bowl, then place the bowl in the freezer for 20 minutes to solidify the fat. Add Madeira to the roasting pan and cook, stirring and scraping up any brown bits, for about 1 minute; strain into a medium saucepan. Skim the fat from the giblet stock and add the stock to the pan. Skim the fat from the chilled pan juices and add the juices to the pan as well. Bring to a simmer. Add the cornstarch mixture to the simmering sauce, whisking until the gravy has thickened slightly. Season with pepper.

9. Remove strings from turkey and carve, discarding the skin. Serve with the Madeira gravy.

Tips & Techniques:
Madeira, a fortified wine from the Portuguese island of Madeira, has a sweet, mellow flavor somewhat like sherry. Find it at liquor stores or in the wine section of the supermarket.

—————————–

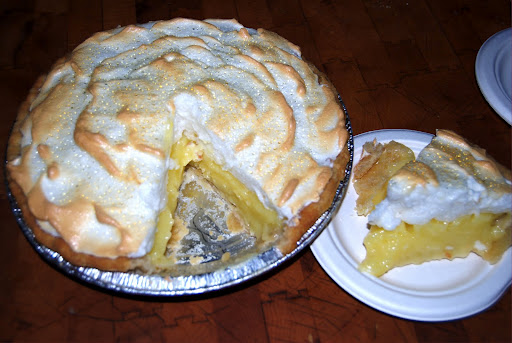
And for those pies you are going to make, try this crust, or check with Jerri!!

Pie Pastry

From EatingWell.com

Whole-wheat pastry flour contributes a pleasant nutty flavor to an all-purpose pie dough and ensures a tender result.

Yields: Makes about 14 ounces dough, enough for one 9- to 11-inch pie or tart.

Ingredients:
3/4 c Whole-Wheat pastry flour
3/4 c All-Purpose flour
2 T Sugar
1/4 t Salt
4 T cold Butter, cut into small pieces
1 T Canola oil
1/4 c Ice Water, plus more as needed
1 lg Egg Yolk
1 t Lemon juice or white vinegar

Directions:
1. Whisk whole-wheat flour, all-purpose flour, sugar and salt in a medium bowl. Cut in butter with a pastry blender or your fingers until the mixture resembles coarse crumbs with a few larger pieces. Add oil and stir with a fork to blend. Mix 1/4 cup water, egg yolk and lemon juice (or vinegar) in a measuring cup. Make a well in the center of the flour mixture. Add enough of the egg yolk mixture, stirring with a fork, until the dough clumps together. (Add a little water if the dough seems too dry.) Turn the dough out onto a lightly floured surface and knead several times. Form the dough into a ball, then flatten into a disk. Wrap in plastic wrap and refrigerate for at least 1 hour.

—————————–

Well, that’s about all for now. Headed down to Sweetwater’s Tropic Zone on 10th Street for dinner. Cheers!

Holiday Foods Part I


Here are some suggestions for those Holiday parties!

Caviar-Stuffed New Potatoes

From EatingWell.com

Caviar lovers agree that the best presentations are the simplest.

Serves: 16 Edit

Ingredients:
16 boiled Red Potatoes, chilled
4 t Caviar
4 t Crème Fraîche
2 t Chives, chopped and fresh

Directions:
1. Slice off one end of each potato and hollow out a small “bowl” in the other end with a melon baller. Fill each potato with 1/4 teaspoon caviar. Top with 1/4 teaspoon crème fraîche and sprinkle with chives.

——————————

Corn and Pepper Chowder

From: EatingWell.com

Cooked chicken or seafood would be a nice addition to this soup. For an even richer flavor, sauté the corn first in a teaspoon of oil until lightly browned.

Yields: Makes 3 servings, 1 1/3 cups each

Ingredients:
1 t Chili Powder
1/2 t Cumin, ground
1 clove Garlic, finely chopped
1/2 c Corn kernels, canned or frozen thawed
1/2 sm Red Bell Pepper, finely chopped
1 can(s) (10-ounce) condensed Cream of Celery Soup preferably reduced-fat
1 1/2 c fat-free Milk
1/4 c Scallions, chopped
Salt and freshly ground pepper , to taste

Directions:
1. Stir chili powder, cumin and garlic in a dry, heavy-bottomed saucepan over medium heat until fragrant, 1 to 2 minutes. Add corn and peppers and toss to coat.
2. Add soup and milk; stir until heated through. Stir in scallions and season with salt and pepper.

——————————

There you are. Try these and see what you think. Cheers!

Pull-Apart Buns for Thanksgiving


From King Arthur Flour, I received the following recipe.

Golden Pull-Apart Butter Buns

At last! The quintessential soft, buttery dinner roll. Nestled — we might even say “crowded” — into a couple of 8″ round pans, the shaped buns rise into one another as they bake. The result? Soft-sided pull-apart buns, ready for melting pats of soft butter.
Read our blog about these buns, with additional photos, at Bakers’ Banter.

Ingredients:
Buns
3 1/2 cups King Arthur Unbleached All-Purpose Flour
2 teaspoons instant yeast
2 tablespoons potato flour or 1/4 cup instant potato flakes
3 tablespoons Baker’s Special Dry Milk or nonfat dry milk
2 tablespoons sugar
1 1/2 teaspoons salt
4 tablespoons soft butter
2/3 cup lukewarm water
1/2 cup lukewarm milk
1 oz melted Butter

Topping
2 tablespoons melted butter

Directions:

1) Combine all of the dough ingredients in a large bowl, and mix and knead — using your hands, a stand mixer, or a bread machine set on the dough cycle — to make a soft, smooth dough.

2) Place the dough in a lightly greased container — an 8-cup measure works well here — and allow the dough to rise for 60 to 90 minutes, until it’s just about doubled in bulk.

3) Gently deflate the dough, and transfer it to a lightly greased work surface.

4) Divide the dough into 16 equal pieces, by dividing in half, then in halves again, etc. Round each piece into a smooth ball.

5) Lightly grease two 8″ round cake pans. Space 8 buns in each pan. Can you use 9″ round cake pans, or a 9″ x 13″ pan? Sure; the buns just won’t nestle together as closely, so their sides will be a bit more baked.

6) Cover the pans, and allow the buns to rise till they’re crowded against one another and quite puffy, about 60 to 90 minutes. Towards the end of the rising time, preheat the oven to 350°F.

7) Uncover the buns, and bake them for 22 to 24 minutes, until they’re golden brown on top and the edges of the center bun spring back lightly when you touch it. An instant-read thermometer inserted into the middle of the center bun should register at least 190°F.

8) Remove the buns from the oven, and brush with the melted butter. After a couple of minutes, turn them out of the pan onto a cooling rack.

9) Serve warm. Store leftovers well-wrapped, at room temperature.

Yield: 16 buns.

Well, they look good. Try them. Cheers!

Pico de Gallo BSU Style


Ah yes! The infamous weekend arrives. The traditional in-state rivalry between the Boise State Broncos and the University of Idaho Vandals. Too bad the ESPN major stations don’t want to carry it and most of the 60000 fans (combined total of BSU and U of I fans) here in Idaho will be shut out of watching the game. So we made the Pico de Gallo BSU Style to devour during the game, as the Broncos will do to the Vandals. (Yes, we were lucky enough to know someone who has ESPNU) Do you see the Blue and Orange in the Pico de Gallo? There’s a lot of it all through the dish.
Do you see any Black and Gold in there? Probably not. There’s nothing left to symbolize the Vandals after they visit Boise. Our Grandson Chris can’t even stay at home to watch the game. He says there is too much “interference” to stay and watch the game with his Mother, Grand Mother, Grand Father and Mac. The blue and the orange represents the Broncos and the red represents what’s left of the Vandals at about 5:00pm. Oh well, guess what ever will be, will be. Mac and I will tip a glass of MacTarnahan’s Ale to the Vandals and say, “Fare thee well”! Cheers!

$100 Lemon Meringue Pie


Yup! That’s right! A $100.00 Lemon Meringue Pie made by Miss Jerri! No, that’s not just the name of the pie. The first one we ever had cost me $100. And yes, you’re right, there really is more to the story. Follow me on this.

The saga begins in July of 2007 in Silver City, Idaho and the Idaho Hotel, owned and operated by Jerri and Roger Nelson. Robin and I were there for our anniversary, we usually go there for that occasion. It seems that one of the residents of Silver City had cancer. The town wanted to do something to help with the costs, so, among other things, they decided on a Silent Auction! Jerri said she would bake some pies and that she did. One was a Lemon Meringue Pie, much like the one pictured here. Light, flaky crust. Yummy sweet and tart lemon filling. Light and fluffy meringue, just lightly toasted on the top. Oh, so succulent. (The pie pictured here is a cousin of the Original Lemon Meringue Pie) I wanted that pie and I told Robin by then end of the night, it would be ours!! But first, I had to bid on it. I asked her what my top bid should be. The number was toooo low – remember this was going for a good cause. $5 was the opening bid. $10. $12. (oh, this sounded good.) What? Someone placed a $25 bid! The lady across the room did and I know her! This could be a real challenge. 10:00pm the bids close and it’s about 9:00 now. Got to plan this out. $30, she would not pay more than that. BIG mistake! $40!! I did not have more than $40 cash on me. “Jerri? Will you take a check?”. “Is it for the auction, Bob”, she queried? “Yes, Jerri, for the auction”. “Have at it, Bob”, she said. $50 bid, do I hear 60? The Lady bid 60. Now this is getting serious and it’s 9:45pm. 15 minutes. So I wrote down: $75. She walked by the table and wrote $90!!! (You see where this is going?) 9:56pm. The Lady is guarding the sheet. Someone distracted her. I wrote $100 and took the pencil and one or two more that were in reach. 9:59pm. The Lady cried, “Where’s the pencil??” Grinning, I showed it to her. And Jerri said, “The bidding is closed”! We really did laugh, somewhat, about this. I got the pie, the $100 Lemon Meringue Pie and was/is it ever good! The Lady, being the lady that she is, told Jerri that if she baked another, she would pay her $100 for the second pie. Jerri did so. I don’t remember right now the total raised but it seems to me it was a pretty tidy sum. $1200? Oh well, That’s my story and I’m stickin’ to it! Cheers!

Green Olive Soup


I know, just don’t go there. This is a surprisingly good soup and one that would probably go well with the Braised Lamb Shanks below. The first time we had this was with Gary Dixon, RN. Nu? Gary passed away several years ago, so this recipe is in his memory. It has really taken that long to find the recipe. Do try it. For some reason, I have the opinion that this is a traditional Middle East soup. Maybe I got that from Gary. Who knows.

——————————
Green Olive Soup

In memory of Gary Dixon, RN. Nu? Unusual and delicious…if you’re as mad about the unripe fruit of olive trees as me. The soup is a spectacular introduction to a Mediterranean meal. Serve hot to 6-8 people as a first course.

Ingredients:
2 c cracked Green Olives, Mideastern or Greek, soaked in water for an hour, drained, and chopped
2 T Olive Oil
1 Onion, chopped
2 cloves Garlic, chopped
3 T Olive Oil
4 T Flour
⅛ t Cayenne
8 c Chicken Stock or Vegetable Stock
½ c heavy Cream
¼ c dry Sherry
Garnish: minced Parsley

Directions:
1). In a large saucepan, sauté the onions, garlic, and ⅔rds of the olives in the olive oil until the onions are transparent. Puree with 1 cup of stock.
2). Heat oil in the saucepan and stir in flour and cayenne, cooking into a roux. Whisk in remaining stock, then pour in the puree. Bring to a slow boil, let thicken, then reduce heat and simmer for 20 minutes. Stir in cream, pepper, and remaining chopped olives, bring back to a boil, then simmer 5 more minutes.
3). When ready to serve, heat to serving temperature, stir in sherry and cook for a minute, then ladle into bowls. Garnish with generous pinches of minced parsley.

——————————

So there you have an epicurean adventure, but one well worth trying. If not for yourselves, try it for Gary. He’d be extremely happy! Cheers!

Braised Lamb Shanks


I’m always looking for a good recipe for Lamb Shanks. I have at least one, that suffices, but this one looks good. Think I’ll try it. Enjoy these lamb shanks!

Braised Lamb Shanks

Long, slow, braised Lamb Shanks are perfect comfort food, so welcome on a chilly autumn or cold winters day. There are many recipes for Braised Lamb Shanks but this is one of my favorites. The Lamb Shank is cooked very slowly in a good red wine (I emphasize good, never cook with wine you wouldn’t drink), which tenderizes the meat until, when it is cooked, the meat will quite literally fall from the bone.

Adapted From: British Food About Dot Com (Some of the spelling and terminology had to be changed)
Prep Time: 0 hour, 20 minutes
Cook Time: 3 hours, 0 minute
Serves: 6

Ingredients:
6 Lamb Shanks
2 T Olive Oil
16fl oz /500ml/ good Red Wine
1 Onion, peeled and roughly chopped
1 Garlic Bulb, cut in half cross-wise
2 sprigs fresh Rosemary
1 T Greek Oregano
1 T Harissa
3 pints /1.5 litre Beef Stock
2oz /55g ice cold Butter
Salt and ground Black Pepper

Preparation:
Preheat the oven to 160°C/320 °F/Gas 2.

1). Sprinkle a chopping board with salt and freshly ground pepper, then roll each lamb shank over the board to cover lightly with seasoning.
2). In a large ovenproof casserole heat the oil, once hot, two at a time brown the lamb shanks. Remove the lamb shanks and keep to one side. Pour in the red wine, bring to a gentle boil, leave to simmer until reduced by half. Add the onion, garlic, oregano, rosemary, harissa and finally the lamb shanks.
3). Pour in enough beef stock to cover the meat, don’t worry if the bones are sticking out, this is fine. Bring back to a simmer then cover the dish and place in the oven. Cook for 3 hours, checking from time to time that the meat is still covered in stock and top up as necessary and turn the shanks from time to time.
4). Once cooked, remove the shanks and keep to one side or the cooking pot. Place the casserole on the burner and bring to a boil, boil for 5 minutes. When the lamb shanks are cooked through, remove them from the cooking liquid and set aside on a warm plate. Strain the sauce and check the seasoning. Whisk in the cold butter to create a really glossy sauce.

——————————

So there you have it. Give these a try. Serve with Roasted Fingerling Potatoes. Here is a Recipe Link to a printable coy of the recipe. Cheers!