~ – Enjoy a meal or a recipe with us! Be sure to check the Sidebar and Menu above. Interesting resources are listed there. Most are hot links. Air Fryer (AF), Instant Pot (IP) and Captain's Shack (CS) recipes now have their own page. Subscribe to the blog. It's still FREE!
I must apologize for the delay in posting. It’s been a while. However, I lost the internet connection and it took CenturyLink a while to determine the problem was in their modem. They let me know it was working on Labor Day at 9:30pm, but at least now it is working.
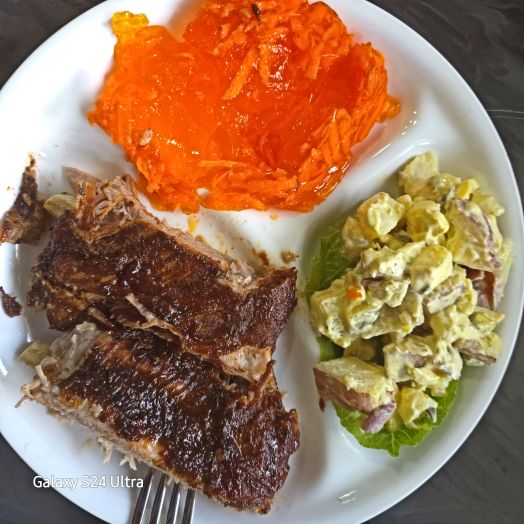
I was lucky enough to work on two recipes that are really good. One is for Instant Pot (IP) BBQ Ribs. Don’t fret. You can adjust it to your own liking. Make it more “smoky” or BBQ’d if you want. The other one came from a good friend, Scot Beseman, RN (Ret). It is for a Potato Salad that is really terrific.
These are the BBQ Ribs done in an IP. They are spare ribs, which I do not prefer but were all I could get.(https://www.rockinrs.com/CS-IP-Ribs.pdf) The recipe is rather easy, although you should really try to follow the it pretty closely. Feel free to adjust to your liking. I served it for Labor Day with Orange Jello with Carrots and Beseman Potato Salad, recipe to follow.
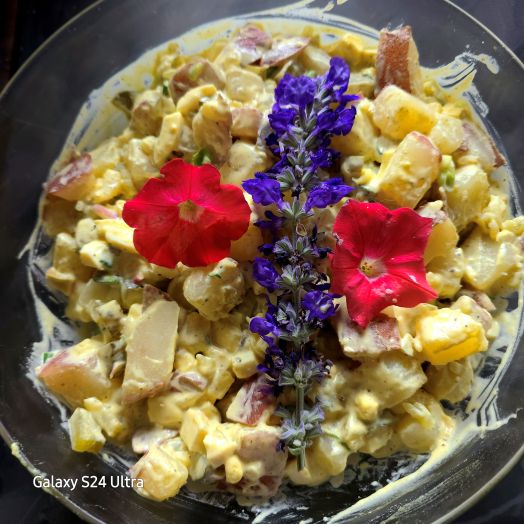
This is the Beseman Potato Salad (https://www.rockinrs.com/CS-Beseman-Potato-Salad.pdf) and it is really good. Love to add flowers to a salad like this for presentation. I used red potatoes, or you can use Yukon Gold potatoes, but I would not use Russet potatoes. Their water content is high and you can end up with mashed potato salad. Also, I did not peel the potatoes.. I also added some Dijon mustard to the recipe, I like the subtle flavor it gives dishes. Be sure, too, to use sweet pickles to add another flavor level.
If you have any questions or comments, please let us know.Hope you enjoy these recipes. Most of the products used in both recipes came from the Boise Farmers Market (BFM).
I know. Its been a while. But it has been a learning session. Making sourdough starter, bread and pancakes. But it has been an exciting adventure and a real learning experience. Started out with a basic
The starter, in my opinion, must be active, bubbly and smell somewhat “sour”. It is the starter is what gives the bread it’s name – Sourdough Bread or Pancakes, Cookies, Bagels or a host of other baked goods their name. The starter pictured here is my starter and you can see how it has doubled in size and is nice and bubbly. Thee rubber band around the jar marks the level at the start and then one can “see” how the starter has grown, or not. The starter is not especially difficult to do, but it does take some time and persistence to create. Check the recipe above to see how it is done, but don’t be intimidated by it.
This is the bread right after it came out of the oven. The recipe link above has two different baking techniques listed. Personally I like the 500 degree F temperature best, but either one will work fine. See the recipe above. The crust could be a little browner, but not much more.
Here is the loaf after it has cooled and is partially sliced. Notice the crumb – the “holes” – in the surface and the color of the crust. Love the flavor from the starter. The interior is soft, but not gummy.. The crust is crunchy, but you won’t break any teeth on it. It is somewhat crunchy. However, it could be a little more crunchy.
And finally, we have one, of many uses, for the starter discard. Sourdough Pancakes. But you can also make cookies, bagels, rolls, etc. There are many recipes on the web, but the one I like is PantryMama, http://www.pantrymama.com. Many recipes there, but more importantly, much useful information and help in solving sourdough problems. You can also find help on Facebook.
So there you go! It was a long 5 weeks or so to gather, read and then produce this bread. It was a long process, but well worth it. And then too, I had a lot of personal help from friends and relatives. I want to Thank each and everyone who gave me assistance. Have fun with these recipes. It might be a new adventure, but a fun one. just remember – Temperatures are extremely important, so follow them closely. And please don’t use cups or ounces. Rather use an inexpensive digital scale that reads in tare and grams. They range from about $20 to well mover $100. The brand I use is Escali, for about $30 and it works just fine. And please too, use a 10 quart Cast Iron pan with lid.
No. Not all at the same time, except for one dish which is a combination of two items. But first, let’s talk about lamb. Many people don’t like lamb and I can appreciate that. But I’m not so sure that folks are confusing lamb and mutton, which come from the same animal. Here are some differences from masterclass.com. Hope this helps. It’s mostly about time.
Mutton and lamb are two types of meat from sheep at different life cycle stages. Here are the main differences between the two types of red meat:
Age: The key difference between mutton and lamb meats is the animal’s age. While mutton refers to the meat of an older animal (typically around three years old), lamb is the meat of a young animal (often around a year old).
Flavor: Lamb is a younger animal, so the meat hasn’t had time to develop as much flavor—thus, it is milder with a faint, grassy flavor. Alternatively, mutton comes from an older sheep with more fat and muscles, giving it a strong, gamey flavor similar to goat, venison, or wild boar.
Preparation: Due to its toughness, mutton tastes best when cooked slowly, which you can do using a slow cooker, slow-roaster, or meat smoker. In Kentucky, chefs sometimes use the mutton of older sheep for barbecuing. Lamb, however, is a tender cut of meat that benefits from a range of cooking methods, including roasting, grilling, and braising.
Texture: Mutton comes from older sheep that have had more time to develop dense muscles and fat content, resulting in tough meat that can be dry or chewy. Conversely, lamb hasn’t had the time to develop much connective tissue, so the meat is often more tender and moist.
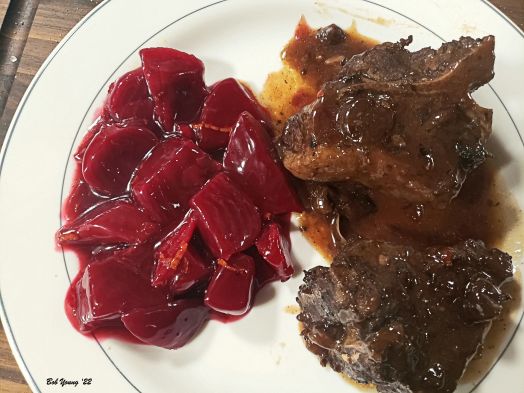
This is a wonderful dish which is fruity and a delicious way to prepare lamb chops. Especially thick cut ones. We get our lamb from Meadowlark Farms in Nampa, ID. The beets – home grown -, Harvard Beets, is from a recipe that Robin came up with and they are wonderful. You can find her recipe at Robin’s Harvard Beets. This makes a wonderful dinner and is a great paring. Any good, jammy Zinfandel will pair well with the lamb. We used a Once & Future Zinfandel (Joel Peterson)
Once again. A delicious Asian type Panko Sesame Shrimp with Broccoli. The photo shows broccolini. That’s all we had so we used it. I think broccoli florets, as the recipe calls for, would be much better. Broccolini tends to be a little “woody” and can be hard to eat. The original recipe called for ginger powder – I changed it to fresh grated ginger and also added some garlic cloves.
The next recipe I want to try is adapted from Rachael Ray, Kielbasa and Pierogi Tray Bake. Problem is, I am having a hard time locating frozen potato pierogis. She used red, yellow and orange peppers, but Robin can not “handle” those peppers, so I have changed it to Poblanos. She has no problem with Poblanos. I also will change the high hot pepper level to 4 drops of Sriracha, which should “tame” the dish, somewhat. We are not particularly fond of hot, spicy foods – Carolina Reapers, habanera or Thai Chilies – so we tend to go light on those hot spices. But you can adjust to your liking when I get the recipe complete.
It’s been awhile. But we are still here. So I think it will be a good idea to look at some of the recipes we have been working on. Some of these recipes call for Herb de Provence and we prefer to make our own. Keeps it to our liking. You can see the recipe here http://www.rockinrs.com/CS-Herbs.pdf. Just remember the 3-1 ratio of using fresh versus dried herbs. For instance, if your recipe calls for 1 Tablespoon of an herb and all your have is dried, use only 1 teaspoon of the dried. (3 teaspoons=1 Tablespoon).
Since summer is right around the corner and BBQ is probably in the back of your mind, here is a recipe for some awesome baked beans. We use a mix of canned Cannellini Beans, Kidney Beans and Black Beans. A wonderful blend of tomato sauce, molasses, brown sugar and dry mustard. Jack Daniels Black Label Bourbon also goes well in this mix. Here is the recipe for these great baked beans. Enjoy! http://www.rockinrs.com/CS-Stovetop-Baked-Beans.pdf.
And if you are doing a BBQ or Grilling – we love St Louis Style Pork Ribs grilled – then try Eric’s Rib Sauce to slather on the ribs and to use as a dipping sauce. It is awesome! http://www.rockinrs.com/Erics-Rib-Sauce.pdf. Please note. The recipe calls for a special cider, Basil/Lemon. It is a local (Boise) brand, Stack Rock Cidery. These ciders are available, whether this brand or not, at most grocery stores. They may have different blends. Find one you like or you can use your favorite apple cider vinegar. Just add your favorite herbs.
And if you are in mind for a beef stew, try http://www.rockinrs.com/CS-Beef-Stew.pdf, CS Beef Stew. It has the Icelandic herb lovage in it. A celery tasting green herb. If you use fresh – dried is available – be careful of the amount. The 1 cup chopped that the recipe calls for, is plenty and even at that, you might want to cut back to 3/4 cup. It is great in stews and soups.
And then there is Halupki. A Ukrainian stuffed cabbage leaves that means “little pigeons”. http://www.rockinrs.com/CS-Halupki.pdf This dish comes from our neighbor and we have slightly altered it. It is simply delicious. It takes right around 3 hours to prepare, but is well worth it. “The name “golubtsy” came to Russia and the region around it in the 18th century when the aristocracy traveled back and forth to eastern Europe. In France, pigeon was wrapped and cooked in cabbage leaves and stuffed cabbage rolls where then called “golubtsy” because the dish resembled the French dish.” [Wikipedia] Note: there is no “G” letter or sound in the Ukrainian language. Therefore this dish is called “Halupki” in the Ukraine.
Easter Boneless Leg of Lamb
You say you like lamb? No? Then you probably have been eating mutton. The difference is in age. Lamb is generally less than 1 year old, whereas mutton is everything else. This one is simply delicious for those who like lamb. Maybe those who say they don’t like it, may learn to eat it using this recipe. Enjoy this lamb. http://www.rockinrs.com/Lamb-Rosemary-Garlic.pdf
And now some dessert! How about Pecan Shortbread Cookies? Yum. To give the pecans some extra flavor, roast them on s sheet pan in the oven at 350 degrees F for 8 minutes. Watch them – Don’t let them burn. Here is the recipe. Enjoy. http://www.rockinrs.com/Pecan-Shortbread-Cookies.pdf
And that does it for now. Brought you at least somewhat up-to-date, and I “learned” this new format, somewhat. Cheers.
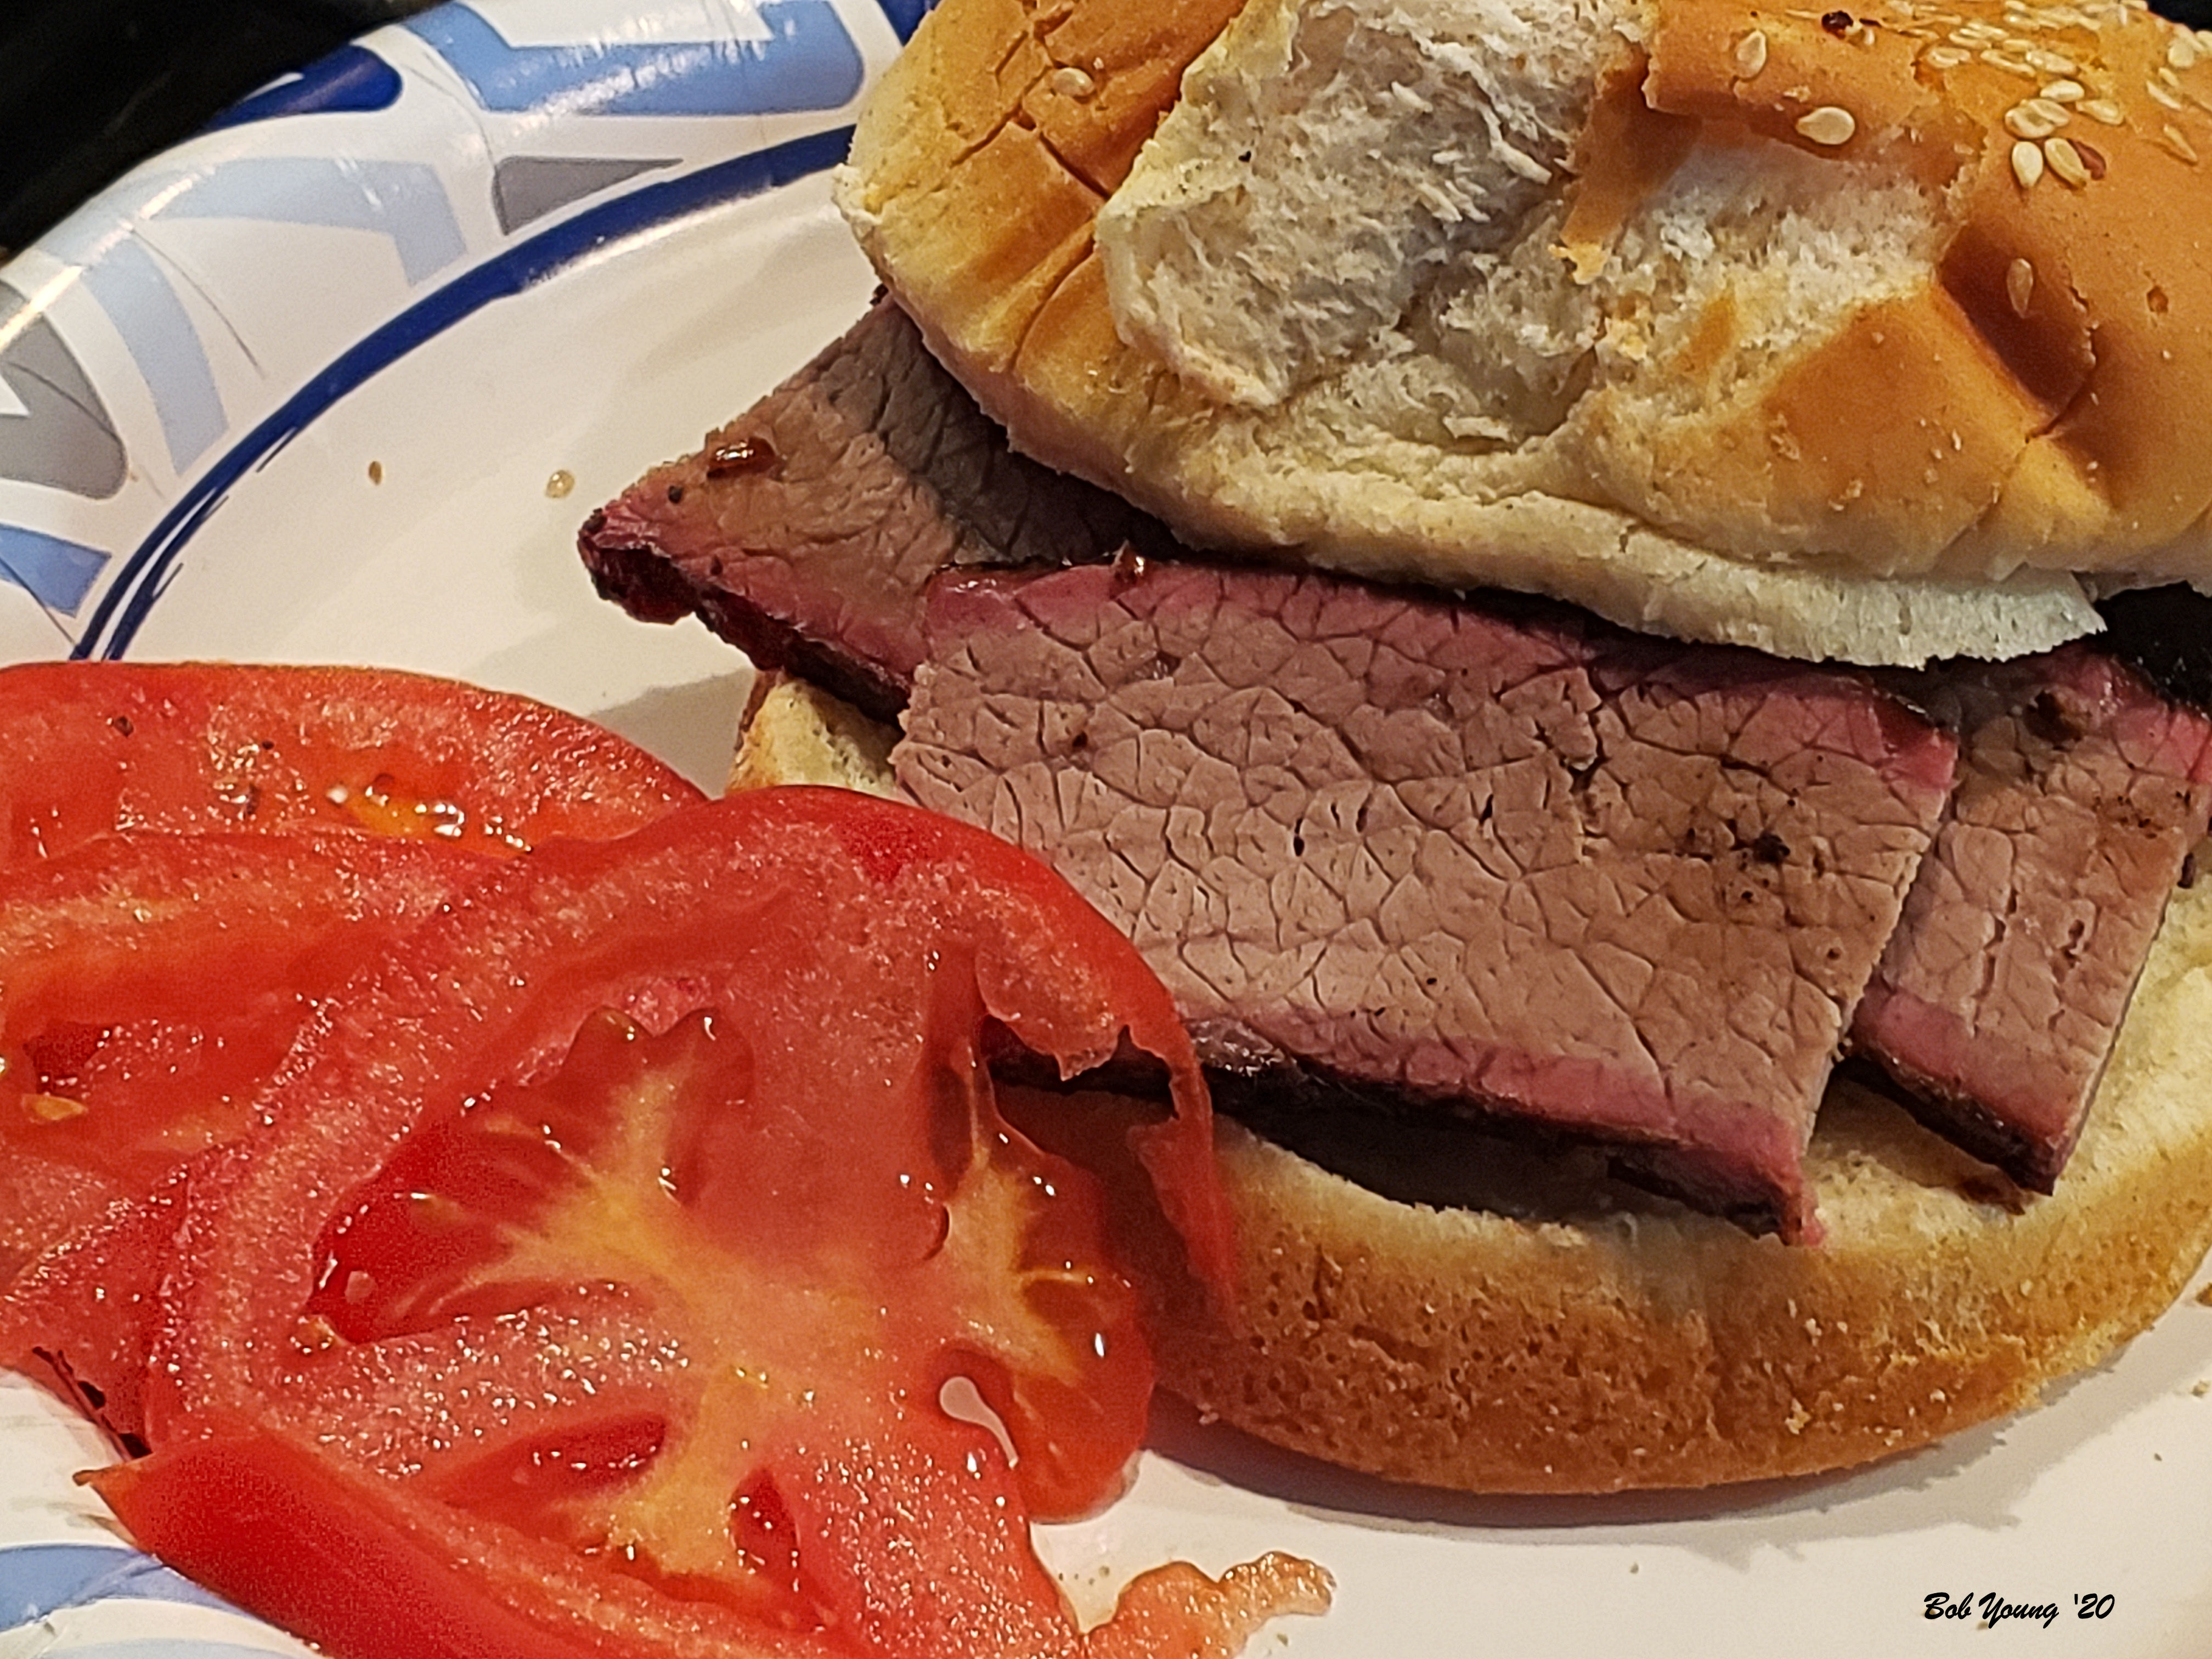
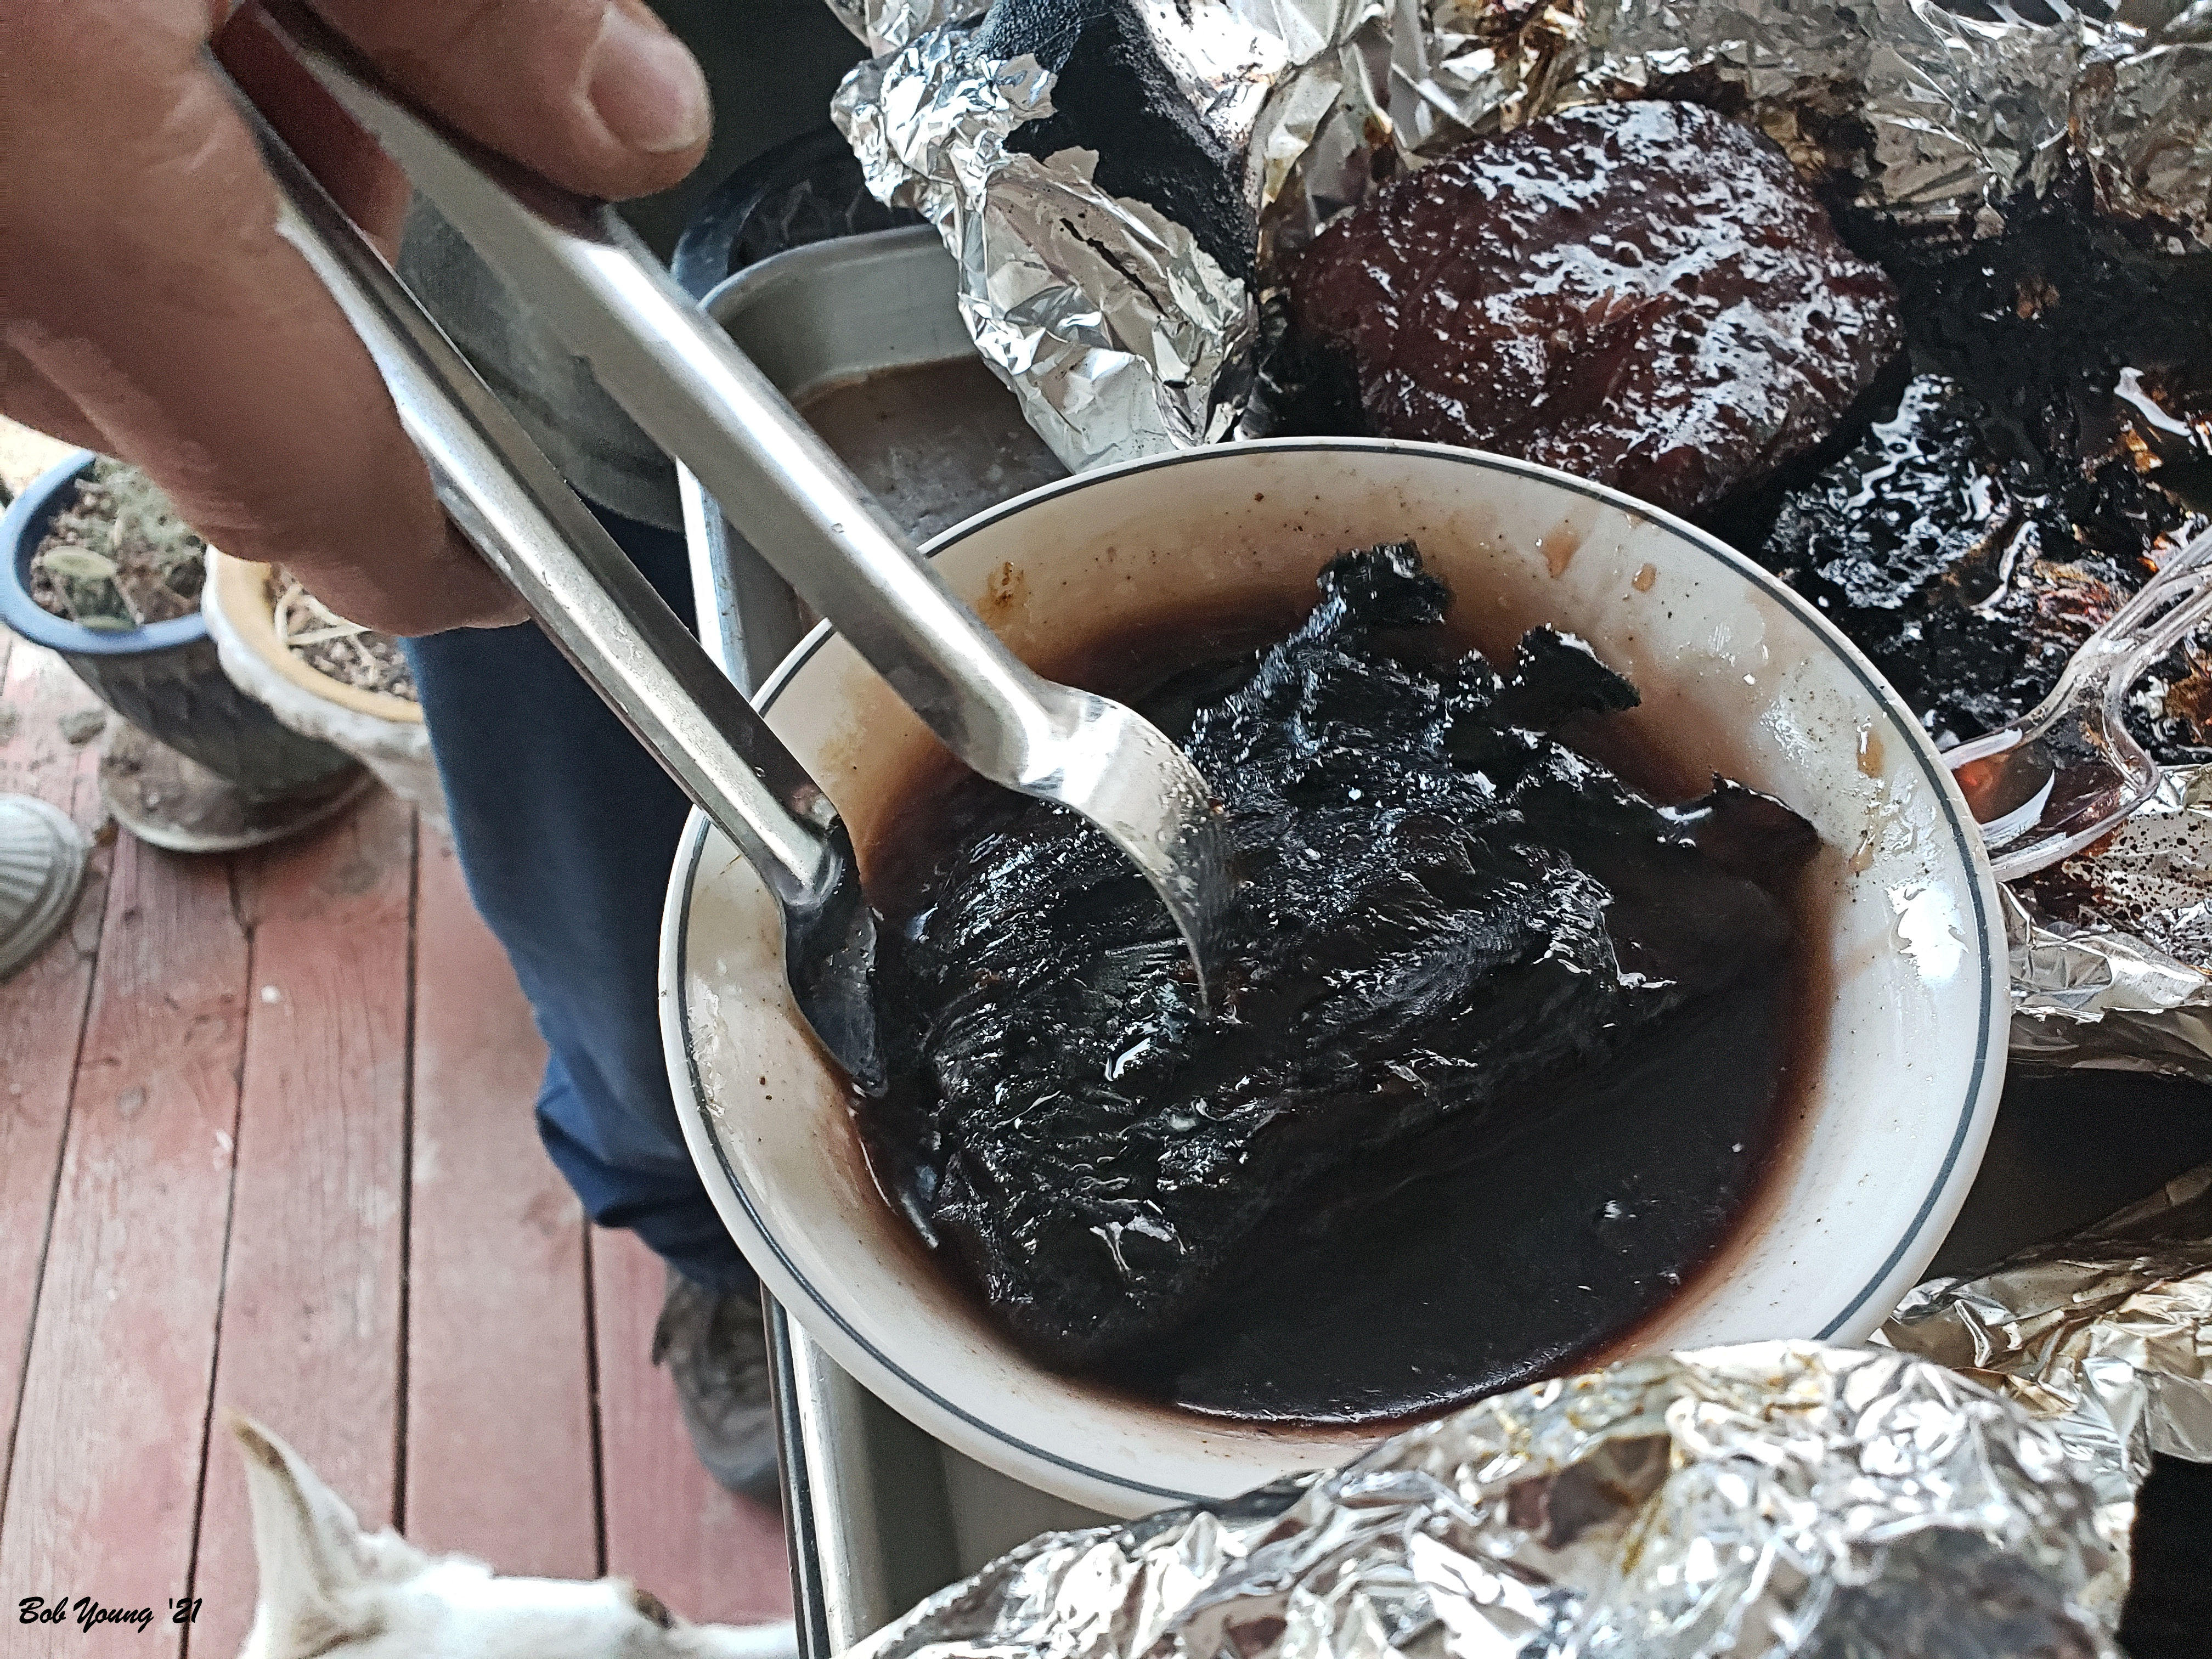
This is by far one of the best CS Brisket that I have made in a long time. Perfect smoke ring and awesome flavors using the rub that is included in the recipe. I love it in sandwiches – pictured here – or just to “nibble” on. It takes some time, but is well worth itt. Just remember to use a very sharp knife to slice it thin, almost shaved. Give it a try.
As many of you know, I have a lot of resources that I use in this blog – recipes, suggestions, food items, kitchen products, etc. Here is a list of ten items that I always have in my kitchen. This list comes from My Recipes
Onion
White, yellow, or Vidalia, I’ll always have one kicking around. I caramelize them for tarts, build massive pots of black and white beans around them, and throw them into guacamole.
Garlic
Like ebony and ivory, these two (of course!) go together. I love to roast the whole head and use the sweet, smashed cloves on bread or spun into pasta. And in the event that I made too much pasta, I’ll sauté a small smashed clove in butter or olive oil the next day, discarding the clove and tossing leftover noodles quickly in the infused oil, then dolloping the whole shebang with crème fraîche.
Lemon
Ideally one has both limes and lemons, but as bartender Joaquín Simó of New York bar Pouring Ribbons expressed it to me, “Lemons are sour, and limes are tart.” Lemon juice adds a real punch of acidity to a dish, whereas lime sort of nudges it down a tart path. I use lemons to stuff chickens and deglaze their pans for easy gravy. I squeeze them into homemade bourbon sours and over pasta. If a dish is lacking something, I ask myself if it’s lemon.
Tuna
Everyone has their emergency canned protein, and props to those of you who bust out high-quality anchovies and salmon as your go-to snacks, but I always have good tuna on hand, splurging on Genova or Cento packed in olive oil when I can. It makes for instant snacks or—if I have bread—tuna melts when I walk in the door ravenous, and I’ve been playing around with layering it into pasta with olive oil, capers, and roasted garlic. (Yum!)
Butter
I’m a New Englander, and even at my most broke in this life—my pants had holes; I couldn’t afford health insurance—I’d buy good, unsalted, European butter. These days some domestic butters are just as lovely, and the price has gone, blessedly, way down.
Olive oil – Greek and Italian
Yes, this list is heavy on proteins and fats, which testifies to the foods that power me; I’d fight you for cheese, but never for a box of pasta. My belly rumbles when I’ve had biscuits or French toast for breakfast, but not when I’ve wolfed a few tablespoons of cannellini beans sautéed in olive oil with onions and garlic and seasoned with lemon.
Salt
An acquaintance, observing my twitchy salt trigger hand at the table, once joked that I should have a salt lick installed in my home. I’m a big fan. I love that you can season lightly at the beginning of cooking in order to cut down on how much you need later. (Pasta water, for example, should be seasoned with at least a tablespoon.) I always have Kosher and sea salt on hand, and sprinkle the latter liberally on eggs and avocados.
Cheese
It was only when I attended the Vermont cheesemakers’ festival many years ago that I felt truly at home in this world. Here were bearded men holding babies and arguing about the difference between 18-month and 30 month Comté; there were women tipping back beer while debating the merits of Brillat-Savarin and Camembert. I’ll always have a knob of cheddar, some twisty, stringy Oaxacan cheese, or a fresh cheese in my fridge.
Coffee
Because life is short, and it’s best to stay alert to catch it all. I have learned the hard way not to leave the house without coffee, as I am not a good person without it in my system. These days I stock up on locally roasted, chocolatey Ethiopian Forty Weight beans.
Beans
Cheap, cheerful, and plentiful in my Mexican-American neighborhood, beans are a major staple in my home. Ideally I have a bag of cannellini and another of black, which are less expensive and lighter than the heavy pre-soaked, pre-cooked beans, but I like to have those, too, for those hangry, rushed weeknights that sideswipe all of us.
And many readers of this blog have trouble making a good gravy. Even I do, at times. Here, from the same source is how to make gravy.
Step One: Choose Your Gravy Style
As much as we absolutely sympathize with the urge to guzzle gravy by itself, it is admittedly a finishing sauce, not a complete meal on its own. Therefore, it’s important to consider what style of gravy you’d like to go for; that means, ultimately, considering what kind of foods the gravy will be topping. It also means considering whether you have the ingredients on hand to make the base flavor behind most gravies. For white gravy, you’ll want butter, milk, ample salt and pepper, and possibly pork fat. For brown gravies, you’ll want some sort of stock, and ideally, fat drippings and browned bits from recently cooked meat. If you or your dinner guests are vegetarian, you can use vegetables that impart a good bit of umami flavor, like mushrooms or onions. Those ingredients can also be used to amplify your meaty gravies.
You’ll also want to think about whether you want a smooth finish to your gravy, or if you’re fine with meaty bits in the sauce. If you’d rather a gravy that mimics store bought, you’ll need to use a sieve to strain out any pieces of meat, onion, or mushroom that might be roughing up the gravy’s finish.
Step Two: Make Your Roux
Making roux is the most critical step to making a good gravy. To many home cooks, it’s also the most nerve-wracking; though it’s not nearly as intimidating a process as it might seem at first. Once you master it, you’ll open yourself up to a lot of other culinary possibilities, like bechamel and hearty stews. To make a roux, you’ll need two things: fat and some sort of thickening agent. Usually, that agent is flour, but cornmeal or cornstarch can also be used, as demonstrated in Uncle Ellis’ recipe listed above. You can also use seeds and nuts (like pine nuts) to thicken your roux, as long as you grind them into a paste first. This method may still require some flour, however.
To make a roux, warm a couple of tablespoons of butter, bacon drippings, or some other form of fat into a pan over medium-high heat. Once the fat is warm, add in your thickening agent, one tablespoon at a time. Stir the mixture until it begins to brown. If you’re making a country or white gravy, you’ll want it to just barely change colors; it’ll smell slightly nutty and have the texture of wet sand. If you’re making a brown gravy, let the roux cook for a little longer. Just don’t let it get too brown; the more a roux cooks, the less thickening power it has. Dark brown roux is best used in dishes with thinner sauces, like gumbo.
After you’ve cooked your roux, slowly add in your liquid. For white gravies, this would be milk; for brown, this would usually be a stock of some sort. Make sure to add your liquid slowly—less than a quarter of a cup at a time is fine. Stir constantly while you’re adding it, too; if possible, you might even want someone else to slowly pour while you stir. The goal is to emulsify the liquid with the hot roux for a smooth gravy that has minimal lumps. If the liquid is added too quickly, the gravy won’t thicken properly.
If something is going wrong with your roux or you’re feeling a little nervous about making one, check out this troubleshooting guide. It’ll take you through the most common mistakes. Adding hot liquid to a hot roux (or cold liquid to a cold roux), for example, will result in a lumpy mess, which is why you want to use cold liquids when using the stovetop roux-making method. And if roux-making ends up becoming one of your most-hated kitchen activities, it’s worth mentioning that roux can absolutely be made up ahead of time. Just keep it in a container in the fridge, and make sure only to add it to hot liquids so that you’re spared the lumpy gravy that results from the temperature mistake mentioned above.
How to Make Brown Gravy
Brown gravy is one of the most universally applicable forms of gravy. For this recipe, you’ll want to gather fat drippings; these can be collected (and stored for later use) the next time you make a roast, cook a turkey, or simply fry up some bacon in the morning. If you don’t have enough (or any) animal fat, you can also, of course, just use butter. It won’t be quite as flavorful as drippings, but it will absolutely still do the job.
Once you’ve made your roux, you’ll want to add your liquid to finish your brown gravy. Oftentimes, this will be the stock or any thinner drippings you may have still from your roast, but you can also use canned or boxed stock to finish off your gravy. Add the liquid to your pan slowly, and stir constantly until the sauce coats the back of your spoon. After about three to five minutes, your gravy should be ready to serve.
How to Make Mushroom Gravy
Mushroom gravy follows almost exactly the same process as brown gravy. After adding a chicken (or vegetable) stock and thickening the gravy, however, you will want to add sauteed mushrooms and shallots to the sauce. If you’re looking for even more flavor (and you’re using meat products), consider sauteeing the mushrooms and shallots in your pan drippings before you make your roux. Remove them from the pan, and then proceed to the next step. You’ll come out with an even more full-bodied gravy that’s perfect for your next steak or stroganoff.
How to Make Onion Gravy
As with mushroom gravy, onion gravy is yet another variation on the classic brown finishing sauce. With this variation, however, it’s worth considering whether you’d like a creamier consistency; as noted in the Caramelized Onion Gravy recipe above, milk makes for a great addition to this gravy variant. If you’re looking for an even easier way to incorporate onions into your gravy, sprinkle them with flour after softening them in the pan, and then proceed to make your roux. The flour-covered onions will help you get your gravy to the dinner table even faster.
How to Make Fruit-Infused Gravy
We know—the idea of fruit-flavored gravy might sound bizarre. But when paired with the right entree, it can be the perfect accompaniment. For this variation, you’ll want to cook a fruit base that compliments your final dish; apple cider can be reduced into a great gravy, but tangerines, cherries, and cranberries would also be a delicious accents to a holiday feast. Once you’ve made a fruit juice that suits your taste, combine with stock, if desired, and add to your roux.
How to Use Beer, Wine, or Spirits to Make Gravy
Whiskey, sherry, wine, and beer can all make for fantastic gravy flavors. And if you’re ambitious, they can also do the duel job of serving as a marinade for your meat. To incorporate alcohol into your gravy, decide whether you would like to add it cold to an already finished gravy, or whether you would like to use it as a cooking liquid first. If the former, make roux as described above and slowly whisk in a quarter cup to a 1 ½ cups of your desired brew. If you’d like to use your gravy as a marinade first, however, cook your meat (either in a slow cooker or on the stove) until tender in a mixture of your chosen alcohol and stock. Remove the meat and strain out any bits that may still remain in the sauce; add the alcohol and stock mixture to a pot, heat it up, and stir in flour a tablespoon at a time. Soon, you’ll have a custom gravy that highlights the flavors you initially imparted into your entree.
How to Make Tomato Gravy
If you love tomatoes, then you’ll adore a gravy that incorporates the sweet, acidic fruit. For this gravy, add tomatoes to your drippings and cook them thoroughly. If they’re whole tomatoes, make sure the skin blisters before breaking them open. Then, once your tomatoes are cooked down and seasoned, add in flour to thicken your sauce. Serve over burgers, pork chops, biscuits, or anything else that you’d prefer topped with tomato-y goodness.
How to Make Redeye Gravy
Redeye gravy is a Southern delight that doesn’t get its due. The caffeine-infused sauce is great when served over country ham and biscuits, and it’s also a great alternative topper for country-fried steak. To make redeye gravy, cook chopped up bacon and ham in butter, along with some onion and garlic, if desired. Add flour and cook your roux, then slowly mix in milk, broth, and cooled, already brewed coffee. Pepper to taste, and feel free to add in some chopped chives or cayenne if you like.
How to Make Egg Gravy
Another Southern staple, giblet gravy is great when dripped over mashed potatoes or bits of turkey. The addition of hard-boiled egg also adds intrigue and flavor to this gravy variation. For this recipe, make gravy using chopped up turkey giblets and turkey neck. Leave these bits in, if desired, once the gravy has thickened. Slice and stir in a hard-boiled egg before serving.
How to Make Country Gravy
Sausage gravy is a comforting treat that every home cook should learn how to make. For great, at-home sawmill gravy, brown some sausage (or use a plant-based meat or textured vegetable protein). If needed or desired, add some butter for extra fat. Then, add some flour to the pan, cooking your roux while adding salt and pepper. Next, slowly stir in milk to finish the gravy off. Cook until thick, and serve over biscuits, mashed potatoes, country-fried steaks, or whatever else you think could use a savry, decadent topping. If you like a little extra spice with your gravy, consider stirring in a can of Ro-Tell tomatoes for an even tastier treat.
How to Make Gravy with Chocolate
Appalachian readers may already be familiar with chocolate gravy—a sweet, thickened sauce that’s sometimes served over biscuits. But if you haven’t had a chance to try it yourself, there’s no time like the present. For this recipe, melt butter in a pan and then whisk in flour, sugar, salt and cocoa powder. Then, slowly add in milk once the roux has cooked. You’ll end up with a thick, chocolatey sauce that’s obviously different from the gravies you may be accustomed to, but no less delicious.
If you’re a fan of Mexican food, then you may prefer a mole inspired version of gravy. For this recipe, you’ll want to make a turkey giblet stock that incorporates toasted chiles (preferably ancho chiles, but use whatever you like best). Once you make a stock using turkey fat, or some other available fat, pour in some of your chile-infused broth, thicken the gravy, and stir in about two ounces of dark chocolate after removing your pan from the heat, along with about a tablespoon of balsamic vinegar. Serve and enjoy.
How to Make Gravy Even Easier
Gravy isn’t exactly time-consuming to make, but if you need to whip up a delicious gravy at the last minute, we have a few hacks for you. For one thing, you can dissolve a bouillon cube in water and use that for stock, if you’re out of the real thing. You can also use poultry seasoning to punch up a gravy made without drippings. And if you’ve got some extra biscuits around, but no time to make a true sawmill gravy, then add some crumbled up biscuits, hot sauce, and seasonings to a blender. Heat up about a cup of milk for each biscuit you use, then add that hot liquid to a blender, cover the top with a towel, throw in some butter, and hit puree. You’ll have an instant gravy that you can immediately serve over your entree.
Aebleskivers are a type of pancake cooked in a special stove-top pan with half-spherical molds. The center is soft and fluffy, almost creamy. The crust is crisp and browned. In Denmark, aebleskivers are traditionally plated in threes, dusted with powdered sugar, topped or filled with tart jams of Nordic berries and served with mellow Scandinavian coffee. There, aebleskivers ( may be pronounced as “eb-el-ski-ver” , “a-bla-ski-va”, “eb-el-sku-wyr” , “ebb-ull-skee-vers” or “able-skEEvers”) have typically not been served in restaurants or for breakfast, but rather at the family table for afternoon coffee breaks. On long and cold Nordic winter evenings, they are served with glögg. In the wintertime, aebleskivers are often sold by street vendors. A symbol of community and hospitality, they are very popular at Scandinavian charity and open-air events.
There are many recipes for the batter, but they generally fall into two categories: those made with baking soda (or baking powder) as a leavening agent, or those made with yeast. The batters vary in texture and flavor — and yeasted batters take a bit more patience to prepare and will expand more in the pan — and which you prefer is a matter of personal taste … Here’s a little of Aebleskiver history:…. During that time of the Vikings, when they roamed the coastal waters of England and the Atlantic, one band of these rough Vikings was hard hit in battle. As they returned to their ship with dented horn helmets and shields, they made pancakes to regain their strength. They didn’t have proper cookware so they greased their dented shields and poured the batter on them over a fire. The first aebleskivers were born. (So they say:)…) [http://www.aebleskivers.com/history.html]
Cast Iron Aebleskiver Pan and Turners
Aebleskivers in Coeur D’Alene, ID describe these treats as Danish meaning apple slices. These are traditional Danish pancakes in a distinctive shape of a sphere. Maybe a cross between a Beignet and a Funnel Cake, without all the grease! So maybe all of this will convince you to try these sweet treats. If so, here is the recipe we use. Enjoy! CS Danish Aebleskiver.
Here is our first try. Homemade Huckleberry and Raspberry Jams. Scrambled eggs, too.
And if you want some great polenta recipes – Idaho grows awesome polenta – look here: 17 Polenta Recipes.
I have a new Air Fryer – actually several – recipe posted at Air Fryer Recipes on this blog and permanently listed above under Air Fryer Recipes. There is something that you should know before you try any of these recipes – and we hope you do and leave a comment – we DO try and work on ALL of the recipes in any of these locations and adapt them to our liking! Ideas come from many locations and resources – other food blogs, recipe connections, Food Network, PBS TV Recipe Saturday and many more.
And another note: The Boise Farmers Market (BFM) moves to it’s new location at Shoreline Drive and Americana Blvd on Saturday April 6, 2019! It’s been a long time in the works. Many, if not most of the produce and products sold at the market, work extremely well with the Air Fryer, and Instant Pot, recipes listed on this blog. See you at the Market! And from their email posting –
The Boise Farmers Market opens in TWO short weeks
on Saturday, April 6th! Join us for our Grand Opening Celebration
and all the goodness of Spring!
Parking and Navigating our New Lot!
The map below is of our new lot and the surrounding streets. Please take a couple minutes to look at it, familiarize yourself, and plan how you will arrive at the market. Safety for our community, customers and vendors is the most important thing. Please be extra careful!
Please note:
Directional arrows on the streets, entrances and exits.
There are light poles on the lot – be careful to watch for them when parking – especially when backing up.
Pedestrians! Scooters! Bikes! There will be pedestrians, scooters and bikes everywhere. Please look twice, or even three times!
5 Miles Per Hour is the parking lot speed limit. Please drive slowly.
When you are walking to the market entrances, please watch for cars.


 And if you are doing a BBQ or Grilling – we love St Louis Style Pork Ribs grilled – then try Eric’s Rib Sauce to slather on the ribs and to use as a dipping sauce. It is awesome!
 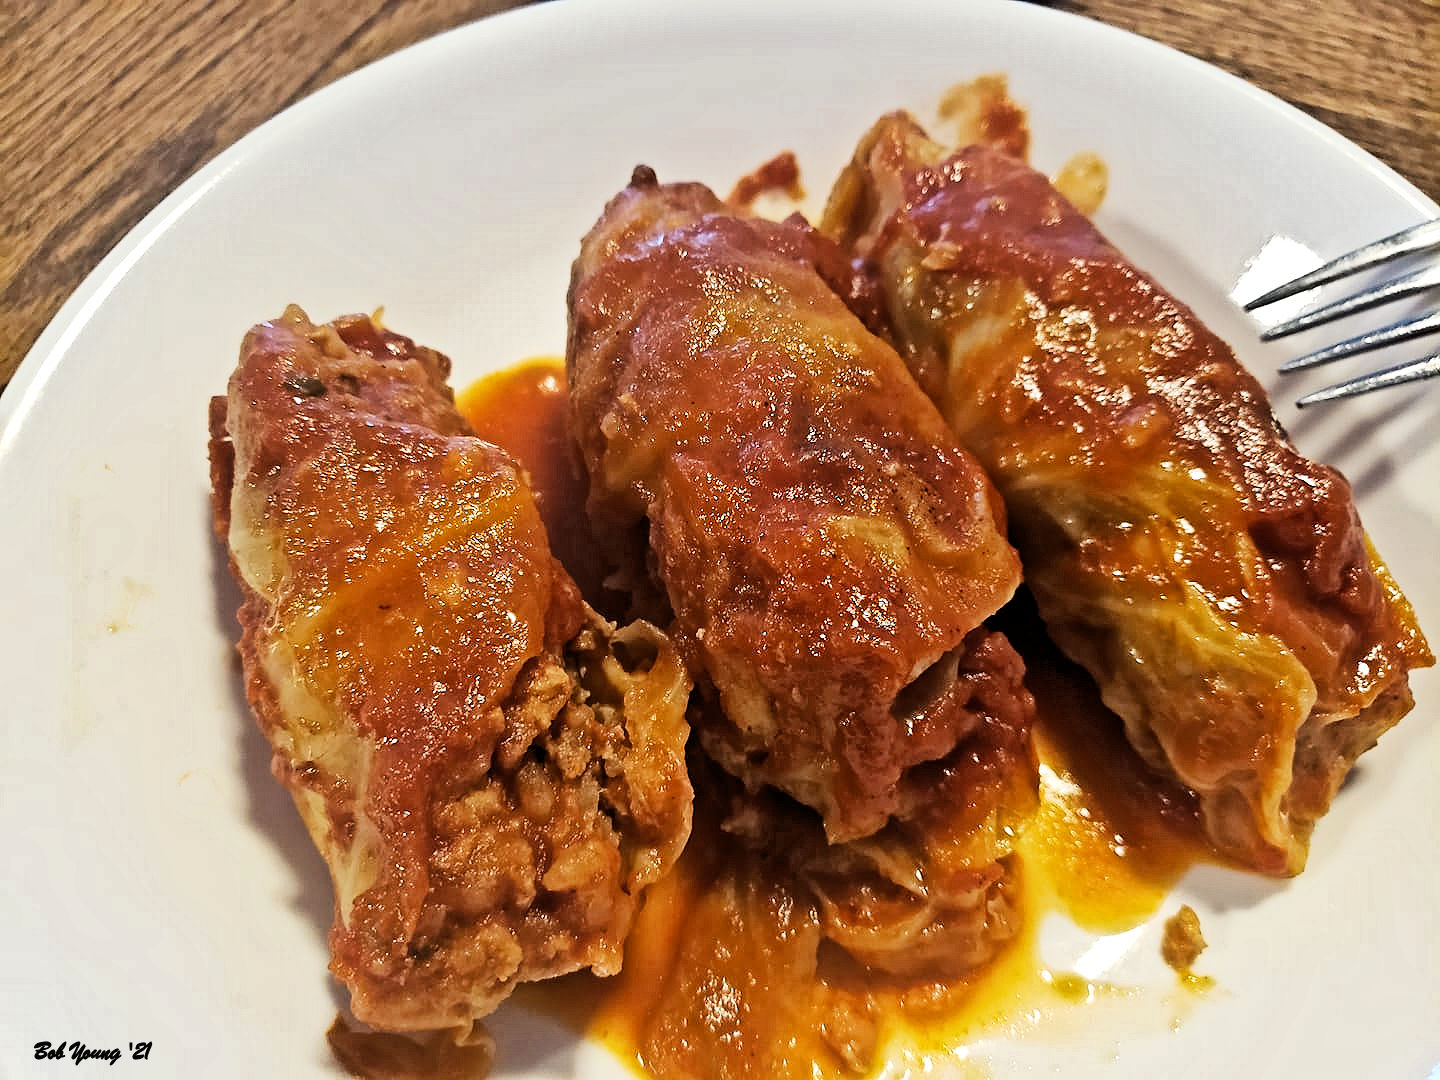 And then there is Halupki. A Ukrainian stuffed cabbage leaves that means “little pigeons”.
 And now some dessert! How about Pecan Shortbread Cookies? Yum. To give the pecans some extra flavor, roast them on s sheet pan in the oven at 350 degrees F for 8 minutes. Watch them – Don’t let them burn. Here is the recipe. Enjoy.