• About and Contact
  • Air Fryer Cooking Charts and Conversions
  • Air Fryer Recipes – Update: August 2020 – Chicken Olivia
  • Barcode Country List
  • Boise Foodie Blog Recipes – Updates: Nov 2024 Basic Hollandaise Sauce and Cream of Mushroom Soup
  • Boise Restaurant Guide – 52 Restaurant Choices! Updated: July 2018
  • Companion Garden Planting
  • Instant Pot Recipes – Update August 2020 – IP Chicken with Ketchup, Honey and Soy
  • Recipes from the Captain’s Shack: Dec 2020 – CS Prime Rib

Boise Foodie Guild

~ – Enjoy a meal or a recipe with us! Be sure to check the Sidebar and Menu above. Interesting resources are listed there. Most are hot links. Air Fryer (AF), Instant Pot (IP) and Captain's Shack (CS) recipes now have their own page. Subscribe to the blog. It's still FREE!

Boise Foodie Guild

Category Archives: Recipes

Roasted Turkey in 70 Minutes

16 Monday Nov 2009

Posted by Bob and Robin in Food, Interesting Information, Local Farmers Markets, Recipes, Things To Do

≈ Leave a comment


Actually, yes you can!! Robin and I made one of these turkeys yesterday, as a preliminary trial for Thanksgiving, coming up soon. The style of cooking is called spatchcocked. “Really, “spatchcocking” is just a fancy term for cooking a whole turkey or chicken by removing the backbone and splaying the bird out flat.
Spatchcocked Turkey

Spatchcocked Turkey

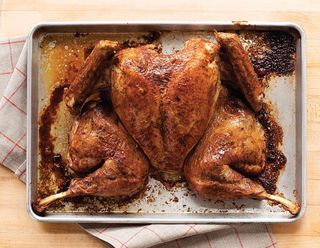
And it’s that simple. Really! Just cut along the both sides of the turkey’s backbone to remove it (use sturdy kitchen scissors). Flip the bird over and flatten it by breaking the breast bone. Brush the bird with olive oil, salt and pepper…Just 70 minutes later (you’ll want to baste it halfway through), you’ll have a perfectly cooked bird.

There are actually a few additional benefits to spatchcocking, in addition to the quick cooking time

–Space. Flattening the turkey out like this makes a lot more room in your crowded Thanksgiving Day oven.
–Carving. With the backbone out of the way, it’s much, much simpler to carve the bird when it’s time to serve it.
–Taste. We actually thought the meat turned out better tasting and more moist than with a traditional roast turkey. And the skin crisped up to golden perfection.” (http://thebittenword.typepad.com)

Roasted Turkey in 70 Minutes

Serves: 8 – 10
Ingredients: (Oil Mixture)
2 T Extra-Virgin Olive Oil
1 T coarse Salt
1 t freshly ground Pepper
1 whole fresh turkey (about 12+ pounds)
Our Suggestion: Add your favorite spices to this mixture: Sage, Thyme, Rosemary, etc.

Directions:
1. Preheat oven to 450°F. Stir together oil, salt, and pepper in a small bowl.
2. Rinse inside and outside of turkey; pat dry with paper towels. Spatchcock turkey*. Transfer to a rimmed baking sheet, breast side up. Let stand for 30 minutes.
3. Brush or rub turkey all over with oil mixture. Roast, rotating sheet halfway through and basting twice, until an instant-read thermometer inserted
into the thickest part of the thigh reaches 165°, about 1 hour and 10 minutes. Let stand for 20 minutes before carving.

*Spatchcocking: (See photo above)
1. Cut out the backbone. Start with the turkey breast side down. Use poultry shears to cut along both sides of the backbone, beginning at the tail end. If you hit a tough spot, try cutting with just the tip of the shears.

2. Open the turkey. Set aside backbone (and giblets) for stock. Take hold of both newly cut edges, and open the turkey. Remove any large pieces of fat. Turn the turkey, breast side up.

3. Break the breastbone. Place your hand on one side of the breast, close to the breastbone, and push down firmly until you hear a crack. Repeat on the other side. (For better leverage as you work, stand on a step stool.)

4. Flatten the turkey. Pull the thighs outward so the turkey lies flat, with the wings facing inward. Tuck the wing tips under to secure.

5. Brush with oil. Place the turkey on a rimmed baking sheet. Let stand for 30 minutes. Use a basting brush to apply oil mixture.

How To Carve:
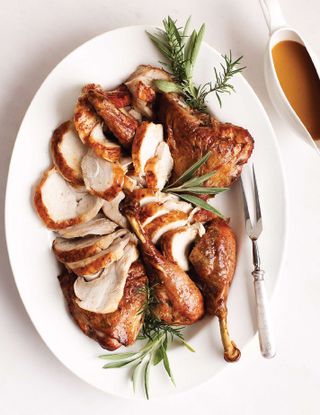
A spatchcocked turkey requires a slightly different carving technique than a bird cooked the traditional way, but the basic approach remains
the same: Remove the legs and wings, and then slice the breast meat.

1. Cut legs from breast. With a sharp chef’s knife, remove each leg by cutting through the turkey where the thigh connects to the breast.

2. Separate drumsticks and thighs. At the joint of each leg, cut drumstick from thigh. Transfer thighs and drumsticks to a warm platter. Tent with foil.

3. Cut wings and breast. On one side, find the joint connecting wing and breast, and cut through it (not shown). Repeat to cut off other wing. Cut breast meat into two pieces, slicing along either side of breastbone.

4. Slice breast meat. Slice the breast meat across the grain. Arrange on the platter with the dark meat, and add the wings.

——————————

The photos are from Martha Stewart Living and the article came from The Bitten Word. This goes great with a 2008 Bedrock Wine Co. Cuvee Caritas White Wine, Sonoma County (55% 100 year old Semillon from Monte Rosso and 45% Sauvignon Blanc from Kick Ranch Vineyard) and a super gravy made from Madeira. (The gravy recipe can be found on this blog)

We found this turkey to be extremely moist and succulent. And the interesting thing is that it really is easy to do and very fast cooking. It has a wonderful flavor and moistness eaten cold in sandwiches or for “nibbling”. The skin is crusty and wonderful. That’s it. Cheers!

Reblog:

  • Email a link to a friend (Opens in new window) Email
  • Share on Pinterest (Opens in new window) Pinterest
  • Share on Facebook (Opens in new window) Facebook
  • Print (Opens in new window) Print
  • More
  • Share on X (Opens in new window) X
  • Share on Instagram (Opens in new window) Instagram
Like Loading...

Holiday Foods Part II

13 Friday Nov 2009

Posted by Bob and Robin in Recipe By: Robin Young, Recipes, Things To Do

≈ Leave a comment


Here is the second installment.

Roast Turkey with Madeira Gravy

From EatingWell.com

This gorgeous herb-rubbed turkey- complete with luscious gravy- is the quintessential holiday centerpiece. It is particularly fitting for Thanksgiving because Madeira, a fortified wine from the Portuguese island of the same name, flowed like water through the Colonies, having arrived here as ballast in ships. Sweet and mellow, reminiscent of sherry, Madeira beautifully enhances a turkey gravy.

Yields: Makes 8 servings, about 3 ounces each, with leftovers

Ingredients:
1/4 c Parsley, fresh and chopped
2 T Thyme, fresh and chopped
2 T Rosemary, fresh and chopped
2 T Shallots, finely chopped
1 T Extra-Virgin Olive Oil, (for turkey)
Salt and freshly ground pepper to taste
1 (12- to 14-pound) Turkey, with giblets
1 Onion, peeled and quartered
1 1/2 t Extra-Virgin Olive Oil, (for gravy)
1 Onion, coarsely chopped
2 Carrots, chopped
2 stalk(s) Celery, chopped
3 c Chicken Stock
1/4 c dry White Wine for basting
1/2 c Madeira
1 1/2 T Cornstarch mixed with 2 tablespoons water

Directions:
1. Set oven rack in the bottom of the oven and preheat to 325 degrees F. Set a wire roasting rack in a large roasting pan and coat the rack with cooking spray.

2. To prepare turkey: Combine parsley, thyme, rosemary, shallots and 1 tablespoon oil in a small bowl. Season with salt.

3. Reserve giblets and neck for the stock; discard the liver. Remove any visible fat from the turkey. Rinse it inside and out with cold water and pat dry. Season the cavity with salt and pepper and place onion in cavity.

4. With your fingers, separate the turkey skin from the breast meat, taking care not to tear the skin or pierce the meat. Smear the herb mixture between the flesh and the skin on both sides of the breastbone. Tie the drumsticks together and tuck the wing tips behind the back. Set the turkey, breast-side up, in the prepared roasting pan and tent with foil.

5. Roast the turkey for 2 hours.

6. To prepare giblet stock: Heat 1 1/2 teaspoons oil in a large heavy saucepan over medium heat. Add chopped onion, carrots, celery and the turkey neck and giblets. Cook, stirring occasionally, until well browned, about 15 minutes. Pour in broth and bring to a boil. Reduce the heat to low and simmer, partially covered, for 30 minutes. Strain the giblet stock through a fine sieve (you should have about 2 cups). Chill until ready to use.

7. After the turkey has been in the oven for 2 hours, remove the foil and continue roasting, basting with white wine from time to time, until an instant-read thermometer inserted into the thickest part of the thigh registers 180 degrees, 45 minutes to 1 1/4 hours longer. Transfer the turkey to a carving board. Cover loosely with foil and let rest for 20 to 30 minutes before carving.

8. To prepare gravy: While the turkey is resting, pour the drippings from the roasting pan through a strainer into a small bowl, then place the bowl in the freezer for 20 minutes to solidify the fat. Add Madeira to the roasting pan and cook, stirring and scraping up any brown bits, for about 1 minute; strain into a medium saucepan. Skim the fat from the giblet stock and add the stock to the pan. Skim the fat from the chilled pan juices and add the juices to the pan as well. Bring to a simmer. Add the cornstarch mixture to the simmering sauce, whisking until the gravy has thickened slightly. Season with pepper.

9. Remove strings from turkey and carve, discarding the skin. Serve with the Madeira gravy.

Tips & Techniques:
Madeira, a fortified wine from the Portuguese island of Madeira, has a sweet, mellow flavor somewhat like sherry. Find it at liquor stores or in the wine section of the supermarket.

—————————–

And for those pies you are going to make, try this crust, or check with Jerri!!

Pie Pastry

From EatingWell.com

Whole-wheat pastry flour contributes a pleasant nutty flavor to an all-purpose pie dough and ensures a tender result.

Yields: Makes about 14 ounces dough, enough for one 9- to 11-inch pie or tart.

Ingredients:
3/4 c Whole-Wheat pastry flour
3/4 c All-Purpose flour
2 T Sugar
1/4 t Salt
4 T cold Butter, cut into small pieces
1 T Canola oil
1/4 c Ice Water, plus more as needed
1 lg Egg Yolk
1 t Lemon juice or white vinegar

Directions:
1. Whisk whole-wheat flour, all-purpose flour, sugar and salt in a medium bowl. Cut in butter with a pastry blender or your fingers until the mixture resembles coarse crumbs with a few larger pieces. Add oil and stir with a fork to blend. Mix 1/4 cup water, egg yolk and lemon juice (or vinegar) in a measuring cup. Make a well in the center of the flour mixture. Add enough of the egg yolk mixture, stirring with a fork, until the dough clumps together. (Add a little water if the dough seems too dry.) Turn the dough out onto a lightly floured surface and knead several times. Form the dough into a ball, then flatten into a disk. Wrap in plastic wrap and refrigerate for at least 1 hour.

—————————–

Well, that’s about all for now. Headed down to Sweetwater’s Tropic Zone on 10th Street for dinner. Cheers!

Reblog:

  • Email a link to a friend (Opens in new window) Email
  • Share on Pinterest (Opens in new window) Pinterest
  • Share on Facebook (Opens in new window) Facebook
  • Print (Opens in new window) Print
  • More
  • Share on X (Opens in new window) X
  • Share on Instagram (Opens in new window) Instagram
Like Loading...

Pull-Apart Buns for Thanksgiving

13 Friday Nov 2009

Posted by Bob and Robin in Food Prep, Recipes, Things To Do

≈ Leave a comment


From King Arthur Flour, I received the following recipe.

Golden Pull-Apart Butter Buns

At last! The quintessential soft, buttery dinner roll. Nestled — we might even say “crowded” — into a couple of 8″ round pans, the shaped buns rise into one another as they bake. The result? Soft-sided pull-apart buns, ready for melting pats of soft butter.
Read our blog about these buns, with additional photos, at Bakers’ Banter.

Ingredients:
Buns
3 1/2 cups King Arthur Unbleached All-Purpose Flour
2 teaspoons instant yeast
2 tablespoons potato flour or 1/4 cup instant potato flakes
3 tablespoons Baker’s Special Dry Milk or nonfat dry milk
2 tablespoons sugar
1 1/2 teaspoons salt
4 tablespoons soft butter
2/3 cup lukewarm water
1/2 cup lukewarm milk
1 oz melted Butter

Topping
2 tablespoons melted butter

Directions:

1) Combine all of the dough ingredients in a large bowl, and mix and knead — using your hands, a stand mixer, or a bread machine set on the dough cycle — to make a soft, smooth dough.

2) Place the dough in a lightly greased container — an 8-cup measure works well here — and allow the dough to rise for 60 to 90 minutes, until it’s just about doubled in bulk.

3) Gently deflate the dough, and transfer it to a lightly greased work surface.

4) Divide the dough into 16 equal pieces, by dividing in half, then in halves again, etc. Round each piece into a smooth ball.

5) Lightly grease two 8″ round cake pans. Space 8 buns in each pan. Can you use 9″ round cake pans, or a 9″ x 13″ pan? Sure; the buns just won’t nestle together as closely, so their sides will be a bit more baked.

6) Cover the pans, and allow the buns to rise till they’re crowded against one another and quite puffy, about 60 to 90 minutes. Towards the end of the rising time, preheat the oven to 350°F.

7) Uncover the buns, and bake them for 22 to 24 minutes, until they’re golden brown on top and the edges of the center bun spring back lightly when you touch it. An instant-read thermometer inserted into the middle of the center bun should register at least 190°F.

8) Remove the buns from the oven, and brush with the melted butter. After a couple of minutes, turn them out of the pan onto a cooling rack.

9) Serve warm. Store leftovers well-wrapped, at room temperature.

Yield: 16 buns.

Well, they look good. Try them. Cheers!

Reblog:

  • Email a link to a friend (Opens in new window) Email
  • Share on Pinterest (Opens in new window) Pinterest
  • Share on Facebook (Opens in new window) Facebook
  • Print (Opens in new window) Print
  • More
  • Share on X (Opens in new window) X
  • Share on Instagram (Opens in new window) Instagram
Like Loading...

Green Olive Soup

11 Wednesday Nov 2009

Posted by Bob and Robin in Food, Recipe: Bob and Robin Young, Recipes

≈ 3 Comments


I know, just don’t go there. This is a surprisingly good soup and one that would probably go well with the Braised Lamb Shanks below. The first time we had this was with Gary Dixon, RN. Nu? Gary passed away several years ago, so this recipe is in his memory. It has really taken that long to find the recipe. Do try it. For some reason, I have the opinion that this is a traditional Middle East soup. Maybe I got that from Gary. Who knows.

——————————
Green Olive Soup

In memory of Gary Dixon, RN. Nu? Unusual and delicious…if you’re as mad about the unripe fruit of olive trees as me. The soup is a spectacular introduction to a Mediterranean meal. Serve hot to 6-8 people as a first course.

Ingredients:
2 c cracked Green Olives, Mideastern or Greek, soaked in water for an hour, drained, and chopped
2 T Olive Oil
1 Onion, chopped
2 cloves Garlic, chopped
3 T Olive Oil
4 T Flour
⅛ t Cayenne
8 c Chicken Stock or Vegetable Stock
½ c heavy Cream
¼ c dry Sherry
Garnish: minced Parsley

Directions:
1). In a large saucepan, sauté the onions, garlic, and ⅔rds of the olives in the olive oil until the onions are transparent. Puree with 1 cup of stock.
2). Heat oil in the saucepan and stir in flour and cayenne, cooking into a roux. Whisk in remaining stock, then pour in the puree. Bring to a slow boil, let thicken, then reduce heat and simmer for 20 minutes. Stir in cream, pepper, and remaining chopped olives, bring back to a boil, then simmer 5 more minutes.
3). When ready to serve, heat to serving temperature, stir in sherry and cook for a minute, then ladle into bowls. Garnish with generous pinches of minced parsley.

——————————

So there you have an epicurean adventure, but one well worth trying. If not for yourselves, try it for Gary. He’d be extremely happy! Cheers!

Reblog:

  • Email a link to a friend (Opens in new window) Email
  • Share on Pinterest (Opens in new window) Pinterest
  • Share on Facebook (Opens in new window) Facebook
  • Print (Opens in new window) Print
  • More
  • Share on X (Opens in new window) X
  • Share on Instagram (Opens in new window) Instagram
Like Loading...

Lacquered Bacon

09 Monday Nov 2009

Posted by Bob and Robin in Classics, Food, Recipes, Side Dishes

≈ Leave a comment


Ever wonder how the Brick 29 in Nampa, ID made that awesome bacon? Well, from Falls Brand we get the following recipe. Enjoy!

Falls Brand Logo

Lacquered Bacon

Ingredients:
1 lbs Falls Brand Thick Sliced Bacon
3 T Light Brown Sugar, packed
1 T Red Pepper Flakes

Preparation:
Adjust the oven rack to the middle position and preheat the oven to 400° F. Line a rimmed baking sheet with aluminum foil and set a large wire rack in the pan. Arrange the bacon slices on the rack and roast until the bacon renders some of its fat and the slices shrink significantly, about 15 minutes.

Meanwhile, in a small bowl, mix the brown sugar and red pepper flakes. Carefully remove the baking sheet from the oven. Sprinkle mixture over the bacon and return the bacon to the oven and continue roasting until the sugar mixture adheres to the bacon and appears glossy. Serve hot.

Yield: 8 servings

——————————

Here is another stand-by recipe for spareribs from Salmon Creek Farms, part of Falls Brand.

Kansas City Spareribs

Ingredients:
4 lbs Pork Spareribs or Baby Back Ribs
1 c Ketchup
1/3 c Onion, finely chopped
1/3 c Apple Cider Vinegar
3 T Brown Sugar
2 T Molasses
1 T Worcestershire sauce
1/2 t Chili Powder, use more for a spicier mixture
1 t Dry Mustard
3/4 t ground Allspice
1/4 to 1/2 t ground Red Pepper
3 cups wood chips (use hickory or oak chips for the best flavor)

Preparation:
BBQ Sauce:
In small saucepan, combine ketchup, onion, vinegar, brown sugar, molasses, Worcestershire sauce, chili powder, mustard, allspice and red pepper. Bring to a boil. Reduce heat and simmer, uncovered, for 10-15 minutes or until desired consistency, stirring frequently. Divide sauce into two portions; set aside.

Ribs: At least 1 hour before grilling, soak wood chips in enough water to cover; drain. Cut ribs into 4 portions. In charcoal grill with cover, place preheated coals around drip pan for medium indirect heat. Add 1/2-inch hot water to drip pan. Sprinkle half of the wood chips over the coals. Place ribs, bone side down, on the grill rack over drip pan. Cover and grill for 1 1/2 to 2 hours or until ribs are tender, basting with one portion of reserved sauce the last 15 minutes. Add more preheated coals (use a hibachi or a metal chimney starter to preheat coals) and wood chips; turn ribs halfway through grilling. Serve second portion of reserved sauce with ribs.

Serves 4.
* Note: For gas grills, preheat and then turn off any burners directly below where the food will go. The heat circulates inside the grill, so turning the food is not necessary.

——————————

Well, there you go for two recipes from Idaho farms and businesses. Support the Buy Idaho campaign. It’s well worth it! That’s my opinion. What’s yours? Cheers!

Reblog:

  • Email a link to a friend (Opens in new window) Email
  • Share on Pinterest (Opens in new window) Pinterest
  • Share on Facebook (Opens in new window) Facebook
  • Print (Opens in new window) Print
  • More
  • Share on X (Opens in new window) X
  • Share on Instagram (Opens in new window) Instagram
Like Loading...

What to do?

09 Monday Nov 2009

Posted by Bob and Robin in Appetizers, Classics, Food Prep, Main Dish, Recipe: Bob and Robin Young, Recipes

≈ Leave a comment


I had to make some more of our award winning Citrus Marmalade and, knowing how long it can take to make it, I wanted something to “snack on”. And knowing that Pico de Gallo can actually be several things – an Appetizer, Side Dish or an adjunct to a Main Dish – I made a large bowl of it. We make our own recipe. Here it is:

——————————
Pico de Gallo

Comments: Pico de Gallo can be used as an Appetizer, Side Dish or Main Dish additive. It is a versatile component. A condiment.
Degree of Difficulty: Easy
Servings: 12

Ingredients:
6 lg Roma Tomatoes, cut into chunks
1 bunch Cilantro, chopped
1 lg White Onion, diced
1 lg Avocado, diced
6 cloves Garlic, minced
2 Jalapeno peppers, seeds removed and diced
1 T Mexican Oregano, dried
2 t Cinnamon
3 Limes juiced

Directions:

1). Dice the tomatoes and place in a large bowl. Dice the onion and add to bowl. Chop the cilantro, dice the jalapeno and mince the garlic and add to the bowl. Add the diced avocado. Mix to combine.
2). Add the spices and salt. Squeeze the limes and add the juice to the bowl. Mix until combines. Taste and adjust as necessary.
3). Place the mixture into the refrigerator for at least one hour before serving to marry the flavors. Serve cold with blue corn chips.

Cooking Times:
Preparation Time: 30 minutes
Inactive Time: 1 hour
Total Time: 1 hour and 30 minutes

—————————–

So there you have it, and a repeat for our Citrus Marmalade recipe. Enjoy! Cheers!

Reblog:

  • Email a link to a friend (Opens in new window) Email
  • Share on Pinterest (Opens in new window) Pinterest
  • Share on Facebook (Opens in new window) Facebook
  • Print (Opens in new window) Print
  • More
  • Share on X (Opens in new window) X
  • Share on Instagram (Opens in new window) Instagram
Like Loading...

South India Lamb Curry

31 Saturday Oct 2009

Posted by Bob and Robin in Food Prep, Herbs, Lamb, Recipe By: Bob Young, Recipes, Things To Do

≈ Leave a comment


At least, that’s what it started as. This recipe is adapted from the Food Network’s Tyler Florence. Southern India can have some really spicy, hot foods, more so than the New Delhi area. I changed that spicy hot to more or a medium to low intensity. Look at the recipe and where it calls for Red Pepper Flakes, change that to 1 Fresh Red Chili. Also, when steaming the basmati rice to serve with it, place 2 – 1″ rounds of fresh ginger in with water before adding the rice. The spices used are very traditional. Grinding them fresh adds another dimension to the curry that you will not get with commercially produced curry spice combinations. And finally, if you don’t want to use lamb, I have also had this with goat. Using beef would be truly a non-traditional curry, but it can be used. The recipe only looks involved – actually it is pretty easy to do. Cheers!

Indian Lamb Curry

Serves: 6

Ingredients:
¼ c Extra-Virgin Olive Oil
1½ T Cloves
1½ T Cumin seed
1½ T Fennel seed
1½ T Coriander seed
1½ T Turmeric
1 Cinnamon stick
2 fresh Bay Leaves
10 fresh Curry Leaves
3 lbs Lamb, boned shoulder cut into 1” cubes
¼ t Red Pepper Flakes
2 med Onions, roughly chopped
5 cloves Garlic, peeled
2 T Ginger, fresh and minced
Kosher salt and freshly ground black pepper
5 lg fresh Tomatoes
½ c plain Yogurt, unsweetened natural
½ bunch fresh Cilantro, roughly chopped
1 Scallion, cut into strips
6 c steamed Basmati rice, steamed with 2 rounds of fresh ginger

Directions:
1). Begin by setting a large, heavy-based pot over medium heat. Grind the cloves, fennel, cumin, coriander, and turmeric in a spice grinder. Add oil to the hot pot and pour in the spices. Throw in cinnamon sticks, bay leaves, curry leaves, and chili. Toast for 2-3 minutes until golden and aromatic. While they are toasting, add onion, garlic and ginger to the food processor and pulse until finely chopped.

2). Season cubed lamb with salt and pepper then add to the pot of oil and spices. Brown all over, about 5-7 minutes. Add onion puree and sweat a little to remove some of the moisture – about 8 minutes. Stir with a wooden spoon as you go.

3). Add fresh tomatoes and cover slightly with lid. Reduce heat and simmer for 40 minutes until the lamb is tender. Remove the lid and skim fat off the surface. Fold in the yogurt and simmer for a further 5 minutes.

4). Garnish with chopped fresh cilantro and scallions serve with steamed Basmati rice.

Cooking Times:
Prep – 20 min
Cook – 52 min
Total – 1hr 12 min

Reblog:

  • Email a link to a friend (Opens in new window) Email
  • Share on Pinterest (Opens in new window) Pinterest
  • Share on Facebook (Opens in new window) Facebook
  • Print (Opens in new window) Print
  • More
  • Share on X (Opens in new window) X
  • Share on Instagram (Opens in new window) Instagram
Like Loading...

Biscuits and Sausage Gravy

29 Thursday Oct 2009

Posted by Bob and Robin in Food Prep, Main Dish, Photos, Recipe: Bob and Robin Young, Recipes, Things To Do

≈ 1 Comment


So what does one do in Boise on a cold, “looks like snow” day? We could go to Manleys for Biscuits and Gravy. Oh …. I forgot. Manleys closed about 10 or 12 years ago. Boo Hoo! 4 of their biscuits would fill a pie plate and they were probably 2″ or so high. So, maybe I should make my own. No Bisquick? No problem!!

Fluffy Buttermilk Biscuits

Yield: 12 Biscuits, or so

1¼ c Cake flour
¾ c All-Purpose flour
1½ t Baking Powder
½ t Baking Soda
½ t Salt
¼ lbs Butter, cut into small chunks
¾ c Buttermilk

Procedure:
1. Preheat oven to 500° F
2. Prepare ingredients: Cut butter into small chunks, place in a bowl and return to fridge. Measure out buttermilk and set aside. Sprinkle flour on a work surface and have extra flour nearby for your hands and biscuit cutter. Have biscuit cutter and an ungreased baking sheet handy
3. Mix dough: In a medium-large bowl, whisk together flours, baking powder, baking soda and salt until very well blended. Add butter and cut into flour using a pastry blender, two knives or your fingertips, until mixture resembles coarse crumbs. Pour in buttermilk and stir lightly until dough comes together in a ball.
4. Knead dough and cut biscuits: Dump dough mixture out onto floured work surface. With floured hands, lightly knead dough a few times until it is fairly well blended. Pat out into a circle, ¾ – 1 inch thick. Dip cutter into flour and cut biscuits without twisting the cutter. Form the dough scraps into an extra biscuit-like shape instead of re-rolling the dough. Place cut biscuits together on the baking sheet so that the sides are touching. Brush tops with melted butter, if desired.
5. Bake biscuits: place baking sheet in the middle of a preheated 500° F oven and bake for 8-10 minutes until they are golden brown. Remove biscuits to a wire rack to cool for a few minutes.

——————————

OK, so now I have the biscuits. (I really need to cut them to 1″ thick before baking. They would be higher.) How about an old stand-by: Biscuits and Sausage Gravy? Sounds good to me. Just break up some sausage links, or use ground sausage – I would not use an Italian sausage for this – some butter and flour for a roux, salt and pepper, some nutmeg and whole milk. Mix all together with the sausage until it thickens and serve on the biscuits you just made. A hearty cup of El Pico coffee and you are set!!! What a delightful way to spend this gloomy day (even Buddy is gloomy!). Make some fresh and homemade Biscuits and Sausage Gravy for my blushing Bride!! Yup! That’ll work. Cheers!

Reblog:

  • Email a link to a friend (Opens in new window) Email
  • Share on Pinterest (Opens in new window) Pinterest
  • Share on Facebook (Opens in new window) Facebook
  • Print (Opens in new window) Print
  • More
  • Share on X (Opens in new window) X
  • Share on Instagram (Opens in new window) Instagram
Like Loading...

British Apple Day

27 Tuesday Oct 2009

Posted by Bob and Robin in Food Trivia, Party Time, Recipes

≈ Leave a comment


Today is British Apple Day! I’ve never heard of this – but then, I’m not British. This information and the recipe comes from Elaine Lemm, About.com.

Today is British Apple Day – Celebrate
Wednesday October 21, 2009

Today is British Apple Day, a day to celebrate that simplest and most delicious of British food, the apple. It is a day to celebrate our 1200 native British apples because if we don’t cherish and support them, they may not be around much longer. The Romans first brought the apple to the Britain and how hard it is to imagine our landscape without apple trees but the arrival of cheap, imported, supermarket fruits – polished impostors with their EU imposed shape and size – has led to a rapid decline of many orchards with the loss of old apple varieties.

British apples have enchanting names like Acklam Russets, Barnack Beauty, Nutmeg Pippin, Knobby Russet…and many more and Apple Day is a celebration of these wonderful fruits, so in support I shall be cooking with them and I also have a lovely polished apple from the tree in my garden which I am about to eat for my morning snack. Yum.

Apple Mousse

This easy recipe for apple mousse is a wonderful way to use cooking apples or sharp-flavored eating apples. It is a light yet delicious dessert and also useful for lunchboxes or picnics.
Prep Time: :10
Cook Time: :20

Ingredients:
3 medium sized cooking apples or Granny Smith apples, peeled, quartered and cored
3 ½ fl oz/100ml water
½ oz/15g white sugar
Dash of lemon juice
10 fl oz/300ml scrumpy (farmhouse cider) or dry cider
3 gelatine leaves softened in a little cold water, or 1 ½tsp powdered gelatin
½ pt/300 ml whipping cream

Preparation:
1). Place the apples in a saucepan, add the water, sugar and lemon juice. Simmer for 10 minutes until the apples are tender and just starting to break up.tender. Liquidize and then push through a fine sieve to create a fine sauce.
2). Place the cider into another saucepan, boil until reduced to about 5tbsp. Remove from the heat then add the softened gelatin leaves or sprinkle over the powdered gelatin, stir until dissolved and leave to cool.
3).Whip the cream until it forms soft peaks and fold in the apple purée and cider. Divide between 4, 3 ½ “/9 cm ramekins, smooth the surface and leave to set in the refrigerator for 2 hours.

Serve immediately garnished with a sprig of fresh mint.

Reblog:

  • Email a link to a friend (Opens in new window) Email
  • Share on Pinterest (Opens in new window) Pinterest
  • Share on Facebook (Opens in new window) Facebook
  • Print (Opens in new window) Print
  • More
  • Share on X (Opens in new window) X
  • Share on Instagram (Opens in new window) Instagram
Like Loading...

Beef and Lamb Stew

26 Monday Oct 2009

Posted by Bob and Robin in Food Prep, Recipe: Bob and Robin Young, Recipes, Things To Do, Wine and Food

≈ 1 Comment


So it is a cold and blustery day here in Boise. Heavy snows are forecast for the 5000 foot level in the mountains, rain and high winds here in the valley. What a good day for a stew!! A good hardy stew – full of vegies, beef and lamb. So, I guess I’d best list the recipe. It calls for a combination of beef and lamb, but, if you don’t like lamb you can add more beef. And if you want a straight lamb stew, just add more lamb.

——————————

Beef and Lamb Stew

Ingredients:
1 T Orange infused oil
2 T Garlic infused oil
. . Salt and Pepper to taste
1 lg Onion, cut into chunks
2 lg Leeks, cut into ¼” rounds
2 lg Carrots, cut into ¼” thick rounds
¾ lbs Mushrooms, thick sliced
1 lg Parsnip. cut into ¼” thick rounds
1 Rutabaga, sliced and cut into ¼” thick pieces
½ c Celery, diced
1 Turnip, sliced and cut into ¼” pieces
1 lbs Lamb Stew meat
¾ lbs Beef Stew meat
32 oz Chicken stock
32 oz Beef stock
½ c Red wine
3 T Worcestershire sauce
1 T Kitchen Bouquet
6 sprigs Thyme, fresh
1 T Sage, fresh and chopped
3 T Parsley, fresh and chopped
2 T Cornstarch
½ c Red Wine

Directions:
1). Add the oil and salt and pepper to a large stock pot. Heat until hot. Add the onion and leeks and sauté until translucent.

2). Add the meats and sauté until browned.

3). Add the beef stock, chicken stock, Worcestershire sauce, Kitchen Bouquet and wine. Bring up to a low simmer. Add the thyme, sage and parsley. Mix to combine. Cover the pot and simmer for 2 hours or longer. Taste and adjust as necessary.

4). 15 minutes before serving, mix 2 T cornstarch and ½ cup of red wine. Add to the pot to thicken the sauce into a gravy. Serve piping hot.

Cooking Times:

Preparation Time: 45 minutes
Cooking Time: 3 hours
Inactive Time: 15 minutes
Total Time: 4 hours

——————————

So there you have it. If you want a better copy of the recipe, either click on the page title above or Click Here.

Reblog:

  • Email a link to a friend (Opens in new window) Email
  • Share on Pinterest (Opens in new window) Pinterest
  • Share on Facebook (Opens in new window) Facebook
  • Print (Opens in new window) Print
  • More
  • Share on X (Opens in new window) X
  • Share on Instagram (Opens in new window) Instagram
Like Loading...
← Older posts
Newer posts →

Current Recipes of this Blog - 2026 Click this link to see them: https://drive.google.com/drive/folders/1dETqO9BZteipG1vgns2Uwu25oGAqFCiG?usp=sharing.

  • Bob and Robin's avatar Bob and Robin
  • rockinrobin43's avatar rockinrobin43

Meta

  • Create account
  • Log in
  • Entries feed
  • Comments feed
  • WordPress.com

Copyright Notice

Creative Commons License
This blog and all work herein is licensed under a Creative Commons Attribution-Noncommercial-No Derivative Works 3.0 United States License.

Enter your email address to follow this blog and receive notifications of new posts by email.

Join 184 other subscribers

Thanks to all of these readers and subscribersz of this blog!

  • 350,621 and 598,479 Folks Reached

Monthly Archives of this Blog

Translate This Page

BFM Drive-Thru

Boise Farmers Market Drive-Thru

Air Fryer Cooking Time and Temperature Conversion Calculator

To convert to the AirFryer

AirFryer Recipes

https://www.airfryerrecipes.com/

Air Fryer Conversions

Rule of 25%. Reduce oven/frying temperature by 25% and time by 25%.

Fork To Spoon – Air Fryer and Instant Pot Recipes

Great resource for AF and IP information and recipes.

AirBnB Buhl, Idaho

Welcome to Mary Anne’s place, a historic cottage in the heart of Kelley’s Canyon Orchard. Just 20 minutes from Twin Falls, unwind in this quiet retreat by enjoying the pleasant sound of a nearby creek and views that look out into the orchard. 4 guests · 2 bedrooms · 3 beds · 1 bath, Wifi · Free parking · Kitchen, Entire House! 1903 River Rd, Filer, Idaho 83328

Bloglovin’

RSS Links

RSS Feed RSS - Posts

RSS Feed RSS - Comments

-----------------------
I Know. Not Idaho Products, But still Worth A Try!
----------------------

Rockin’ Rs

----------------------
Items of Blog Interest.
-----------------------

Member of The Internet Defense League

The History Kitchen

Interesting historical information about food - prep, origins and uses. Written by a kitchen anthropologist!

-----------------------
Of Concern To This Blog
----------------------

Recent Posts

  • CS Coconut Shrimp
  • Pistachio Encrusted Salmon
  • Coconut Shrimp Recipe
  • New Recipe Library
  • CS Pear and Rutabaga Soup

-----------------------
Think Local!! Buy Local!!

Let them know you saw their logo on this blog. Thanks!
----------------------

Buy Local!

If you are not from Idaho, think about Buying Local in Your area! As for us, we have lived in Idaho since 1982. We Buy Idaho wherever possible.

Chef Jake Sandberg, Crispeats

Food References and Recipes

Buy Local

And it does ... Just Make Sense! Regardless of where you are from.

------------------------
Think Local!! Idaho Products.

Let them know you saw their logo on this blog. Thanks!
-----------------------

The New Boise Farmers Market

Summer and Winter - 1500 Shoreline Dr, Boise (Americana and Shoreline)

Idaho Farmers Markets

A listing of statewide Farmer's Markets with contacts.

Find Your Local Farmers Market

Click on the graphic to find your local farmers market either by city or zip code.

Acme Baked Shop, Boise

Available at the Boise COOP. Some of the best bread in Boise and all local!! They make the bread for the 10 Barrel Brew Pub, Angell's Bar and Grill, Salt Tears, all here in Boise. Awesome rye bread that actually tastes like rye bread. And the baguettes .... Wonderful. (208) 284-5588 or runsvold2000@gmail.com

Brown’s Buffalo Ranch

Give them a call or EMail for awesome buffalo meat.

Desert Mountain Grass Fed Beef (formerly Homestead Natural Beef)

Desert Mountain Grass Fed Beef, with Bob and Jessica Howard of Howard Ranch in Hammett. The company will only sell whole animals to the Boise Co-op and Whole Foods stores in Boise and Utah. They will also be at the Boise Farmers Market.

Falls Brand Pork roducts

Click the image for pork recipes.

Kelley’s Canyon Orchard

1903 River Rd, Filer, ID 83328 Hours: 10am - 6pm, Phone: (208) 543-5330

Malheur River Meats

Matthews Idaho Honey

Matthews All-Natural Meats

Meadowlark Farms

All natural Eggs, Lamb and Chicken

Purple Sage Farms

True Roots Farm

Available at the Boise Farmers Market and online at https://www.trueroots.farm

True Roots is a local produce farm committed to sustainable and chemical-free farming practices. We raise pesticide-free and non-GMO produce fresh from the farm, offering a diverse variety of farm-fresh services to our local community. Since our founding in 2014, our mission has been to provide farm-direct access to clean, reliable, and affordable produce.

Reel Foods Fish Market

1118 Vista Avenue, Boise, ID 83705 (208) 713-8850 Monday-Friday: 10am-6pm, Saturday: 9am-5pm. Sunday: Gone Fishin’

Standard Restaurant Supply

Plenty of items for the home, too. Check them out. 6910 Fairview, Boise 83704 (208) 333-9577

-----------------------
Some Awesome Recipe and Spice Sources. Culturally diverse.

Let them know you saw their logo on this blog. Thanks!
------------------------

Crockpot Recipes

Many good recipes here.

A Taste of France

A collection of French recipes

Basque Recipes

Best Ever Recipes of Mexico

Malaysian Recipes

Awesome Malaysian recipes.

Memorie di Angelina Italian Recipes

My Best German Recipes Web Site

Regional and Oktober Fest Recipes

There are a lot of recipes here.

Sauer Kraut Recipes

Recipes By Robin and Bob

Recipes that we have collected and created throughout the years.

Recipes of Elizabeth W. Young, Bob’s Mother

These are the recipes that my Mother collected over 85 or so years. The photo of my Mother was one of the last I have of her. It was taken in July, 1987.

Recipes From The Mediterranean Area

Soup and Chowder Recipes

Recipes from "My Recipes"

Deep South Dish Recipes

The Recipes of Greece

Tasty Mexican Recipes

The Shiksa In The Kitchen

Great Jewish recipes!

-----------------------
Some Great Boise Restaurants.

Let them know you saw their logo on this blog. Thanks!
-----------------------

Asiago’s – Italian

Bella Aquila, Eagle, ID

775 S Rivershore Ln., Eagle, ID 83616 (208) 938-1900

Bar Gernika – Basque Pub and Eatery

202 S Capitol Blvd, Boise (208) 344-2175 (Checked)

Cottonwood Grille

913 W River St., Boise (208) 333.9800 cg@cottonwoodgrille.com

Enrique’s Mexican Restaurant

482 Main St., Kuna (208) 922-5169 New name. Was El Gallo Giro. Same owners and kitchen. The Best Mexican restaurant in the Boise/Kuna area, bar none!

Flying Pie Pizzaria

Goldy’s Breakfast Bistro

108 S Capitol Blvd., Boise (208) 345-4100

Goldy’s Corner Cafe

625 W Main St., Boise (208) 433-3934

Guanabanas – Island Restaurant and Bar

960 N Highway A1A, Jupiter, FL

Janjou Pâtisserie

Janjou Pâtisserie, 1754 W State St., Boise, Idaho 83702 (208) 297.5853

Mai Thai Asian Cuisine

750 West Idaho Street Boise, ID 83702 (208) 344-8424

Mazzah Grill – Mediterranean and Greek Cuisine

1772 W State St., Boise (208) 333-2566

Richards Inn by Chef Richard Langston

Formerly - Vincino's. New location at 500 S Capitol Blvd., Boise (208) 472-1463. Reservations are highly suggested.

The Orchard House

14949 Sunnyslope Rd., Caldwell (208) 459-8200

The Ravenous Pig

1234 N. Orange Ave. Winter Park, FL

-----------------------
Think Local!! Boise Breweries, Brew Pubs and Wine Bars.
Let them know you saw their logo on this blog. Thanks!
-----------------------

10 Barrel Brewery Boise

830 W Bannock St., Boise (208) 344-5870

Cloud 9 Brewery and Pub

Opening Fall 2013 in the Albertson's Shopping Center, 18th and State in the old Maxi Java

Edge Brewing Company

525 N Steelhead Way, Boise, ID 83704 (208) 323-1116

-----------------------
Miscellaneous Items
-----------------------

Blog Syndication

NetworkedBlogs
Blog:
Boise Foodie Guild
Topics:
Food, Recipes, Cooking
 
Follow my blog

Blog Badge

Local & Regional Food Blogs - BlogCatalog Blog Directory

  • Subscribe Subscribed
    • Boise Foodie Guild
    • Join 76 other subscribers
    • Already have a WordPress.com account? Log in now.
    • Boise Foodie Guild
    • Subscribe Subscribed
    • Sign up
    • Log in
    • Report this content
    • View site in Reader
    • Manage subscriptions
    • Collapse this bar
%d