~ – Enjoy a meal or a recipe with us! Be sure to check the Sidebar and Menu above. Interesting resources are listed there. Most are hot links. Air Fryer (AF), Instant Pot (IP) and Captain's Shack (CS) recipes now have their own page. Subscribe to the blog. It's still FREE!
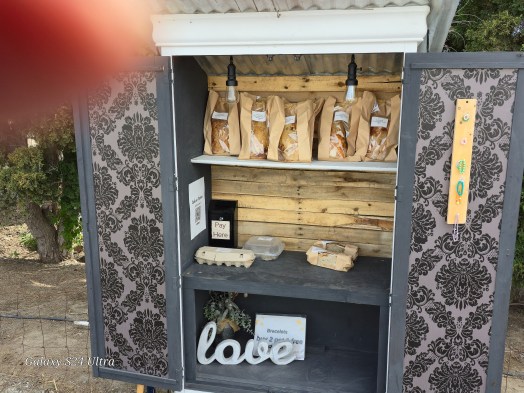
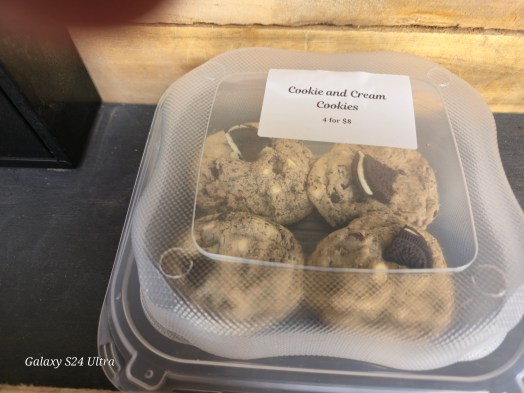
(Yes, that’s me in the photo!) I found this little farmstand while4 riding my bike in Marsing, ID. South Bruneau Hiway and 4th Ave. A really good small stand, and they have good products. Eggs, sourdough breads and cookies that are fresh baked on site. If you are in the area, well worth the stop. Cash only or EBT. Just look at some of the products. This is by far not all of them.
The stand supply
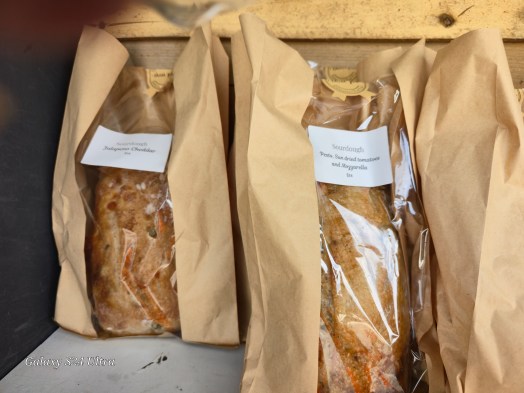
Cinnamon Swirl bread
So those are some of the products. The breads and cookies are sourdough. You can’t miss the stand there are signs and flags. Fun place. Good breads!
I have been working on some new recipes for the past several weeks. I have 3 that I will post here. Hope you like them. Let me know. The3re will be at least three new recipes. My favorite oven bbq pork ribs, a really good bbq sauce in the Memphis style – slightly tart, but also with a sweetness. A Memphis style bbq rub that is great on ribs, beef, pork and chicken. Then a side dish – corn fritters, since corn is now in season. I grew up on these and love them. Almost as good as a corn pie! Most, but not all of the ingredients in the posted recipes, come from the Boise Farmer’s Market (BFM) and I am grateful for their products and information. Use your local farmer’s markets. Enjoy!
Starting with the Oven BBQ Pork Ribs, I have created our version of a Memphis style bbq rub. Sweet, but tangy. Best to be very generous with this rub and the longer it “cures”, stays refrigerated for awhile – I let the ribs I was doing to rest (cure) in the refrigerator for 24 hours. But that length of time is not essential. 8 hours will also work. Don’t forget to let the meat come to room temperature before you cook it. This rub is full of sugar, sea salt, onion powder and garlic granules, Aleppo pepper, cumin and smoky paprika. Great on the pork In did and super on chicken.
The BBQ Sauce I came up with, https://www.rockinrs.com/CS-BBQ-Sauce.pdf, CS BBQ Sauce, is thick and rich. Slightly smoky. Slightly tangy. It includes red onion, minced garlic, ketchup, dark brown sugar, apple cider vinegar and pomegranate molasses among some other ingredients. Check the recipe by clicking the link.
Now, IMNSHO, In My Opinion Not So Humble Opinion, are super good! And they are done in the oven. (Can these be considered truly BBQ Ribs?) As plated here, we added some of our Doctored Baked Beans and a Corn Fritter. Drizzle some CS BBQ Sauce over the ribs (even go well with the beans) and Yum-O! They fall of the bone and have great flavors from the rub and the sauce.
And since I mentioned Corn Fritters, they go really great for breakfast with eggs. The eggs above are basted. A very Pennsylvania Dutch (German) treat. I was raised on these and they were aq hit when I made them for folks. Not hard to do. Fresh corn works best, but frozen corn can also be used. Here they are served with fresh fruit and homemade sourdough bread toast.
The last item I want to share is a sourdough bread we have been working on since January of this year. Created our own starter and it takes a while to develop and experiment making bread and other treats. Sourdough Blueberry Muffins, for one. (https://www.rockinrs.com/Sourdough-Blueberry-Muffins.pdf) This bread I have baking in a Romertopf Clay Pot and it comes out just great.It is a full flavored sourdough. Robust. Makes great toast and sandwiches. Great grilled cheese.
So there you are. Try these and let us know if you liked them or not. If not, let us know why. Cheers and Good Eating!
Been trying some4 different recipes, most of which are Use What You Have In The Kitchen. You end up with some interesting combinations and meals.
For instance, I really hate to throw away the sourdough starter. Seems a waste to me both in time and ingredients. S I came across this recipe for http://www.rockinrs.com/Sourdough-Blueberry-Muffins.pdf – Sourdough Blueberry Muffins, that are really good and easy7 to make. Not particularly easy, but fun and delicious. Give it a whirl and see what you think, I haven’t tried, but why not change the fruit, strawberries, apricots or blackber4ies, for instance?
And if you have made some sourdough bread, why not make Sourdough French Toast? This was really deliciously different.
And here is a very basic Salisbury Steak dinner with Pan Gravy made with Apple Brandy and Caramelized Vidalia Onion and Button Mushrooms. Corn On the Cob and Steamed Asparagus on the side. Then add a slice of homemade Sourdough Bread.That sauce with the apple brandy was fantastic!
And this one, a Pork Loin Chop in a Brandy-Apple-Pear-Herb Sauce with Corn On the Cob. It was delicious! Apples and pork with fresh pears is an awesome combination. Just be sure to caramelize the apple and pear The pears should break down to act as a thickener. slices with some brown sugar in the unsalted butter.
And as an endnote, the sourdough recipe that I have been using I named Anna’s Sourdough and it comes from my Granddaughter In-Law, Anna Shaner. You can find her recipe at http://www.rockinrs,com/Annas-Sourdough.pdf
Always great information from the FoodNetwork. This is no exception if you want to make your own sourdough!! Here is the original recipe From the Foodnetwork. Robin sent me this link.
Ingredients:
1 cup (4 ounces) whole-wheat or rye flour
Warm water between 65 to 80 degrees F (see notes below)
Unbleached all-purpose or bread flour, for feeding (see notes below) Supplies:
One 1-quart glass jar, very clean (see notes below)
Rubber spatula
Kitchen scale or dry and liquid measuring cups (see notes below) Notes:
Water: If you know your tap water to be high in chlorine, fill a vessel and let it sit uncovered overnight to release the chlorine before using to mix a starter. Alternately, you may use filtered water. Aim to keep your starter at 75 degrees F. If your environment is much colder, you might want to start with warmer water. Flour: After the initial mix, you will feed your starter white flour — both all-purpose and bread flour work — just make sure it is unbleached and look for one that has a protein content between 11 to 12 percent for best results. Jar: To ensure you don’t bring unwanted mold or bacteria into your starter, sterilize your jar by running it though a hot dishwasher wash cycle, or for canning jars, boil for 10 minutes. Scale: A kitchen scale is optional but if you plan on keeping up your sourdough starter for a long period of time, it will make the feedings a bit easier, less messy and faster. Day 1: Initial Mix
Add 1 cup (4 ounces) whole-wheat or rye flour into a very clean 1-quart jar along with 1/2 cup (4 ounces) warm tap or filtered water between 65 to 80 degrees F. Stir well until all the flour is moistened and the dough resembles a thick paste. Cover loosely with the lid or plastic wrap. Set out at warm room temperature (75 to 80 degrees F) for 24 hours. Day 2: First Feeding
You will not likely notice much of a difference in appearance in the starter after the first 24 hours other than some condensation and a wheat-like aroma. You will need to begin feeding it to encourage growth. Use a rubber spatula to measure out 2/3 cup (5.5 ounces) of the starter and add it to a stainless steel or glass mixing bowl; discard any remaining starter. Add 1 cup (4 ounces) all-purpose or bread flour along with 1/2 cup (4 ounces) warm tap or filtered water between 65 to 80 degrees F to a stainless steel or glass mixing bowl. Stir well to combine all ingredients, making sure all the flour has been incorporated and the starter is well mixed. Return the starter to the jar. Cover again loosely with the lid or plastic wrap. Set out at warm room temperature (75 to 80 degrees F) for 24 hours. Days 3 to 5: Two Feedings Per Day
On day 3 you should notice some activity in your starter. The mixture should look bubbly and it will probably have risen some. It will have a fresh, slightly tangy aroma. Now you’ll feed the starter twice a day. It’s best to arrange the times to conveniently work with your schedule. Keep them as evenly spaced apart as possible — every 12 hours is the goal. To feed the starter, give it a couple of good stirs to release any bubbles. Measure out a heaping 1/2 cup (4 ounces) starter and place it into a stainless steel or glass mixing bowl; discard any remaining starter. Add 1 cup (4 ounces) all-purpose or bread flour along with 1/2 cup (4 ounces) warm tap or filtered water between 65 to 80 degrees F to a stainless steel or glass mixing bowl. Stir well to combine all the ingredients, making sure all the dry flour has been incorporated and the starter is well mixed. Return the starter to the jar. Cover again loosely with the lid or plastic wrap. Set out at warm room temperature (75 to 80 degrees F). Repeat the process 12 hours later and every 12 hours for the next 2 days. Days 4 and 5: Checking In
You may notice the activity in your starter will vary between feedings over the next 2 days. It should consistently look bubbly and sometimes foamy before each feeding. By day 5 it will have nearly doubled in size before you feed it. The aroma should be pleasantly sour and slightly yeasty. Day 5 or 6: Ready to Go!
By day 5 or 6 your sourdough starter should be strong enough to use in your first loaf of bread. Check the signs: The starter should be nearly doubling in volume between feedings and look very bubbly and slightly foamy at the surface. It should also have a strong, but pleasant acidic aroma. If you don’t feel your starter is ready, continue feeding it in 12-hour increments for another day or two. Maintenance and Storage:
For frequent bakers: If you are baking with your starter more than once a week, keep it at cool room temperature (65 to 50 degrees F) and feed it once a day as instructed above. For occasional bakers: If you are baking once a week or less, you want to slow the starter’s growth by storing it in the refrigerator. To prep your starter for cold storage, give it a regular feeding then let it ripen at warm room temperature until you see a good amount of activity, 3 to 4 hours. Then store in the refrigerator. Check the starter at least every other day and feed it weekly as instructed above, making sure to let it ripen at warm room temperature before you refrigerate it again. A refrigerated starter should smell pleasant and sour and you’ll see some bubbles on the surface. You should NOT see watery liquid on the surface or smell alcohol. If you do see liquid, try feeding it more frequently.
With time, you’ll get to know your starter and the environments and temperatures in which it will thrive best.