I receive an email newsletter from About.Com and I just received this article on BBQ grilling on a gas grill, which can be tricky. The article and photos are by Derrick Riches, Barbecues & Grilling Guide. Cheers! Here is a Direct Link to the article.
 “Getting Started –
Getting good ribs with a genuine barbecue flavor from a gas grill is a challenge. Gas grills are great for hot and fast cooking but not so good when you need to turn a rack of ribs into tender, smoky barbecue. There are some tricks you can use however. To get the best possible ribs from your gas grill you need to use a three step process to get them perfect.
In this example I am using a full rack of spareribs trimmed. You can use baby back ribs with this same method but reduce the cooking times about 5 minutes per stage.
Your gas grill needs to be large enough and with at least two burners since we will be cooking these ribs indirectly. This means the heat will not be below the rack of ribs, but off to the side of the grill. I will explain the set up more later on.
What you will need:
•one rack of ribs
•a good Rib Rub
•barbecue sauce
•1/2 cup apple juice
•aluminum foil
•fuel for your grill
•wood chips for smoke
•a sharp knife
Preparing The Rack:
Spareribs from the store are seldom properly prepared. You will need to do some basic trimming before we get started. What you want is a rack of ribs with an even thickness throughout and a basic square shape. Make sure you inspect the ribs for loose pieces of meat or fat. You want all this cut off. You also want to remove excessive fat from the rack. This doesn’t mean cutting all the fat off, just thick useless sections. Since we are grilling these ribs faster than we would on the smoker (see BBQ Ribs) the benefit of the fat isn’t as great. We still need fat to keep the meat moist but you do not want to end up with a finished product that still has a good deal of fat on it. Once done trimming, rinse the rack of ribs off in cold water and pat completely dry with paper towels.
Rubbing The Ribs:
Once the ribs are trimmed and ready it is time to apply the rub. A good rib rub adds flavor but doesn’t overpower it. You want to apply the rub all over the rack. This means back and front as well as the side and ends. Apply as much rub as will stick. The natural moisture of the ribs will hold all the rub you need.
You can apply the rub up to an hour before you start cooking but any longer will affect the texture of the meat, giving it a ham like flavor and consistency. If you need to return the rack to the refrigerator ofter putting on the rub, wrap it in plastic wrap and handle it gently. Preferably you can get the rack to the grill in the next 10 to 20 minutes so it is okay to leave it out until the remaining preparations are made.
Making Smoke Bombs:
Making good smoke on a gas grill while cooking at lower temperatures is a real challenge. To be honest, while you might be able to give these ribs a hint of smoke, they are not going to have a strong smoke flavor. That is the sacrifice we make by using a gas grill. However, we are certainly going to give it a try by throwing in a couple of smoke bombs to generate smoke. This is a quick, easy, and cheap way to make smoke on a gas grill. To make a smoke bomb start by placing about 1/2 cup of damp, but not wet wood chips on a piece of foil. Wrap the wood chips so that one side has a single layer of foil. Poke several holes through the foil to let the smoke out. I’m using two smoke bombs, but you can use more if you wish.
You want to place the smoke bombs under the cooking grate as close to the burner you are going to be using as possible. You will need to preheat the grill hot enough to get the combustion of the wood started. Once you see smoke coming out of the smoke bombs, turn down the heat and place the ribs on the grill.
Placing the Ribs On The Grill:
Your grill placement is most important. We need indirect heat to cook our ribs without drying them out or overcooking them. We also need to be able to hit temperatures up to 375 degrees F. On the grill I am using the burners run side to side instead of the more typical front to back. I am using the front burner for heat and putting the ribs in the back. This works because most gas grills vent out the back so the smoke I create in the front will be drawn to the back of the grill.
If you have a grill with the burners running front to back you will need to use one of the burners on either end. Lets say you are using the left most burner. This means you will place your smoke bombs directly over this burner (and under the cooking grate). The ribs will be placed as close to the right side if possible. If the rack is short enough to be placed running parallel to the burners set it as far to the right as possible. Otherwise you might have to place it more diagonal on the grill.
Place the rack, bone side down on the grill, close the lid, and adjust the grill until it holds a temperature of 300 degrees F. Now let the ribs cook for 30 minutes. Don’t open the lid. This will hold in as much smoke as possible. Don’t expect a lot of smoke to billow out of your grill. There won’t be a lot of smoke.

Wrap The Ribs and Steam:
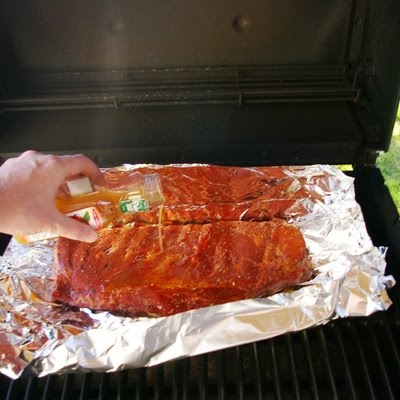
Once the ribs have been on the grill for 30 minutes it is time to move to the second stage. Now we are going to make the ribs tender by steaming them with apple juice. The secret is to wrap the ribs tightly in foil. You want to get it as water tight as possible (after you have poured in the apple juice).
With a tightly wrapped packet place the ribs back on the grill in the indirect grilling space. Now close the lid and increase the grill temperature to around 375 degrees F. At this temperature the apple juice will boil, tenderize the ribs and help get the ribs cooked quickly.
BBQ Sauce:
After the ribs have been steaming in foil for 30 minutes it is time to turn down the heat and unwrap the ribs. You want your grill at a temperature around 250 degree F, but definitely not more than 265 degrees F. (the burning temperature of sugar). Place the ribs back in the same place to finish them off.
When you smoke ribs it is up to you whether you want sauce or not. However, with the gas grill method I encourage the sauce. It adds an authentic barbecue flavor to your ribs and adds to the surface texture of the meat.
The secret to a good sticky rib is multiple coats of barbecue sauce. The best method is to sauce one side of the ribs, close the lid and cook for 5 minutes. Then open the lid, flip the ribs and sauce the other side. Do this for 30 minutes and you will have a heavy coating of barbecue sauce.
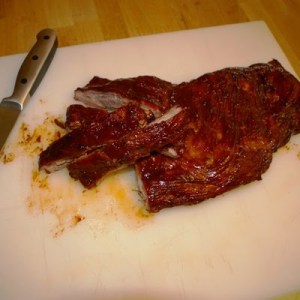
Five minutes after you put on the last coat (at least 2 coats a side) take your ribs off, cut, and serve.” (May 2010, Derrick Riches, Barbecues & Grilling Guide)
——————————
So there you have some grilling instructions. If you go to the site, as linked above, you can find recipe for rubs and BBQ sauces that you can make at home. There is also an article on BBQ Grilling using charcoal. Enjoy and have fun. Let me know when the ribs are ready … we’ll be right over and bring the wine and beer! Cheers!